Last updated on
Red Velvet Cheesecake
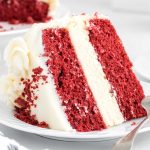
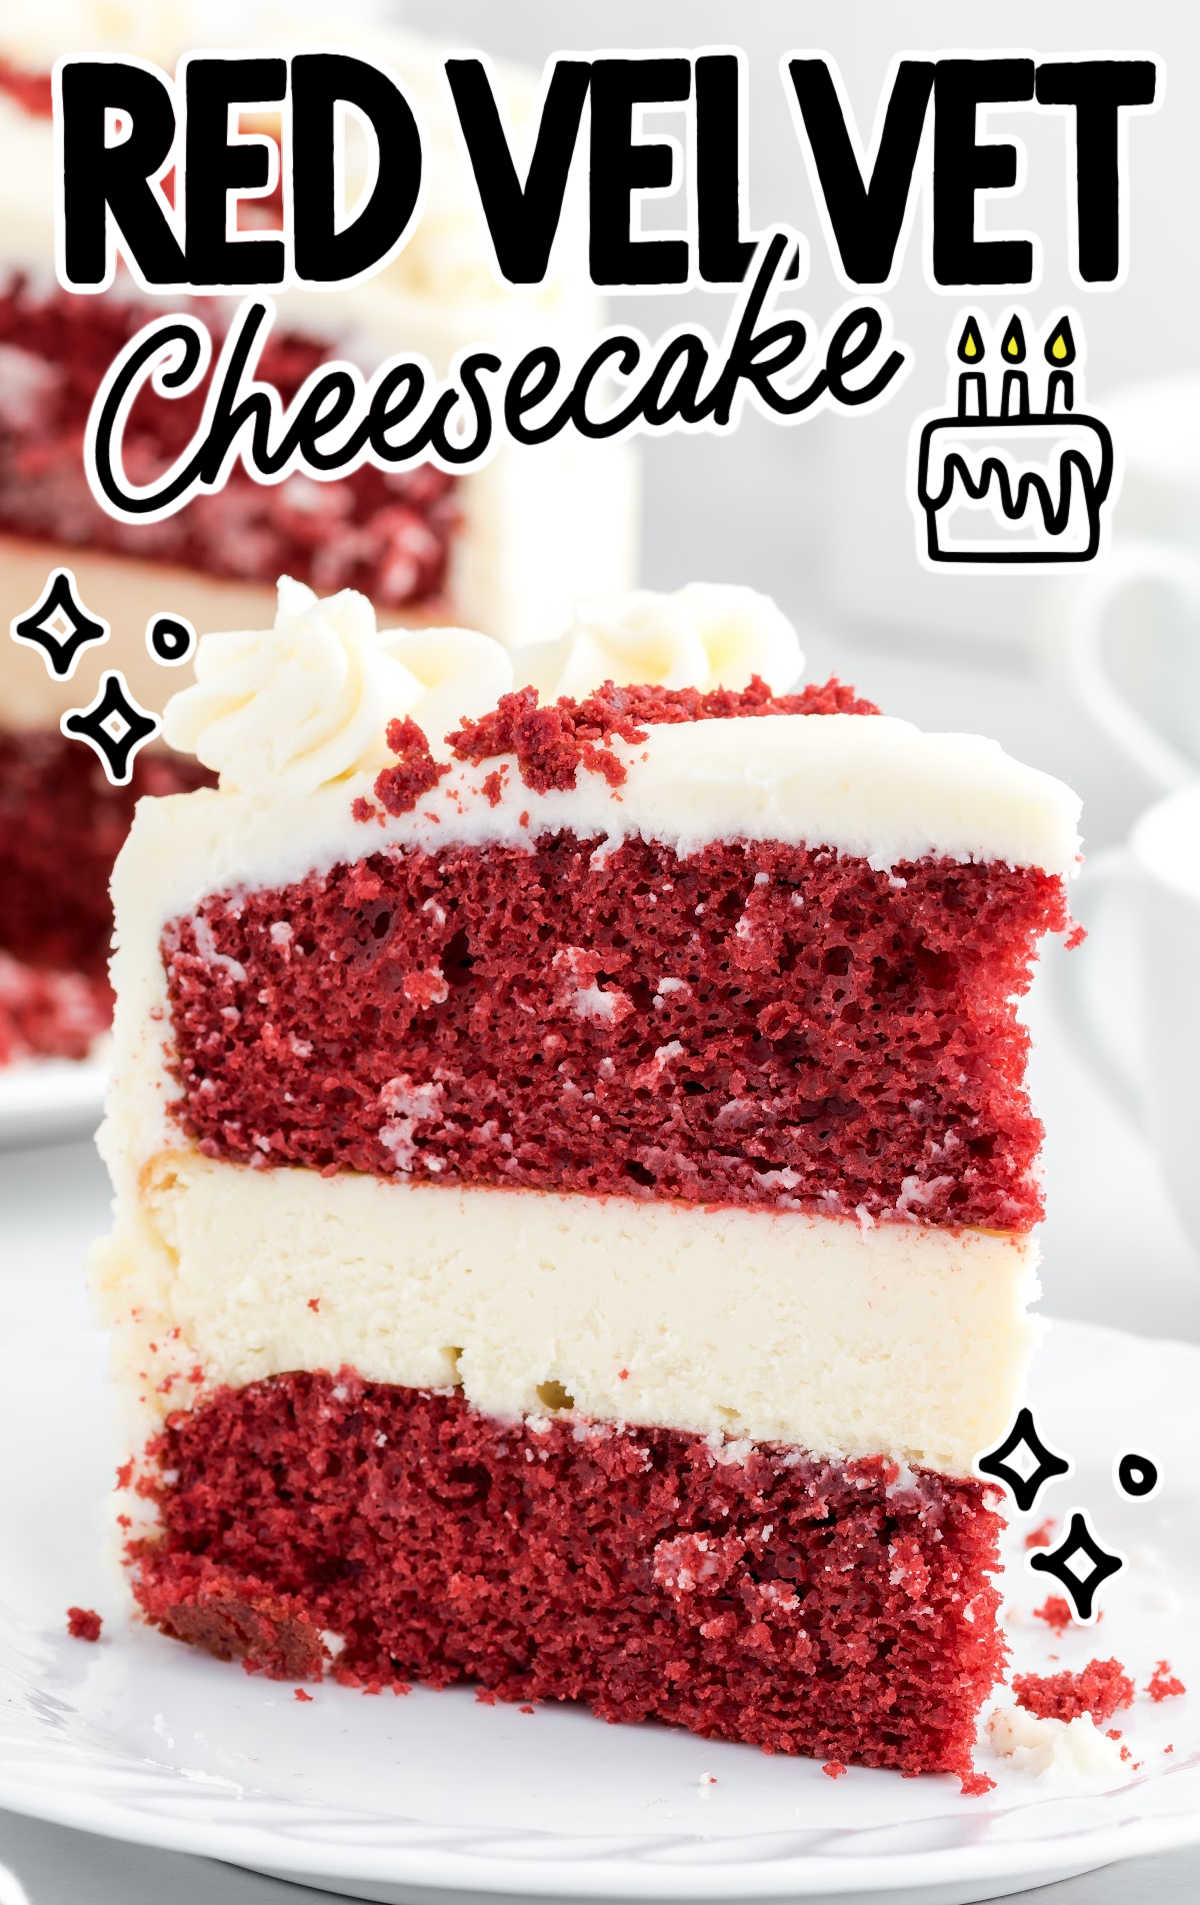
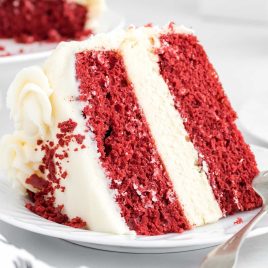
Red velvet cheesecake will leave you swooning. Layers of red velvet cake surround a layer of creamy cheesecake, topped with luscious cream cheese frosting.
Jump to RecipeTable of Contents
When you’re looking for a dessert that will leave you swooning, red velvet cheesecake delivers. Decadent red velvet cheesecake features soft red velvet cake surrounding a center layer of creamy cheesecake and then topped with luscious cream cheese frosting.
From ice cream to cookies, there’s a reason that red velvet cake is the inspiration for so many enticing desserts. Combining red velvet cake and cheesecake creates a stunning dessert that is as delicious as it is beautiful.
Red Velvet Cheesecake Ingredients

You will need:
Cake
- 1 (15.25-ounce box) Red Velvet cake mix (I used Duncan Hines brand)
- 1 cup buttermilk
- ½ cup vegetable oil
- 3 large eggs
Cheesecake
- 16 ounces cream cheese, room temperature
- 1 cup granulated sugar
- 2 large eggs, room temperature
- ½ cup sour cream
- 2 tablespoons all-purpose flour
- 1½ teaspoons vanilla extract
Cream Cheese Frosting
- 1 cup unsalted butter, room temperature
- 8 ounces cream cheese, room temperature
- 5½ cups powdered sugar, sifted
- 3 tablespoons heavy cream
- 2 teaspoons vanilla extract
- ¼ teaspoon salt
Substitutions and Additions
CREAM CHEESE: For this recipe, I like using full-fat cream cheese. You can use the low-fat cream cheese but I do not recommend using a non-fat version as it compromises the taste and texture of the cream cheesecake portion and the frosting.
BUTTERMILK: You can make your own buttermilk using whole or 2% milk and lemon juice or distilled white vinegar. For every 1 cup of milk, stir in 1 tablespoon of lemon juice or vinegar.
How to Make This Red Velvet Cheesecake Recipe
PRO TIP: This recipe needs plenty of cooking and cooling time before assembling and frosting it. It is best to start this recipe early in the day so that you can assemble your layers before wrapping the cake in plastic wrap and refrigerating it to allow the cheesecake layer to set up completely before you frost the cake and serve it. Alternatively, you can make the cheesecake layer the day before, refrigerate it overnight, then bake the red velvet layers the next day.
STEP ONE: Preheat the oven to 350°F. Lightly spray 2 (9-inch) cake pans with baker’s spray.
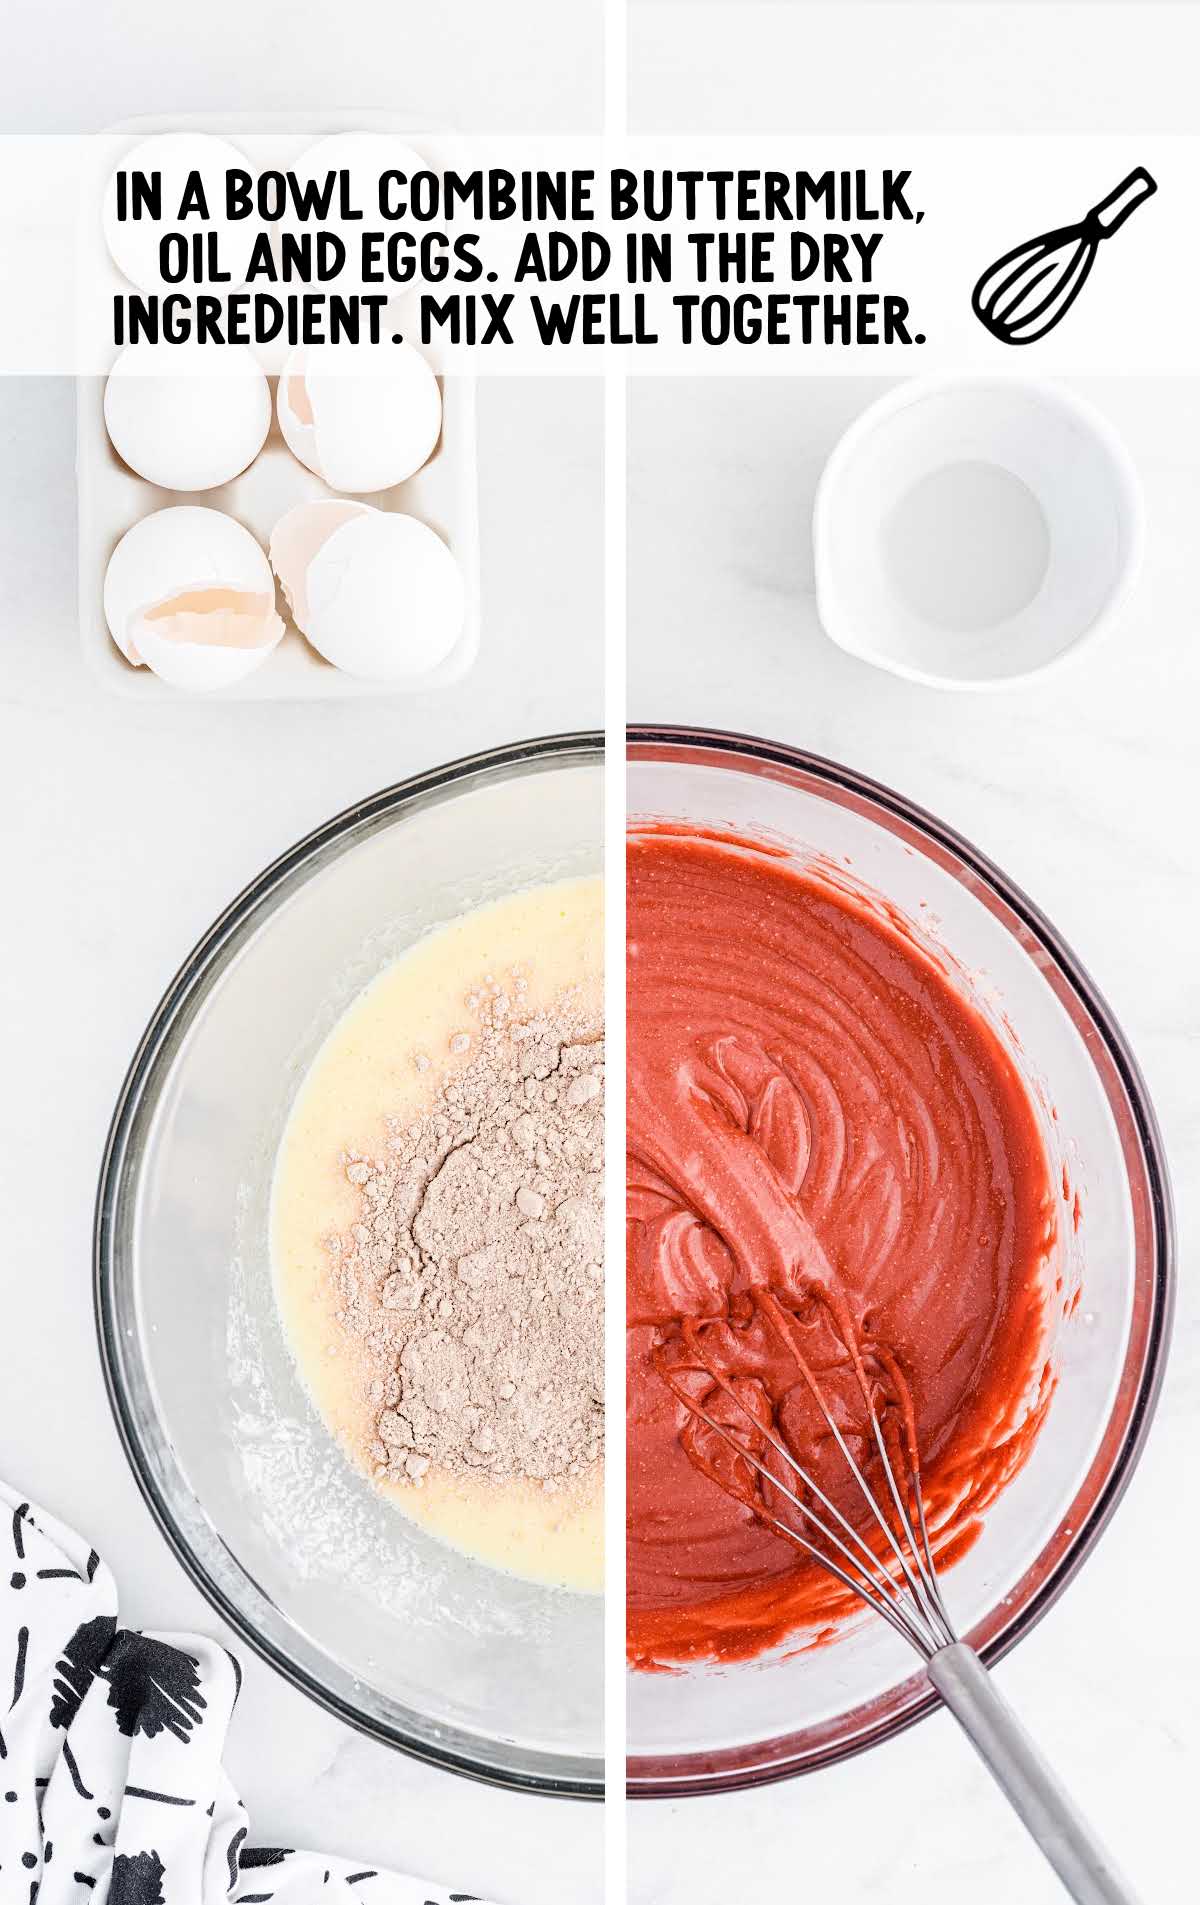
STEP TWO: To make the cake, whisk together, in a large mixing bowl, the buttermilk, vegetable oil, and eggs until fully combined. Add the dry ingredient packet from the box of red velvet cake mix. Whisk vigorously by hand, or with a handheld mixer on low, for 2 minutes or until no lumps remain.
PRO TIP: I substituted the 1 cup water in the instructions of the red velvet box mix for the buttermilk. I think it makes the cake more tender, however, you can make the cake according to the box directions (with the water) and your cake will still be delicious.
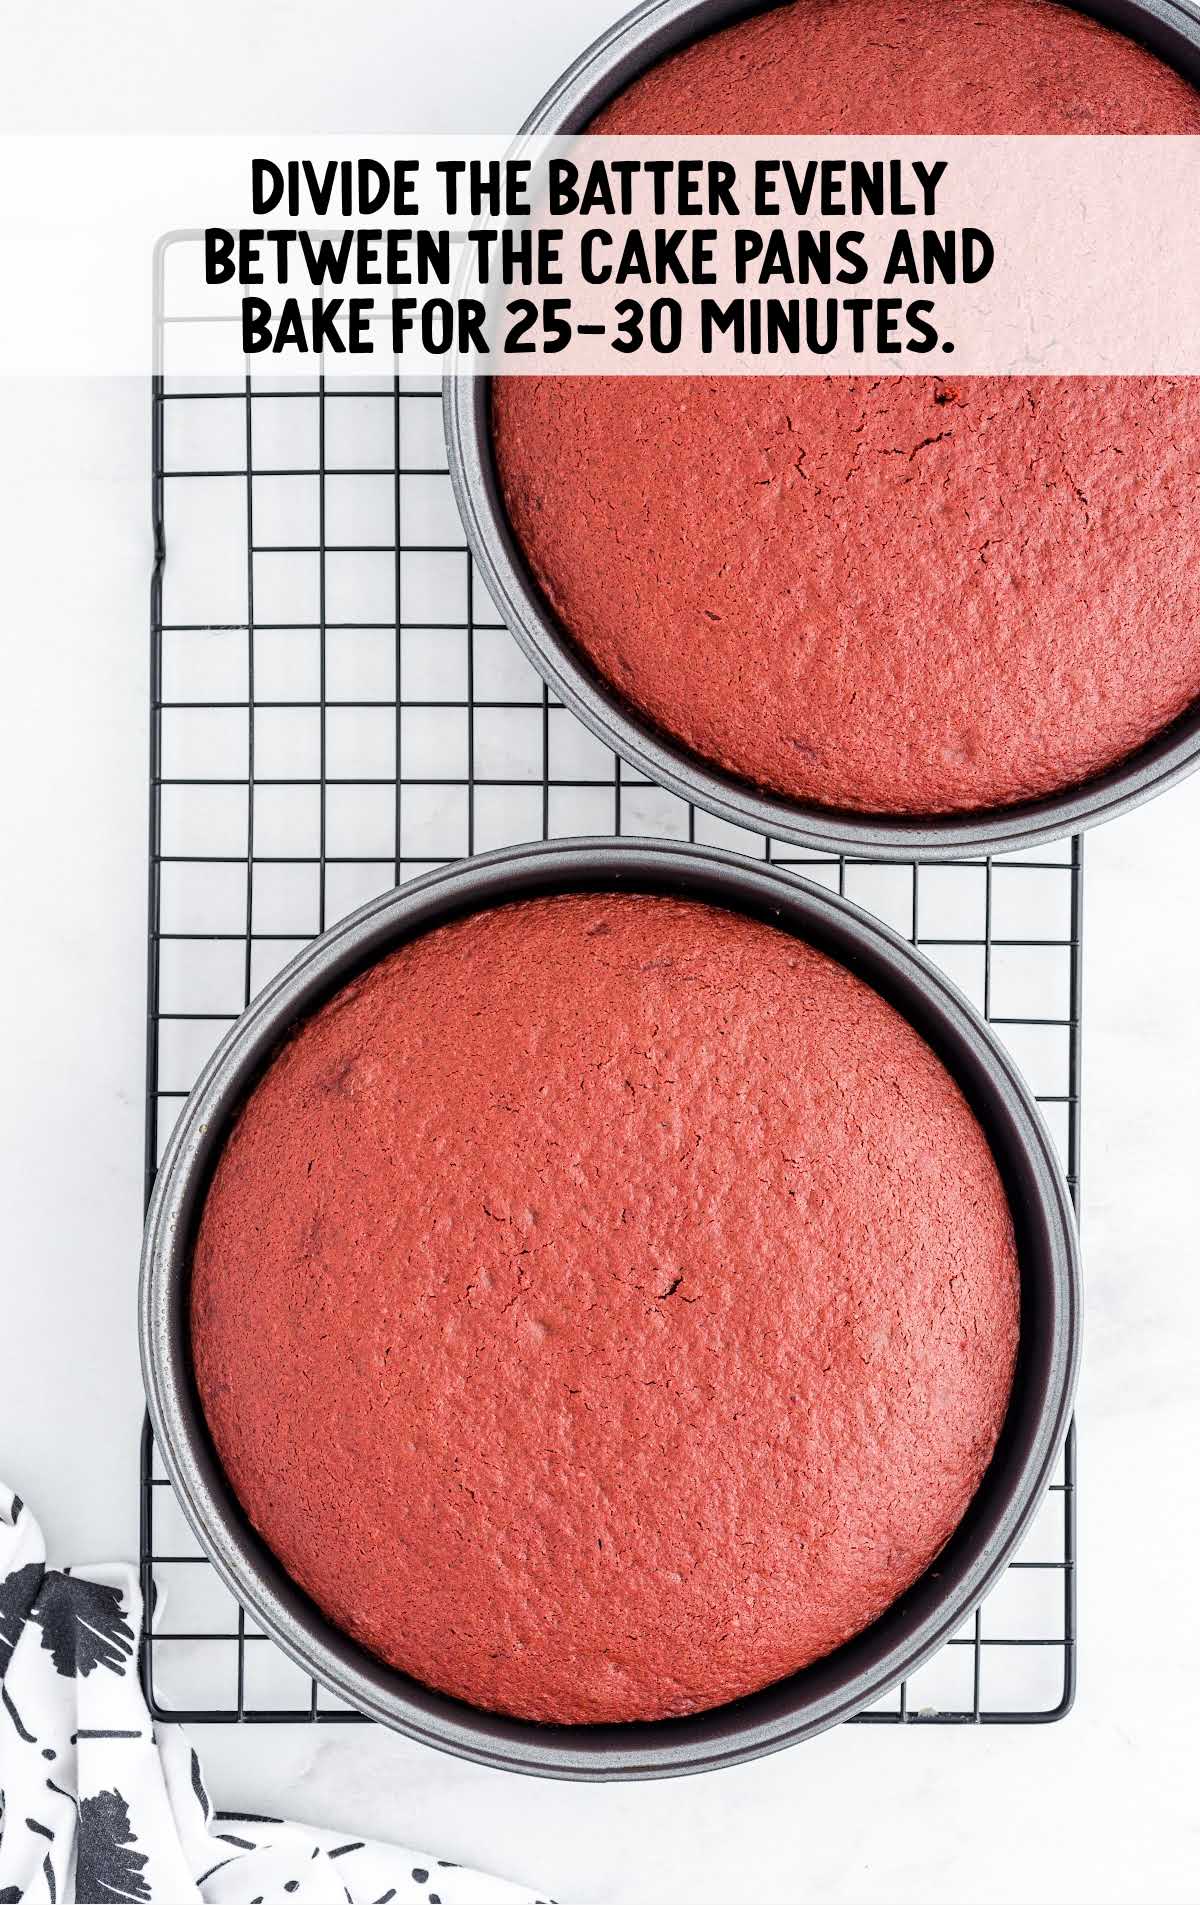
STEP THREE: Divide the batter evenly between the two prepared cake pans and bake for 25 to 30 minutes. A toothpick inserted into the center of your cake should come out clean. Cool in the pans for 10 minutes before turning them out onto a cooling rack to cool completely.
STEP FOUR: While your red velvet cake is baking, you can prepare the cheesecake batter.
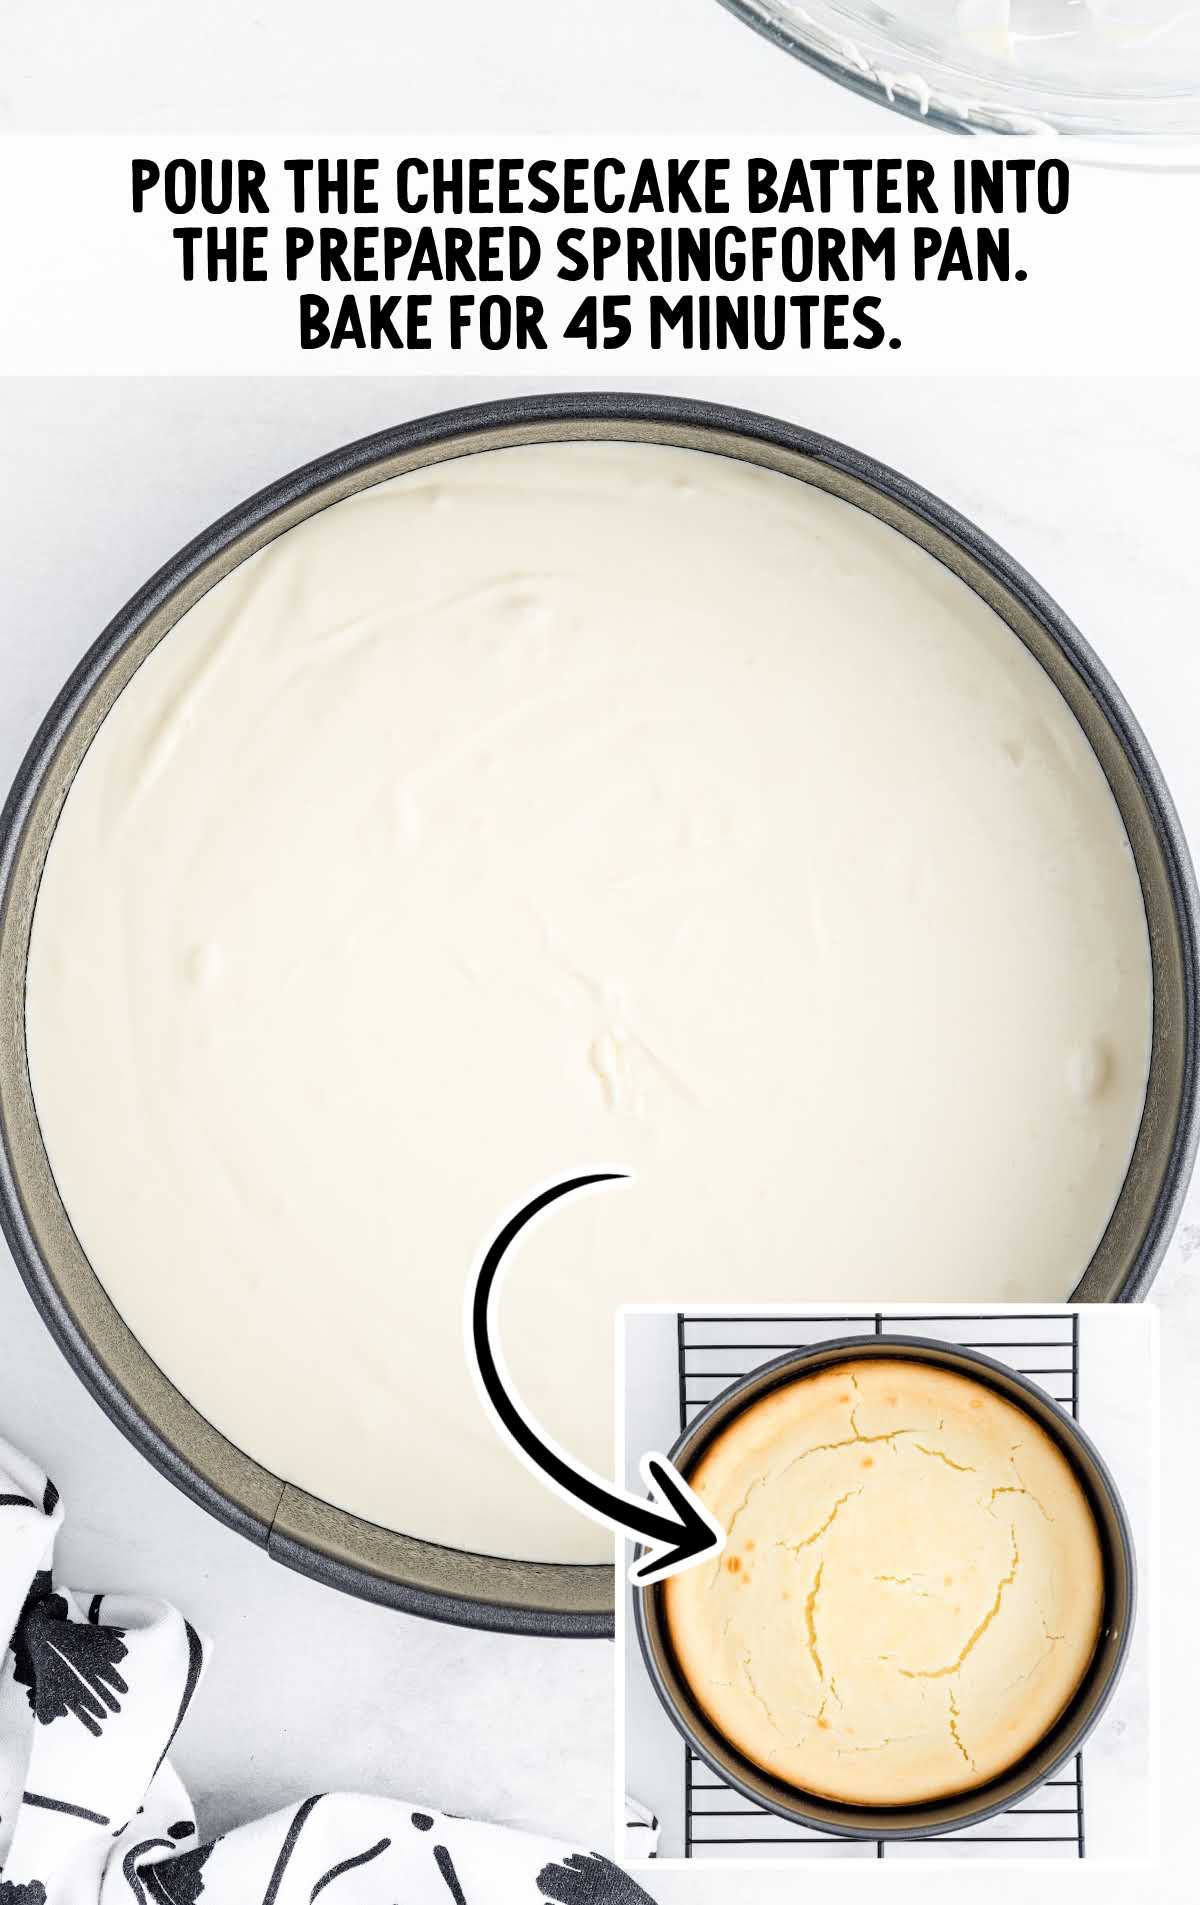
STEP FIVE: Lightly spray a 9-inch springform pan with baker’s spray and line the bottom of the springform pan with a round piece of parchment paper. In an oven-safe 9×13 pan, add enough water to fill the pan about 1-2 inches. Set both pans aside.
PRO TIP: The water is a key step to ensuring that the outside of the cheesecake doesn’t cook faster than the inside.
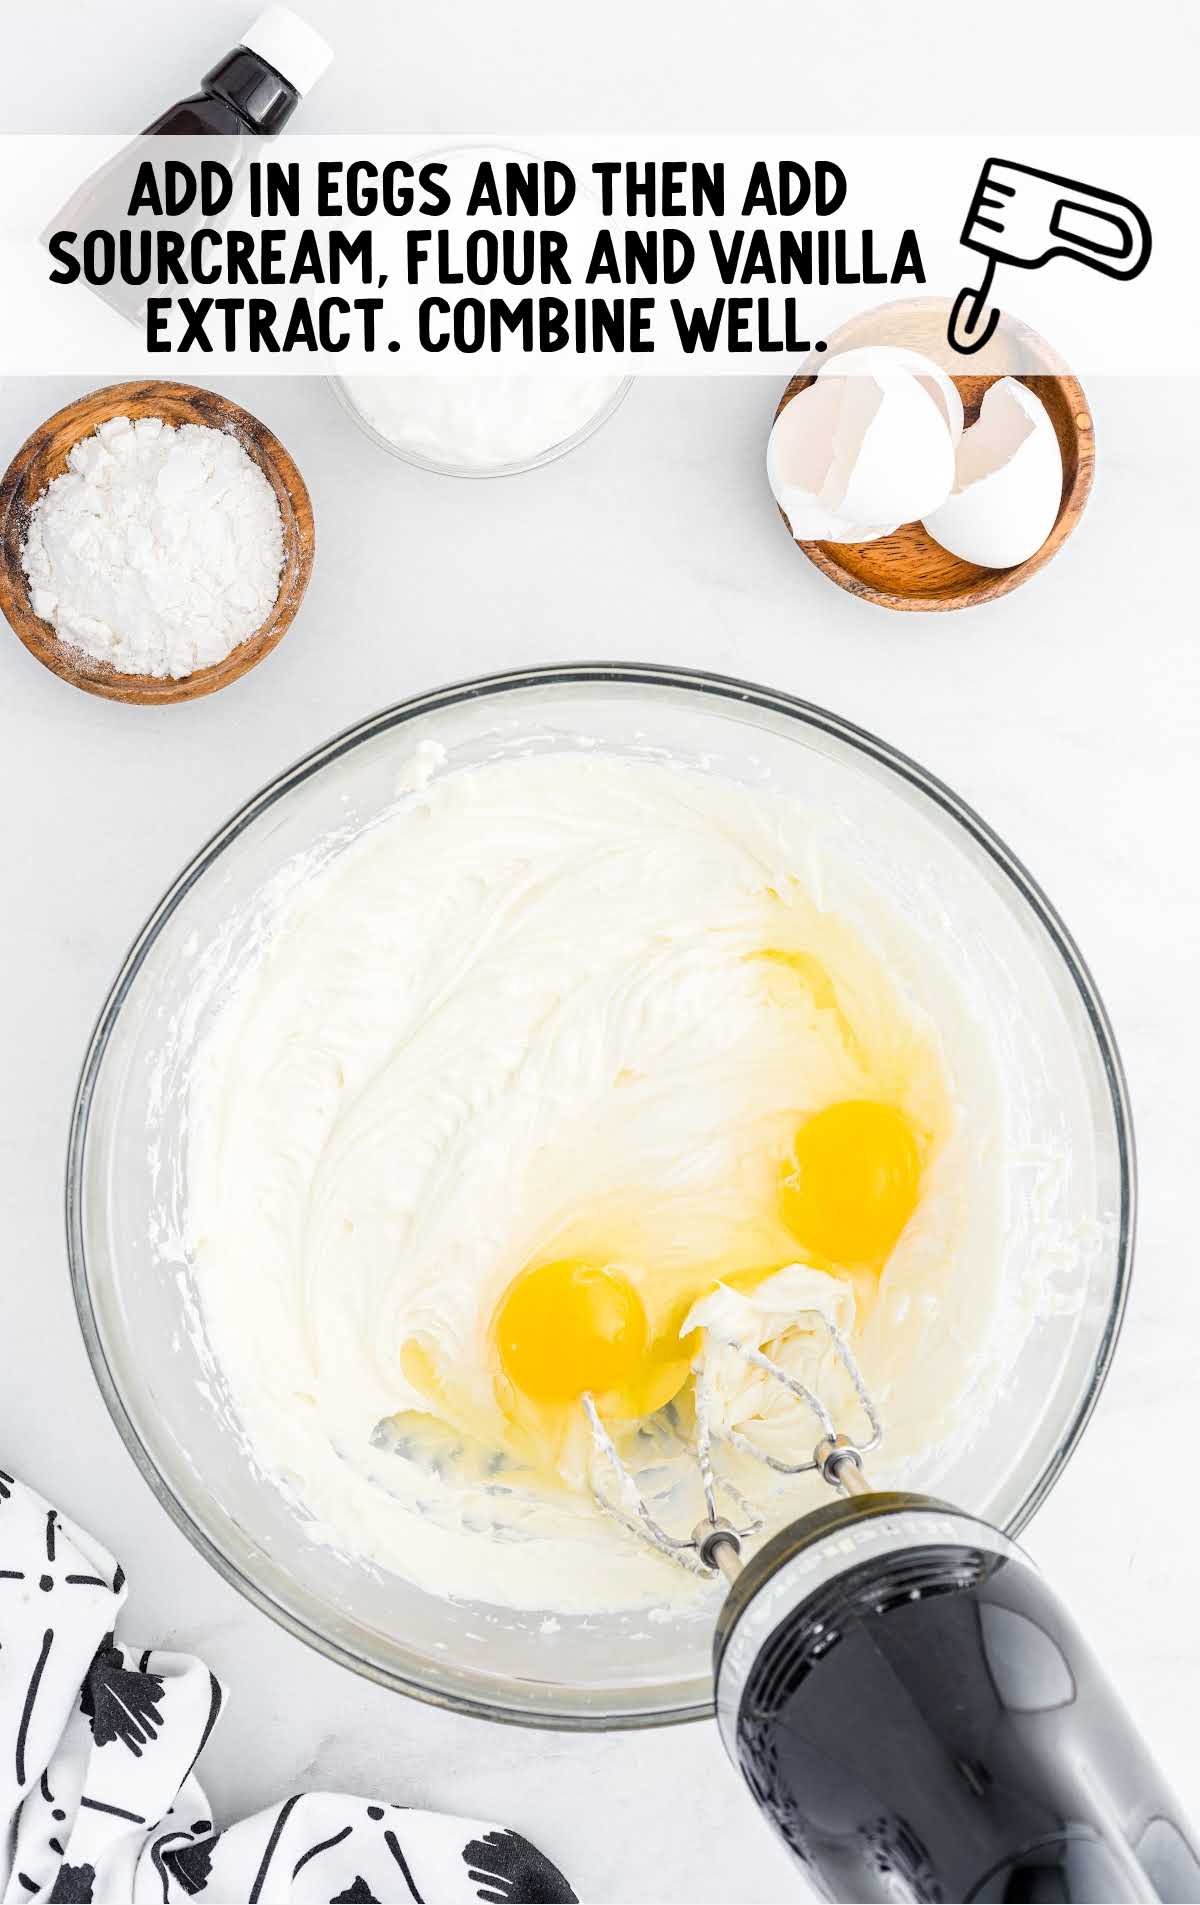
STEP SIX: In a large mixing bowl, with a handheld mixer on low, beat together the cream cheese and granulated sugar for 1 minute. Make sure that your cream cheese is smooth and without lumps.

STEP SEVEN: Add the eggs and beat for another 30 seconds, on low, to completely incorporate the eggs. Add the sour cream, all-purpose flour, and vanilla extract and beat just until combined. Do not overmix the cheesecake mixture. You do not want to incorporate a lot of air into your batter.
STEP EIGHT: Pour the cheesecake batter into the prepared springform pan. Add the springform pan to the middle rack in the oven and place the water-filled pan on the bottom rack in the oven. This will create a moist environment for the cheesecake to cook evenly. Bake for 45 minutes or until the center is just barely jiggly.
STEP NINE: Turn off the oven and crack the oven door open about 1 inch. Leave the cheesecake in the oven for an additional 1 hour. This allows the cheesecake to continue to cook and set as it cools. After one hour, remove the cheesecake from the oven and allow it to cool for an additional 1 hour on the counter. *Don’t forget to remove the water-filled dish as well*
STEP TEN: Once your cheesecake has cooled on the counter for 1 hour, you can assemble your cake.
STEP ELEVEN: Place your first layer of red velvet cake onto a serving platter. Gently place the cheesecake layer, upside down, onto the bottom red velvet cake layer. Peel the parchment paper off the bottom of the cheesecake before placing the second red velvet cake layer on top of the cheesecake.
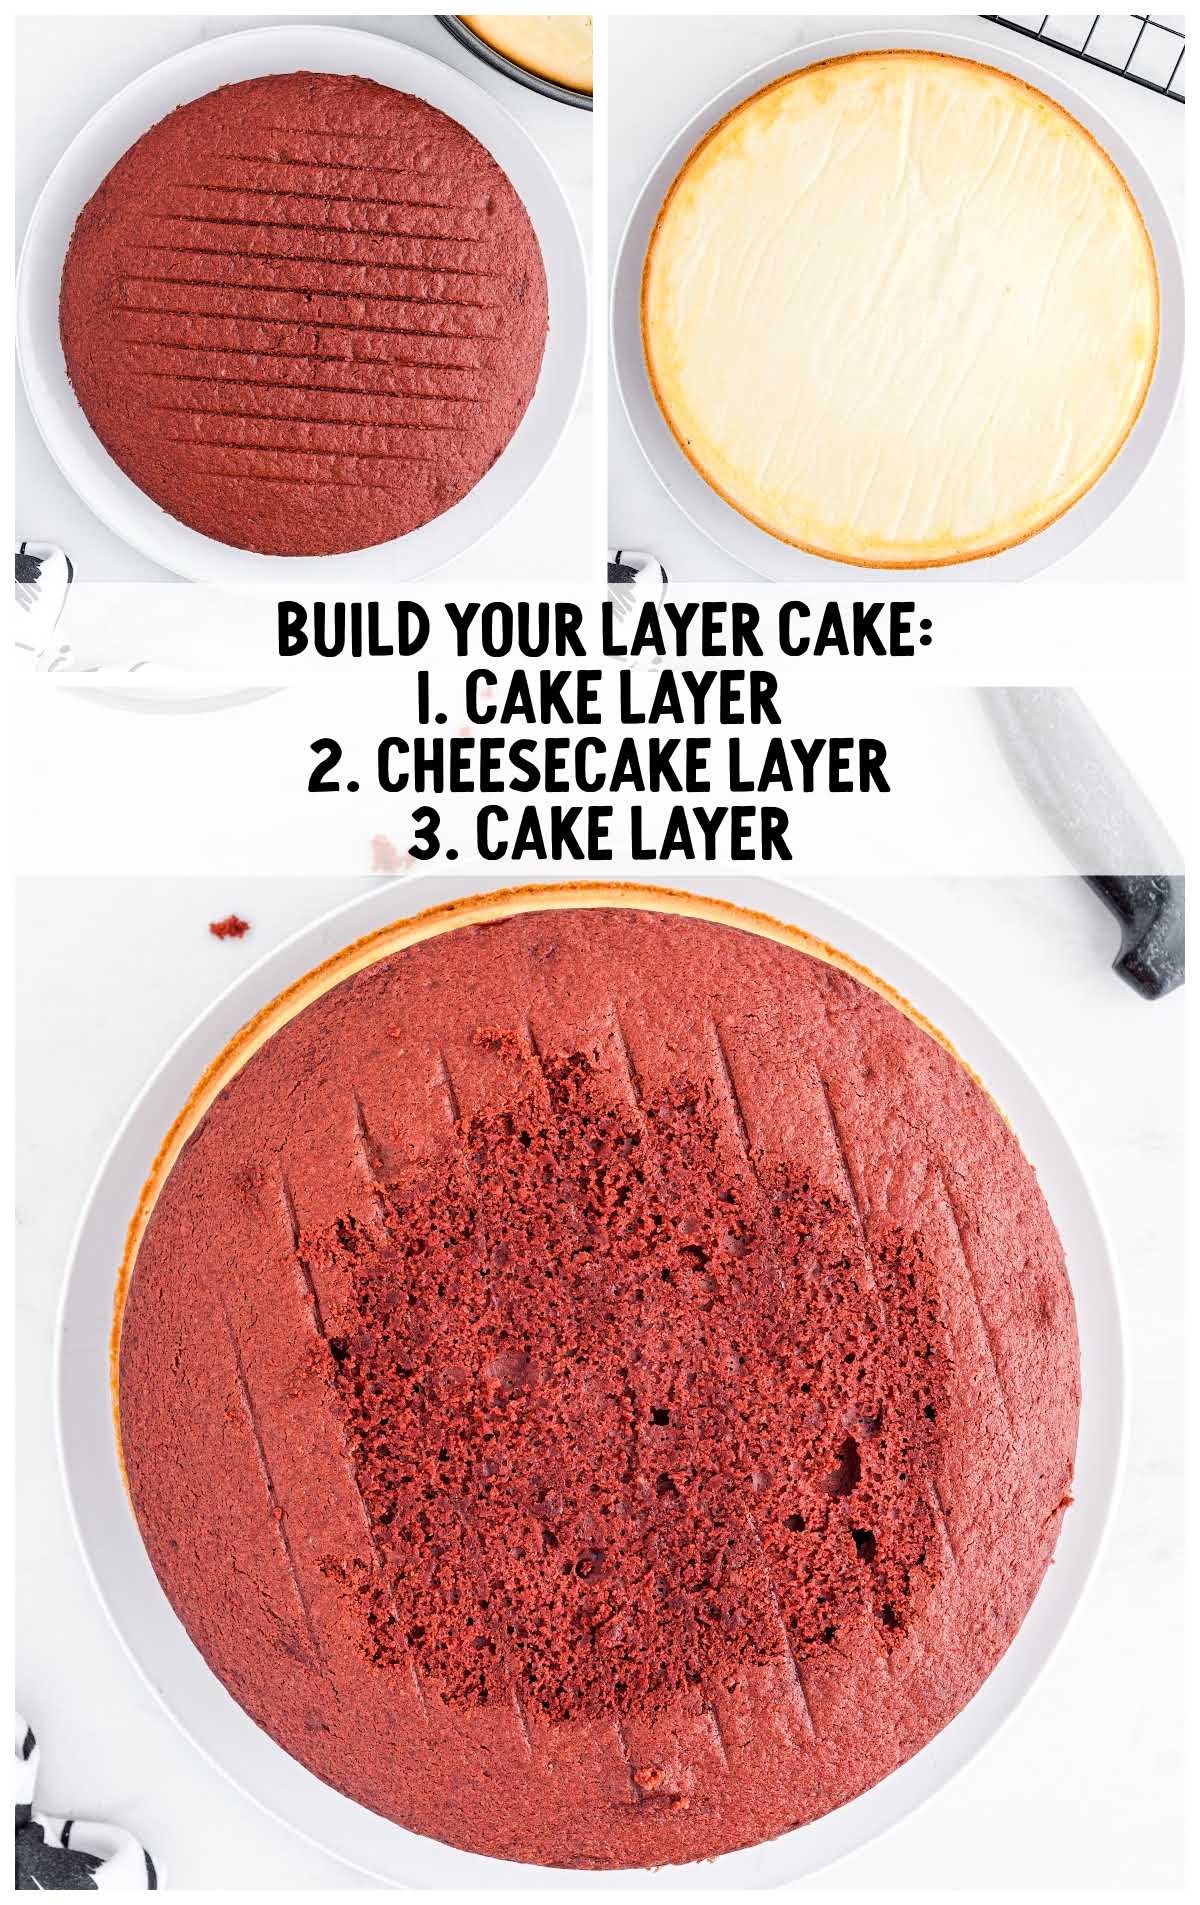
STEP TWELVE: Using a bread knife, gently level off the domed part of the top red velvet cake layer. **Save those scraps of red velvet cake because you can crumble them and use them as a garnish on the top of your red velvet cheesecake**.
PRO TIP: Save those scraps of red velvet cake because you can crumble them and use them as a garnish on the top of your red velvet cheesecake.
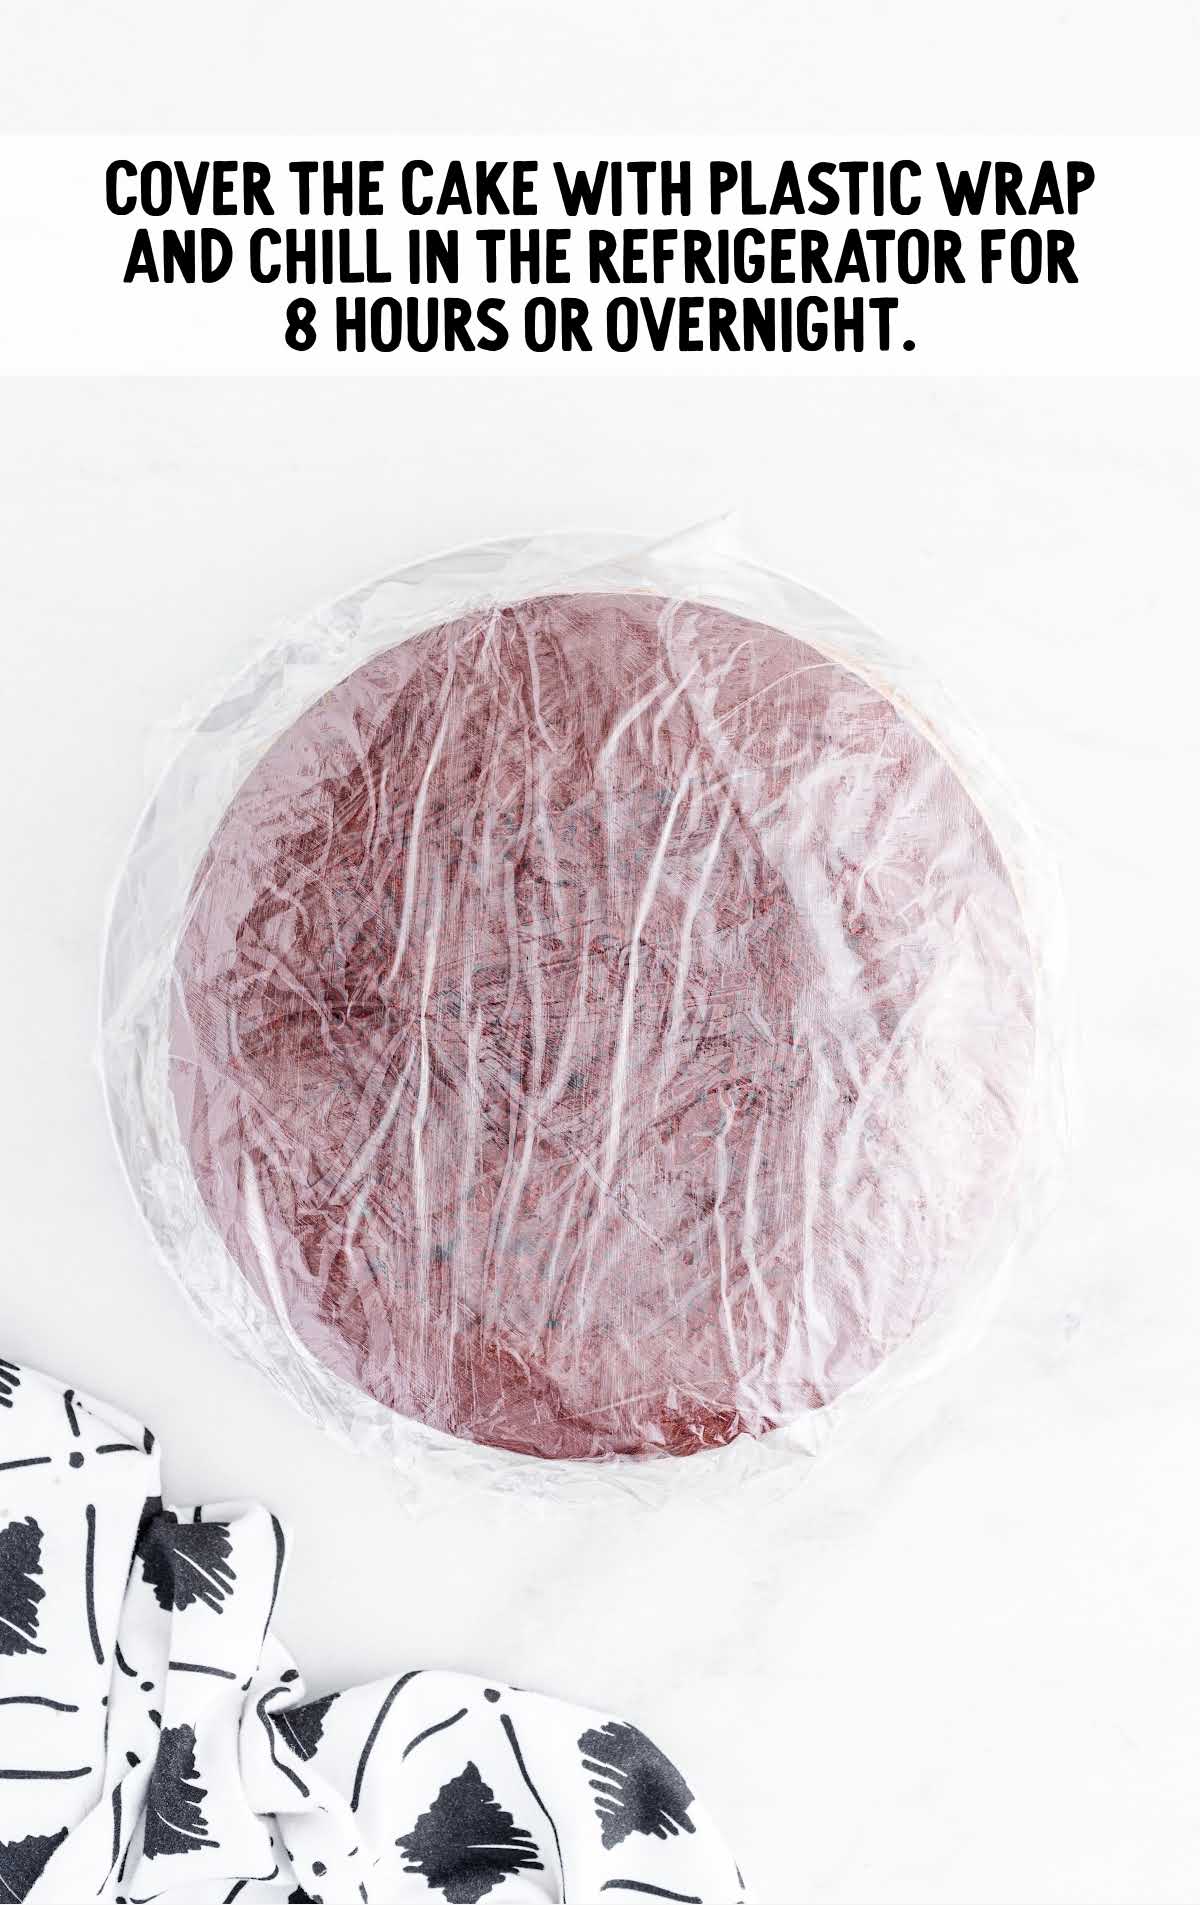
STEP THIRTEEN: Lightly cover the cake with plastic wrap and chill in the refrigerator for 8 hours up to overnight.
STEP FOURTEEN: Once your red velvet cheesecake has chilled, remove the plastic wrap and frost your cake with the cream cheese frosting.
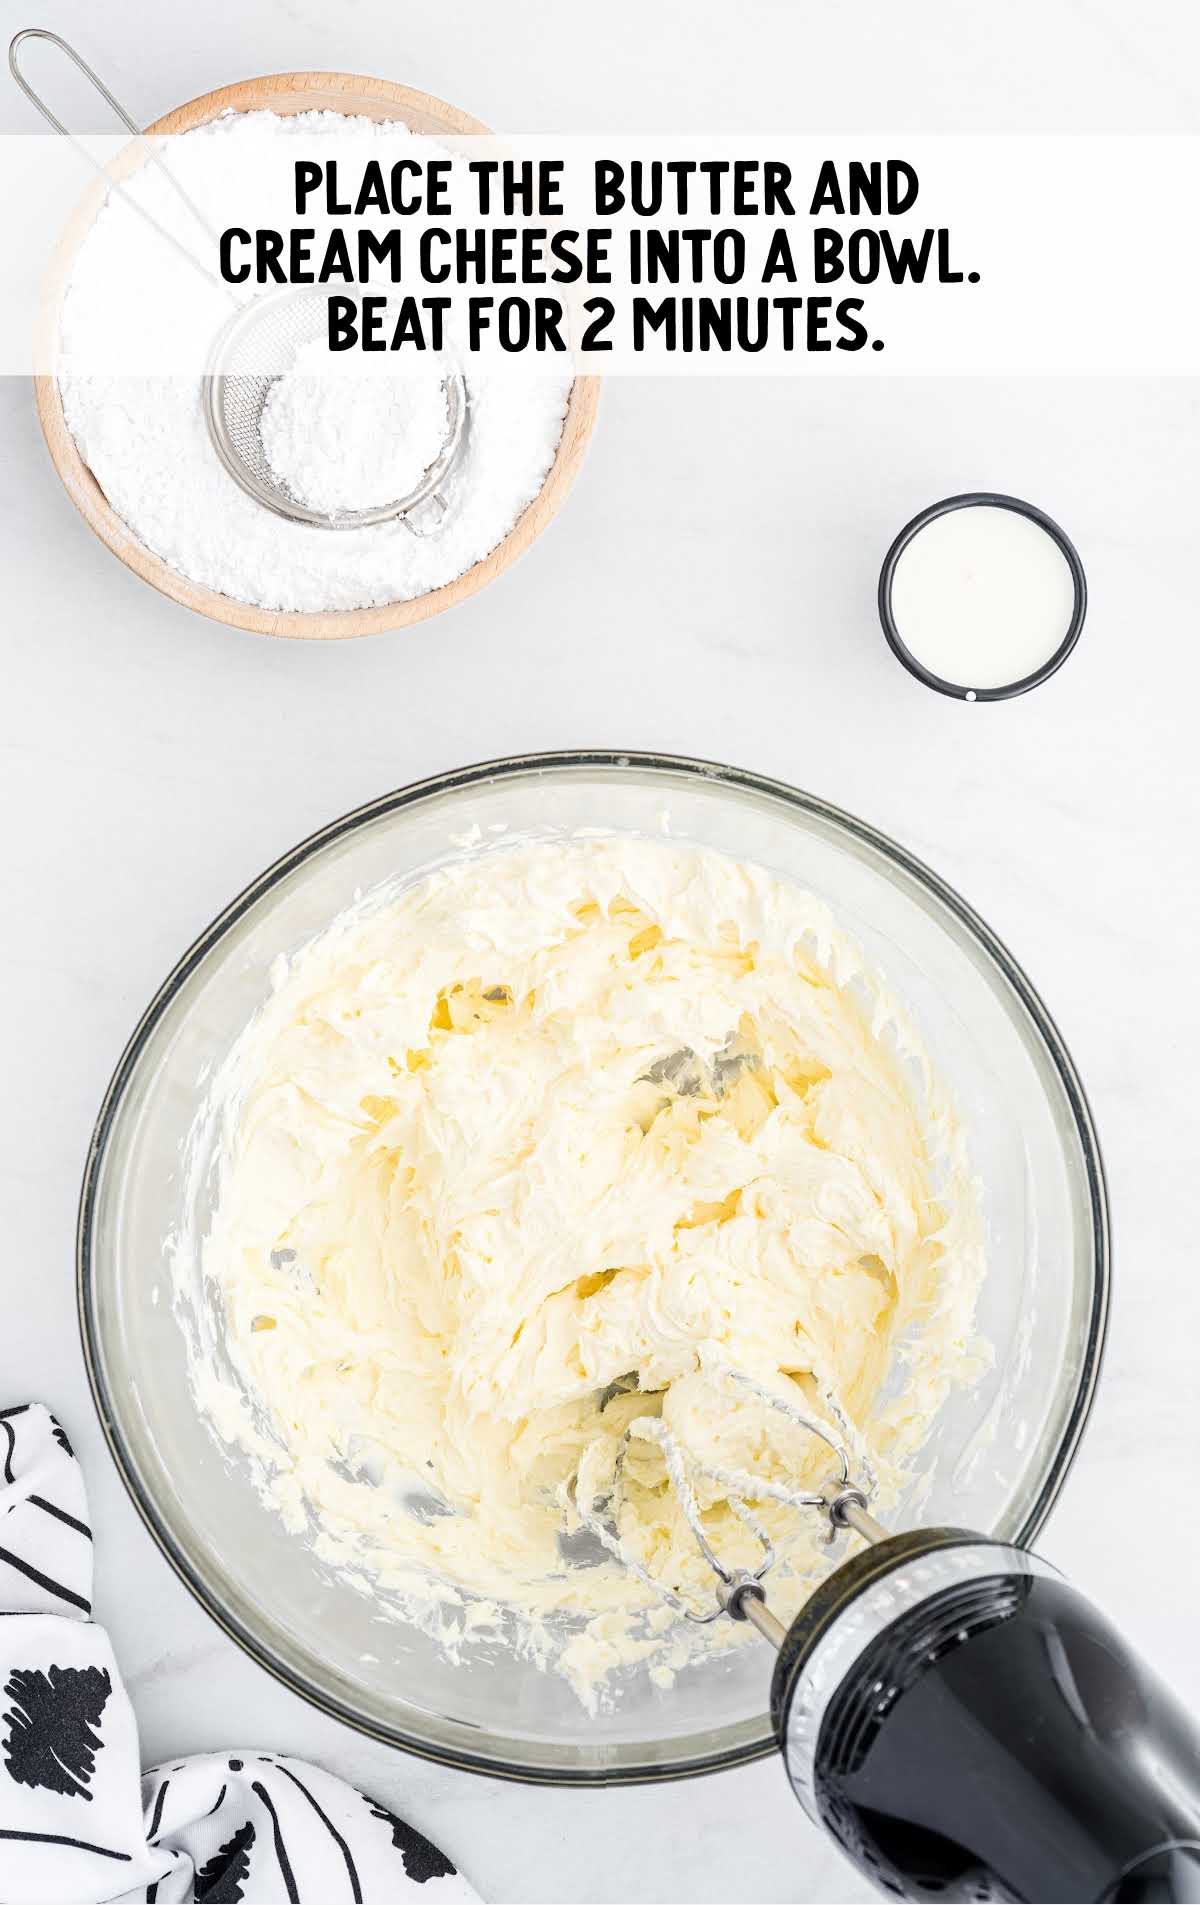
STEP FIFTEEN: To make the cream cheese frosting, you will place the unsalted butter and cream cheese into a large mixing bowl. Using a handheld mixer, on medium speed, beat the butter and cream cheese for 2 minutes or until very smooth.
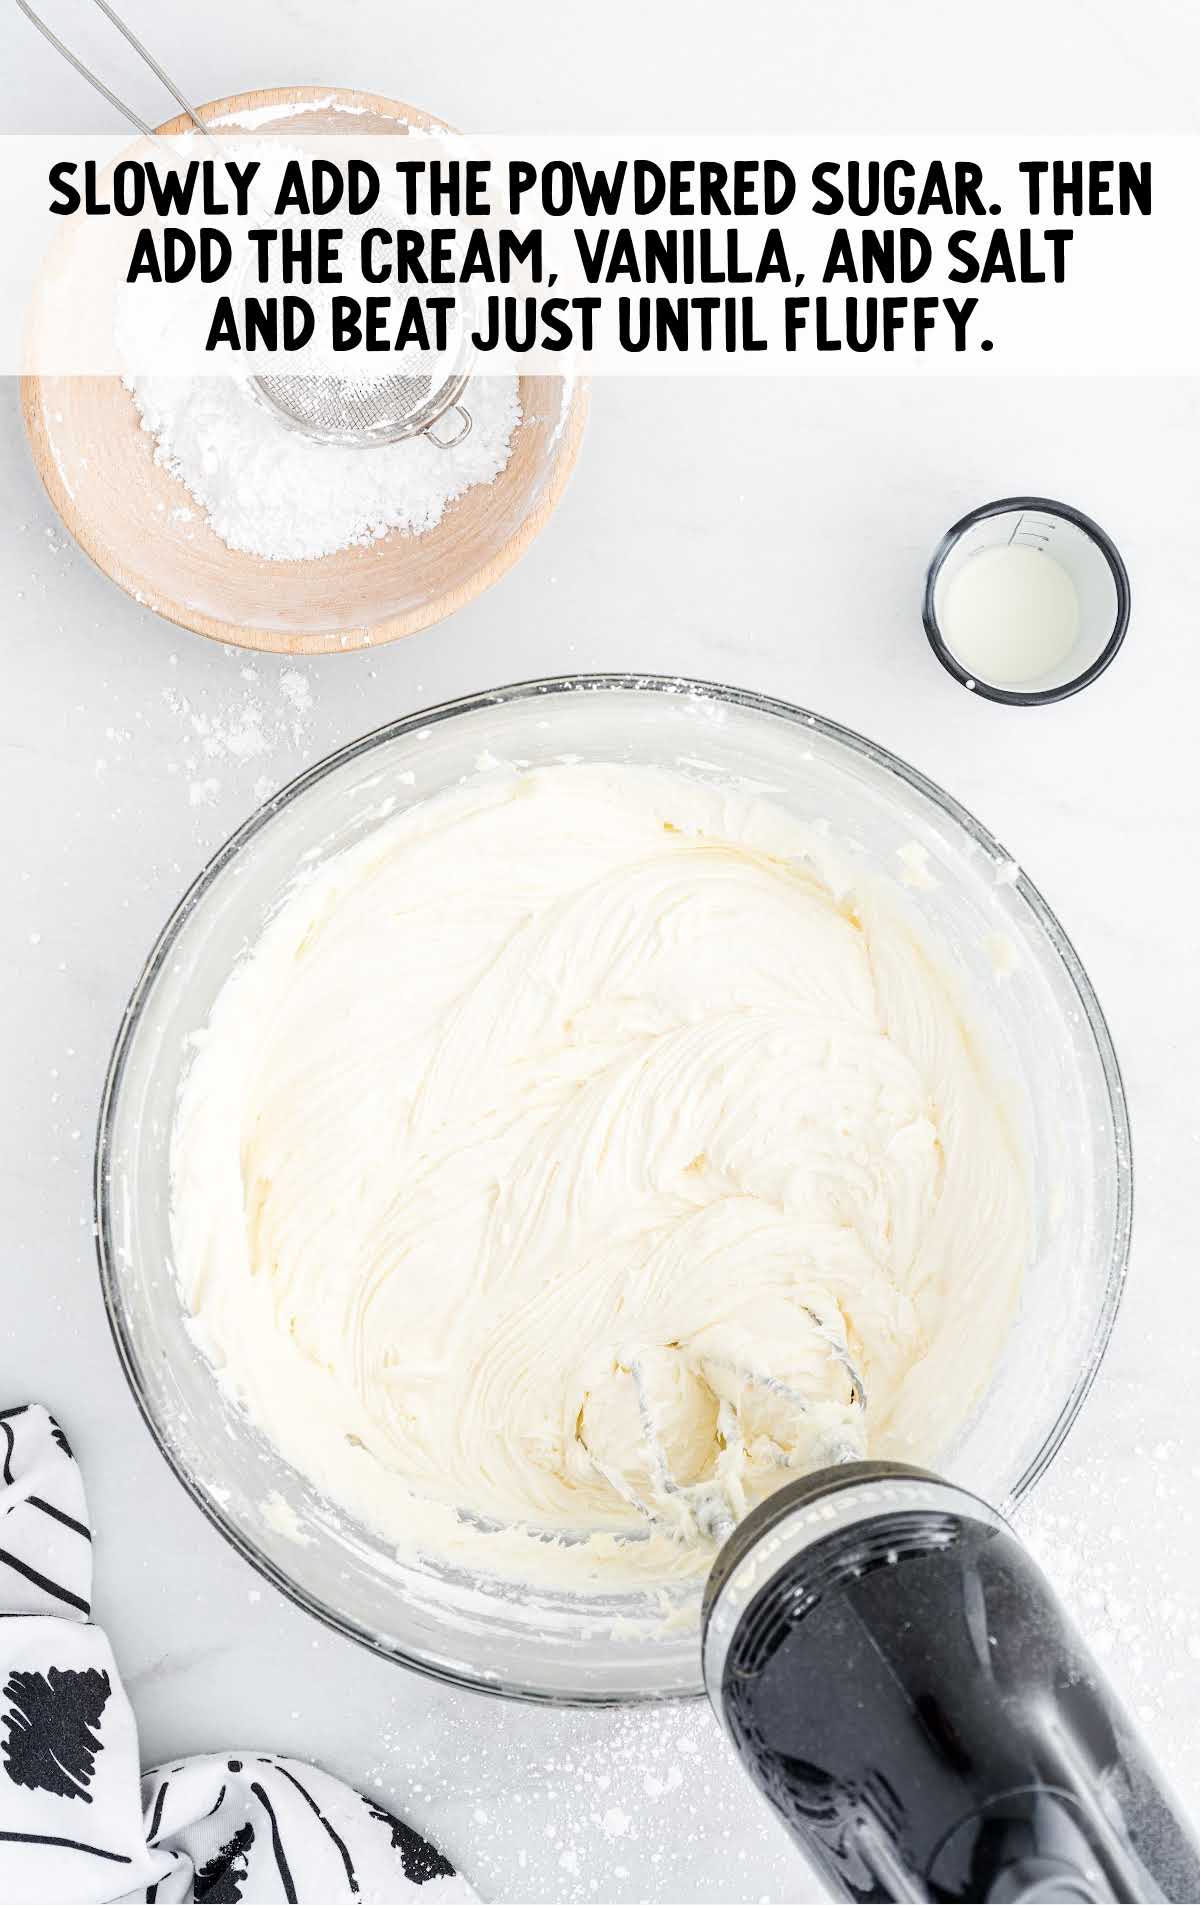
STEP SIXTEEN: Slowly add the powdered sugar, one cup at a time, until all the powdered sugar is incorporated. Add the heavy cream, vanilla extract, and salt and continue to beat just until the frosting is light and fluffy. It should be stiff enough to hold its shape when frosting the cake. If the frosting is too loose, you can add additional powdered sugar, ¼ cup at a time, to thicken it up. If it is too stiff, you can add an additional 1 tablespoon heavy cream.
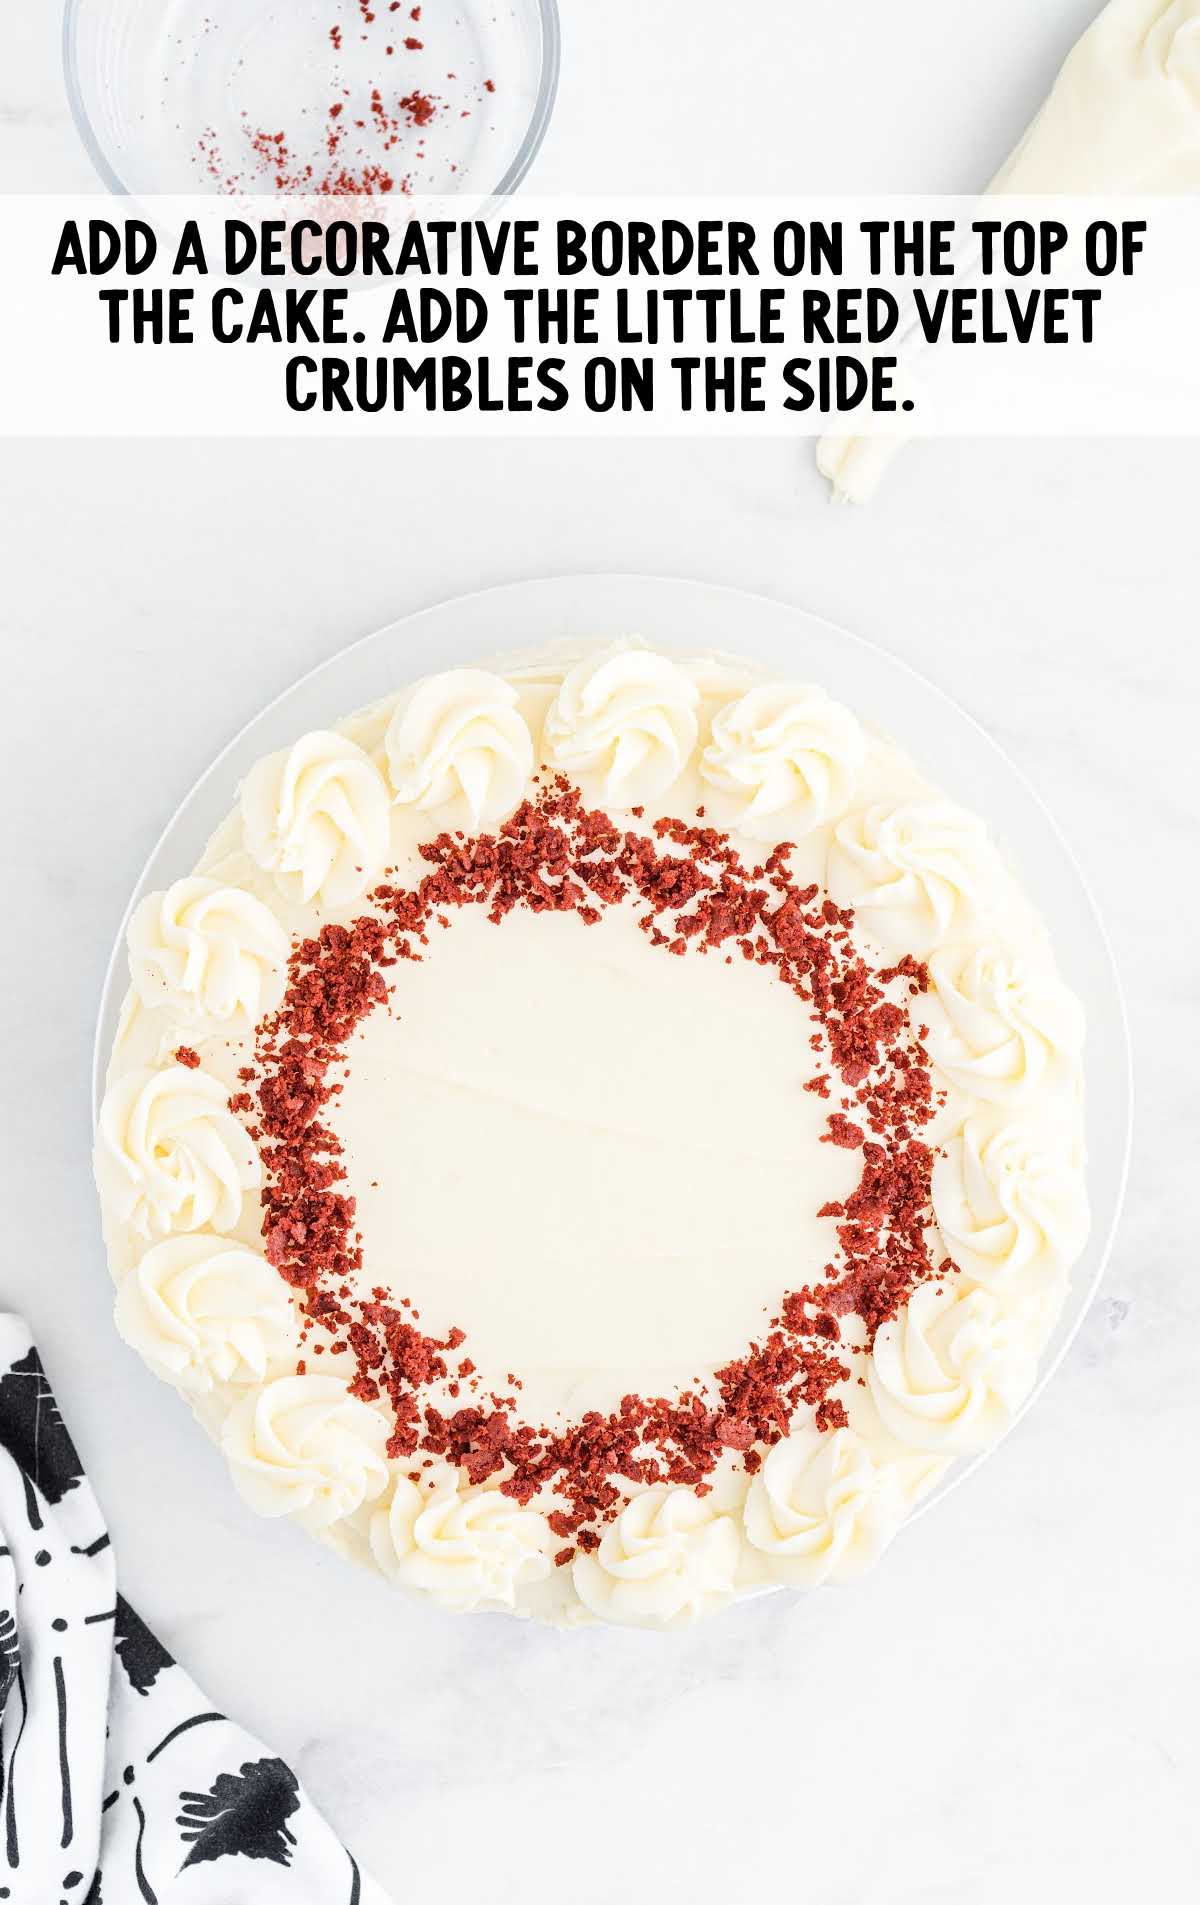
STEP SEVENTEEN: Reserve about a cup of the frosting and place it into a small piping bag, fitted with a star tip to add a decorative border on the top of your cake once you have frosted it. You can also add the little red velvet crumbles (from leveling off the cake layers) on the inside border of the top of your cake.
How to Serve
Slice up your delectable red velvet cheesecake and serve it on its own or with a side of ice cream. Wash down your cake with a tall glass of cold milk or a warm cup of coffee.
Storage
IN THE FRIDGE: You can store this red velvet cheesecake cake in a covered container, in the refrigerator, for up to 3 days.
IN THE FREEZER: Red velvet cheesecake can be frozen for up to a month well wrapped in plastic wrap and aluminum foil.
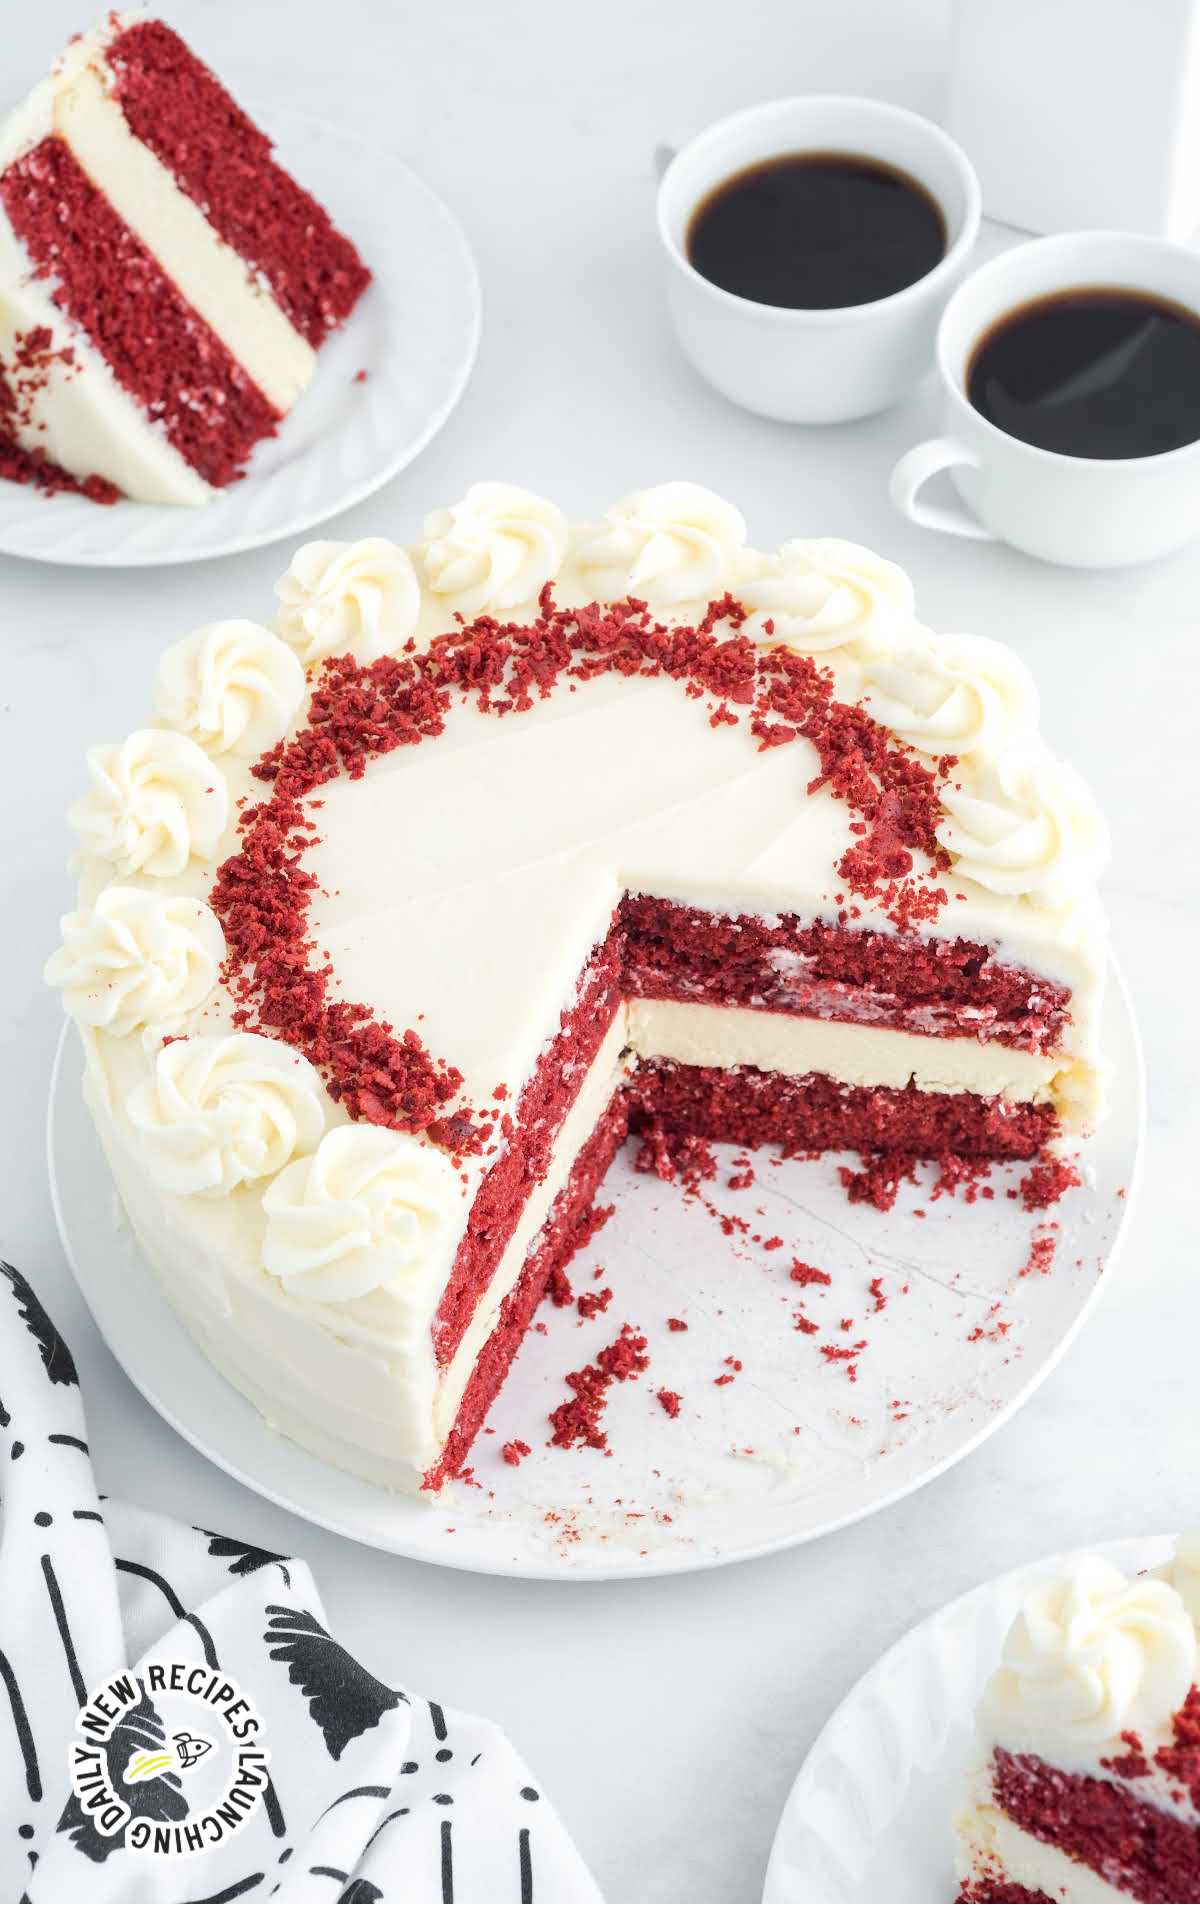
Red velvet cheesecake is truly a special occasion cake worthy of the attention that the bold red color demands. Smooth, creamy, moist, and tender, biting into red velvet cheesecake tastes like a celebration.
Frequently Asked Questions
Why do I bake a cheesecake with a pan of water?
Using a pan of water will give you a moist, perfectly baked cheesecake. The hot water creates a moist cooking environment for the dairy and eggs to produce the creamy cheesecake texture.
Can I use a homemade red velvet cake recipe for this cheesecake?
If you have a preferred homemade red velvet recipe, you can certainly use that instead of the boxed mix.
How do I freeze a whole cheesecake?
Make sure you cool the cheesecake completely before freezing. Wrap the cheesecake in layers of plastic wrap and then in aluminum foil. To thaw, place cheesecake in the fridge overnight.
More Recipes You’ll Love
Red Velvet Cheesecake
Red velvet cheesecake will leave you swooning. Layers of red velvet cake surround a layer of creamy cheesecake, topped with luscious cream cheese frosting.
Ingredients
Cake
- 15.25 ounces Red Velvet cake mix (I used Duncan Hines brand)
- 1 cup buttermilk
- ½ cup vegetable oil
- 3 large eggs
Cheesecake
- 16 ounces cream cheese, room temperature
- 1 cup granulated sugar
- 2 large eggs, room temperature
- ½ cup sour cream
- 2 tablespoons flour, all-purpose
- 1½ teaspoons vanilla extract
Cream Cheese Frosting
- 1 cup unsalted butter, room temperature
- 8 ounces cream cheese, room temperature
- 5½ cups powdered sugar, sifted
- 3 tablespoons heavy cream
- 2 teaspoons vanilla extract
- ¼ teaspoon salt
Instructions
- Preheat the oven to 350°F. Lightly spray 2 (9-inch) cake pans with baker’s spray.
- To make the cake, whisk together, in a large mixing bowl, the buttermilk, vegetable oil, and eggs until fully combined. Add the dry ingredient packet from the box of red velvet cake mix. Whisk vigorously by hand, or with a handheld mixer on low, for 2 minutes or until no lumps remain.
- Divide the batter evenly between the two prepared cake pans and bake for 25 to 30 minutes. A toothpick inserted into the center of your cake should come out clean. Cool in the pans for 10 minutes before turning them out onto a cooling rack to cool completely.
- While your red velvet cake is baking, you can prepare the cheesecake batter.
- Lightly spray a 9-inch springform pan with baker’s spray and line the bottom of the springform pan with a round piece of parchment paper. In an oven-safe 9×13 pan, add enough water to fill the pan about 1 to 2 inches. Set both pans aside.
- In a large mixing bowl, with a handheld mixer on low, beat together the cream cheese and granulated sugar for 1 minute. Make sure that your cream cheese is smooth and without lumps.
- Add the eggs and beat for another 30 seconds, on low, to completely incorporate the eggs. Add the sour cream, all-purpose flour, and vanilla extract and beat just until combined. Do not overmix the cheesecake mixture. You do not want to incorporate a lot of air into your batter.
- Pour the cheesecake batter into the prepared springform pan. Add the springform pan to the middle rack in the oven and place the water-filled pan on the bottom rack in the oven.This will create a moist environment for the cheesecake to cook evenly. Bake for 45 minutes or until the center is just barely jiggly.
- Turn off the oven and crack the oven door open about 1 inch. Leave the cheesecake in the oven for an additional 1 hour. This allows the cheesecake to continue to cook and set as it cools. After one hour, remove the cheesecake from the oven and allow it to cool for an additional 1 hour on the counter. *Don’t forget to remove the water-filled dish as well*
- Once your cheesecake has cooled on the counter for 1 hour, you can assemble your cake.
- Place your first layer of red velvet cake onto a serving platter. Gently place the cheesecake layer, upside down, onto the bottom red velvet cake layer. Peel the parchment paper off the bottom of the cheesecake before placing the second red velvet cake layer on top of the cheesecake.
- Using a bread knife, gently level off the domed part of the top red velvet cake layer. **Save those scraps of red velvet cake because you can crumble them and use them as a garnish on the top of your red velvet cheesecake**.
- Lightly cover the cake with plastic wrap and chill in the refrigerator for 8 hours up to overnight.
- Once your red velvet cheesecake has chilled, remove the plastic wrap and frost your cake with the cream cheese frosting.
- To make the cream cheese frosting, you will place the unsalted butter and cream cheese into a large mixing bowl. Using a handheld mixer, on medium speed, beat the butter and cream cheese for 2 minutes or until very smooth.
- Slowly add the powdered sugar, one cup at a time, until all the powdered sugar is incorporated. Add the heavy cream, vanilla extract, and salt and continue to beat just until the frosting is light and fluffy. It should be stiff enough to hold its shape when frosting the cake. If the frosting is too loose, you can add additional powdered sugar, ¼ cup at a time, to thicken it up. If it is too stiff, you can add an additional 1 tablespoon heavy cream.
- Reserve about a cup of the frosting and place it into a small piping bag, fitted with a star tip to add a decorative border on the top of your cake once you have frosted it. You can also add the little red velvet crumbles (from leveling off the cake layers) on the inside border of the top of your cake.
Notes
- This recipe needs plenty of cooking and cooling time before assembling and frosting it. It is best to start this recipe early in the day so that you can assemble your layers before wrapping the cake in plastic wrap and refrigerating it to allow the cheesecake layer to set up completely before you frost the cake and serve it. Alternatively, you can make the cheesecake layer the day before, and refrigerate it overnight, then bake the red velvet layers the next day.
- I substituted the 1 cup water, in the instructions of the red velvet box mix, for the buttermilk. I think it makes the cake more tender, however, you can make the cake according to the box directions (with the water), and your cake will still be delicious.
- For this recipe, I like using full-fat cream cheese. You can use the low-fat cream cheese, but I do not recommend using a non-fat version as it compromises the taste and texture of the cream cheesecake portion and the frosting.


Comments
Jenn says
This is SO delicious – and very impressive looking!