Published on
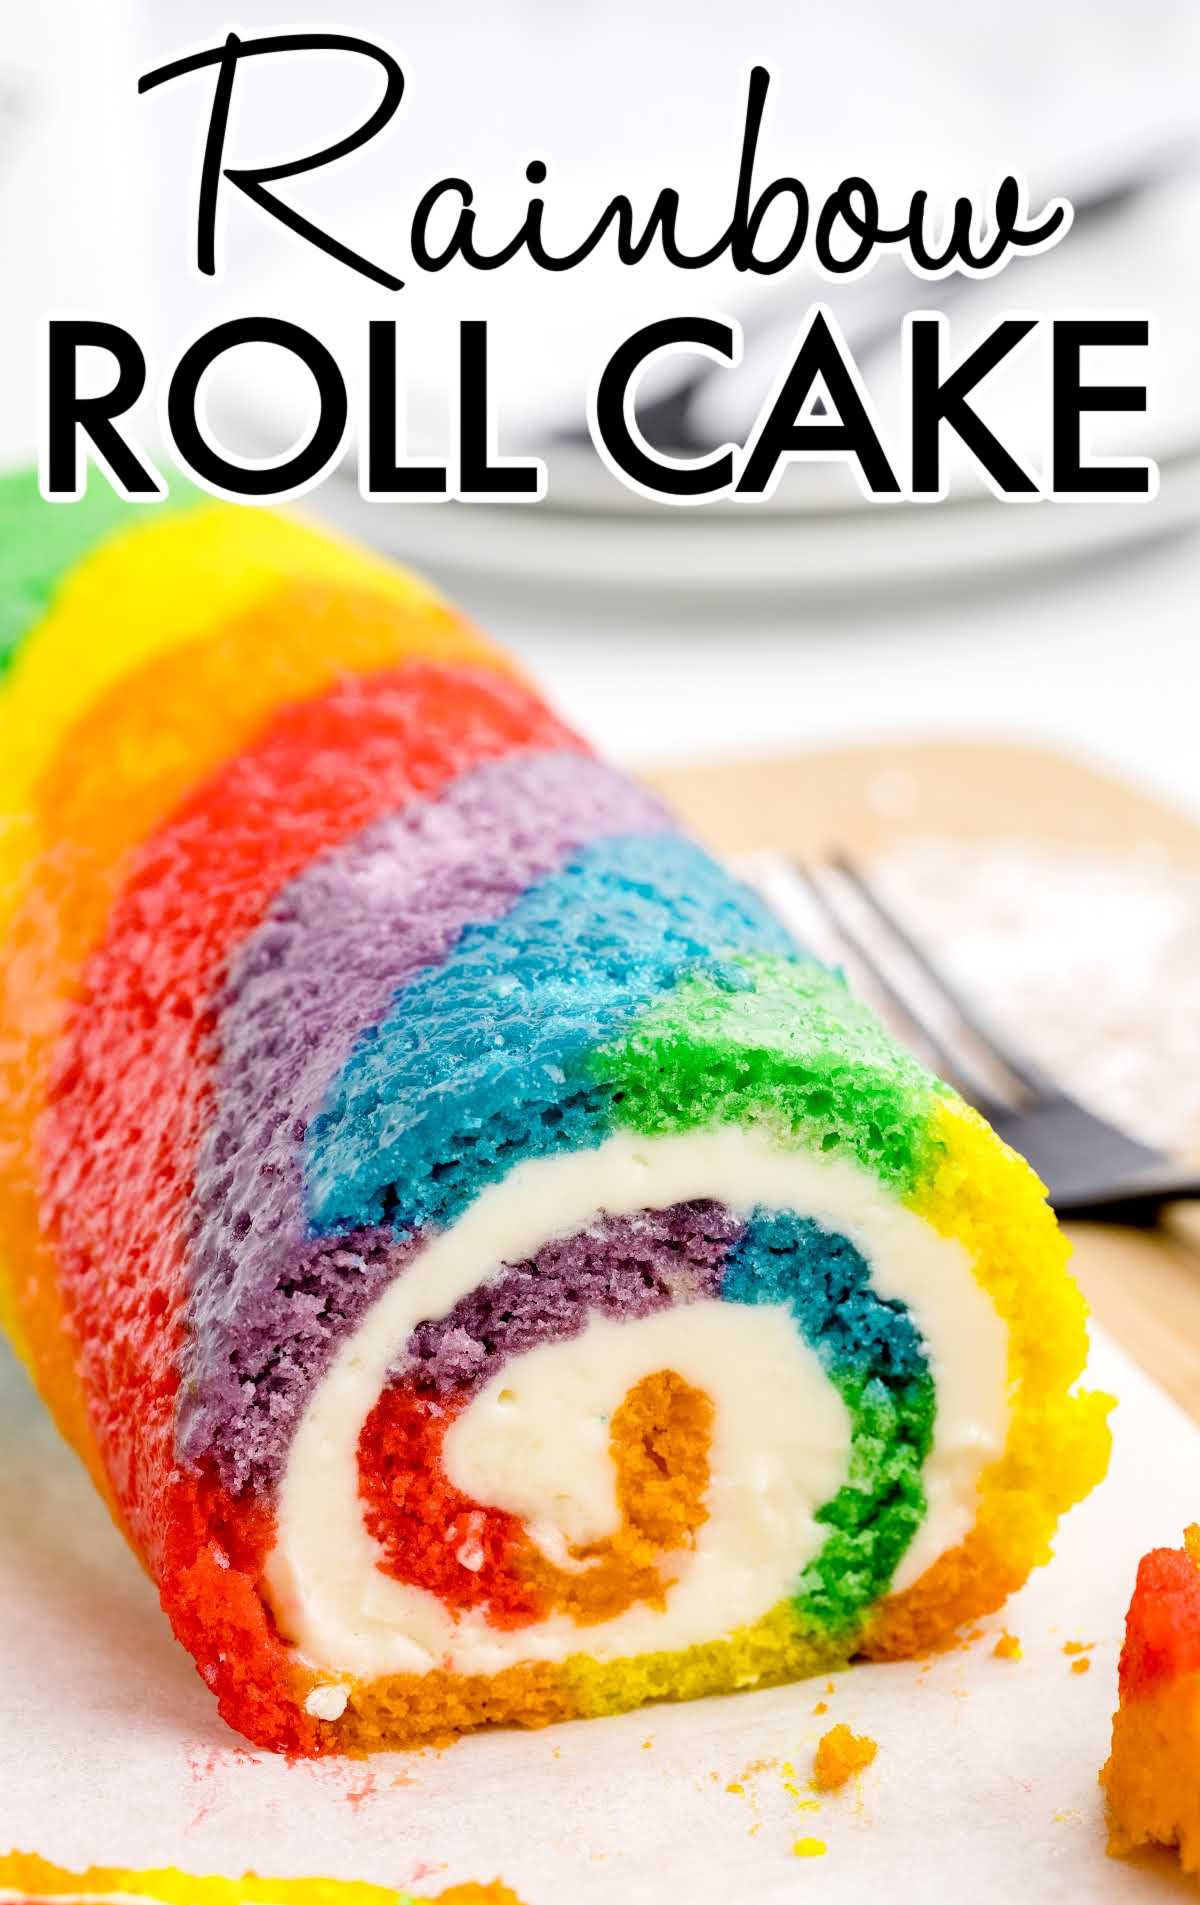
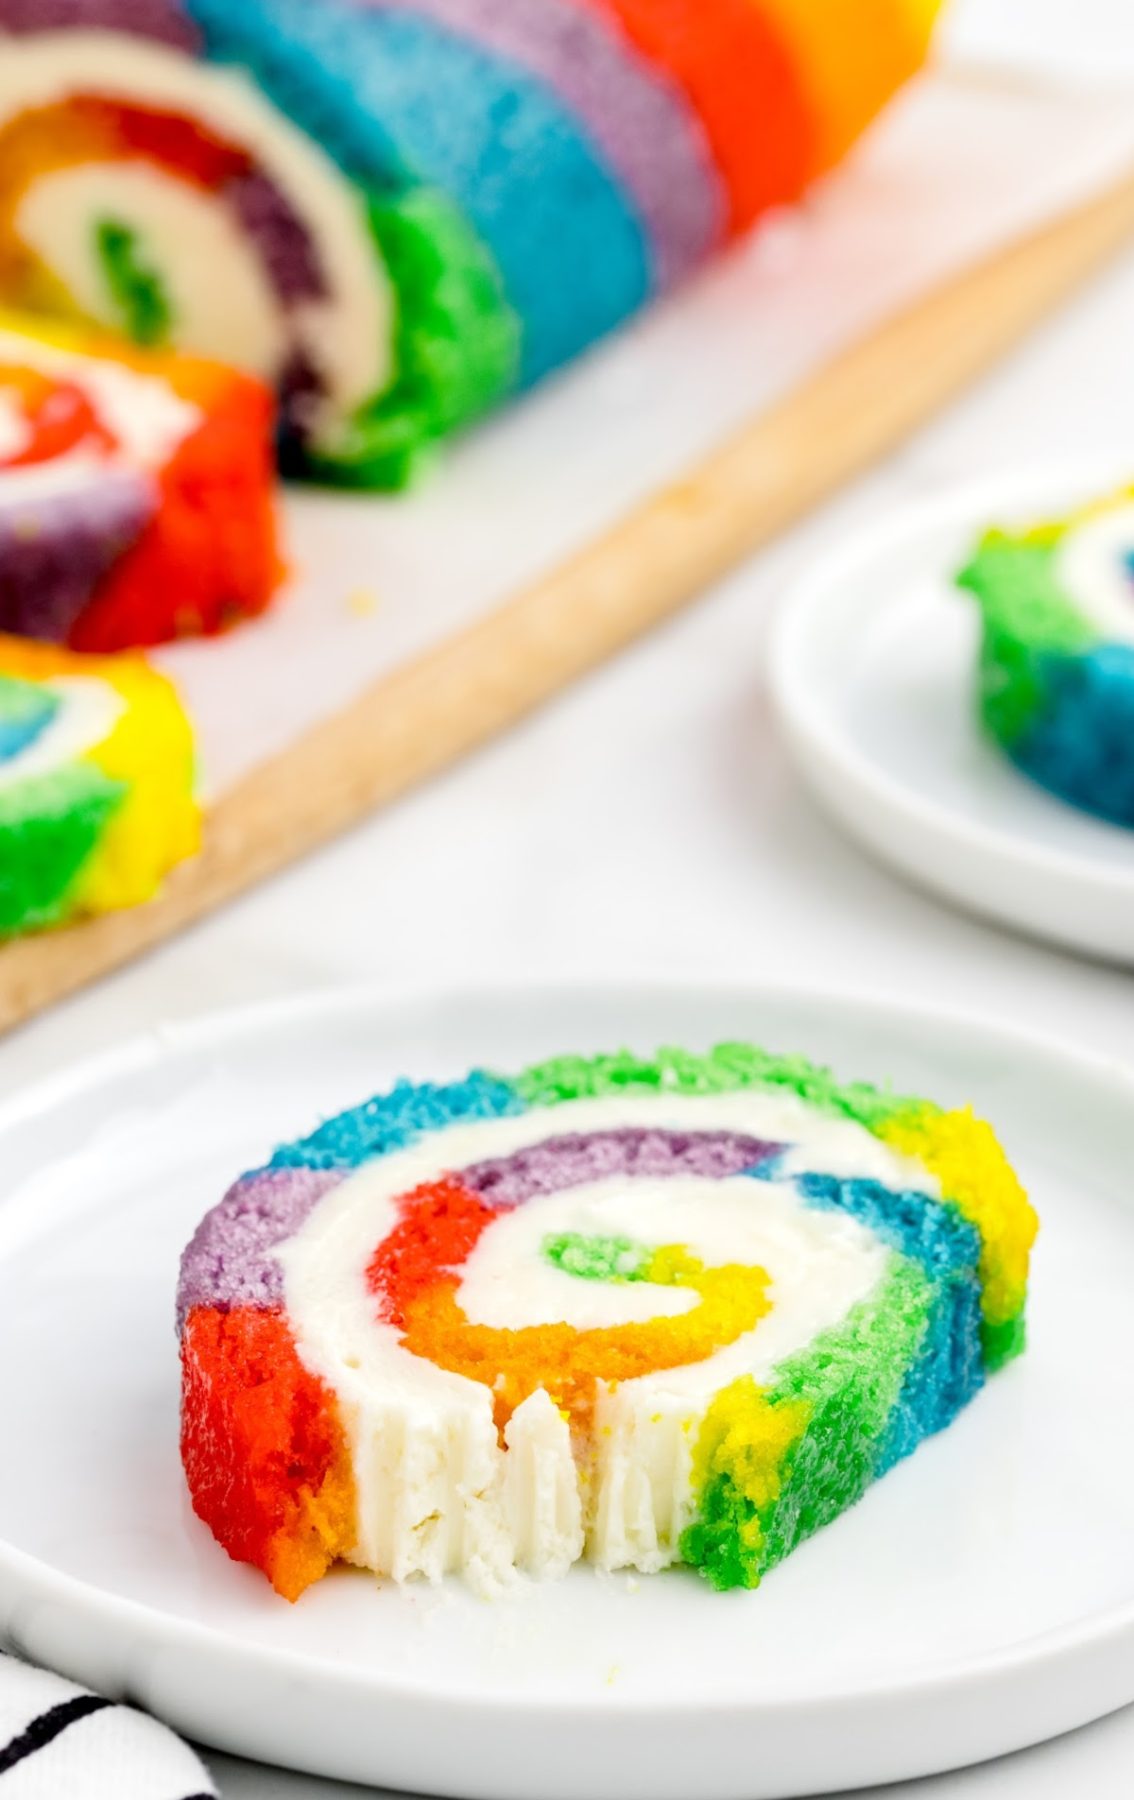
Rainbow Roll Cake
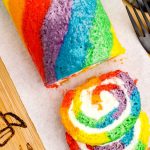
Rainbow roll cake is a whimsical, bright cake that is moist and sweet with a creamy buttercream filling inside.
Jump to RecipeTable of Contents
Rainbow roll cake is a bright and colorful confection! This eye-catching treat, with its vibrant rainbow stripes, is an allure for the eyes and the tastebuds. Moist and sweet, with a creamy buttercream filling inside, it’s hard to resist this stunning rainbow roll cake.
If you love roll cakes then you’ll also want to make Caramel Banana Cake Roll, Hot Chocolate Roll Cake, and Strawberry Cake Roll.
Rainbow Roll Cake Ingredients

You will need:
Rainbow Cake
- ¾ cup all-purpose flour
- 1 teaspoon baking powder
- ½ teaspoon salt
- 4 large eggs, room temperature
- ½ cup granulated sugar
- 3 tablespoons vegetable oil
- 1½ teaspoons pure vanilla extract
- ½ teaspoon pure almond extract
- gel food coloring, red, orange, yellow, green, blue, and purple
- Powdered sugar, for dusting
Buttercream Filling
- ¾ cup salted sweet cream butter, softened
- 1 teaspoon clear vanilla flavoring
- ½ teaspoon almond extract
- 2 cups powdered sugar
- 2 tablespoons heavy cream
Substitutions and Additions
FOOD COLORING: We recommend gel food coloring in this rainbow cake recipe. You will get a nice bright color with only a few drops, while liquid food coloring will require quite a bit for equally vibrant rainbow colors.
SPRINKLES: Add rainbow sprinkles onto the filling once it has been spread for an extra pop of color in the middle of your cake.
How to Make Rainbow Roll Cake
Rainbow Cake
STEP ONE: Preheat the oven to 350°F. Line a 10x15x1-inch baking sheet (jelly roll pan) with parchment paper. Set it aside.
PRO TIP: Make sure you are using an actual jelly roll pan. You cannot substitute a cookie sheet for a jelly roll pan as it will not produce the cake you are hoping for.
STEP TWO: Add the flour, baking powder, and salt to a small mixing bowl. Whisk to combine.
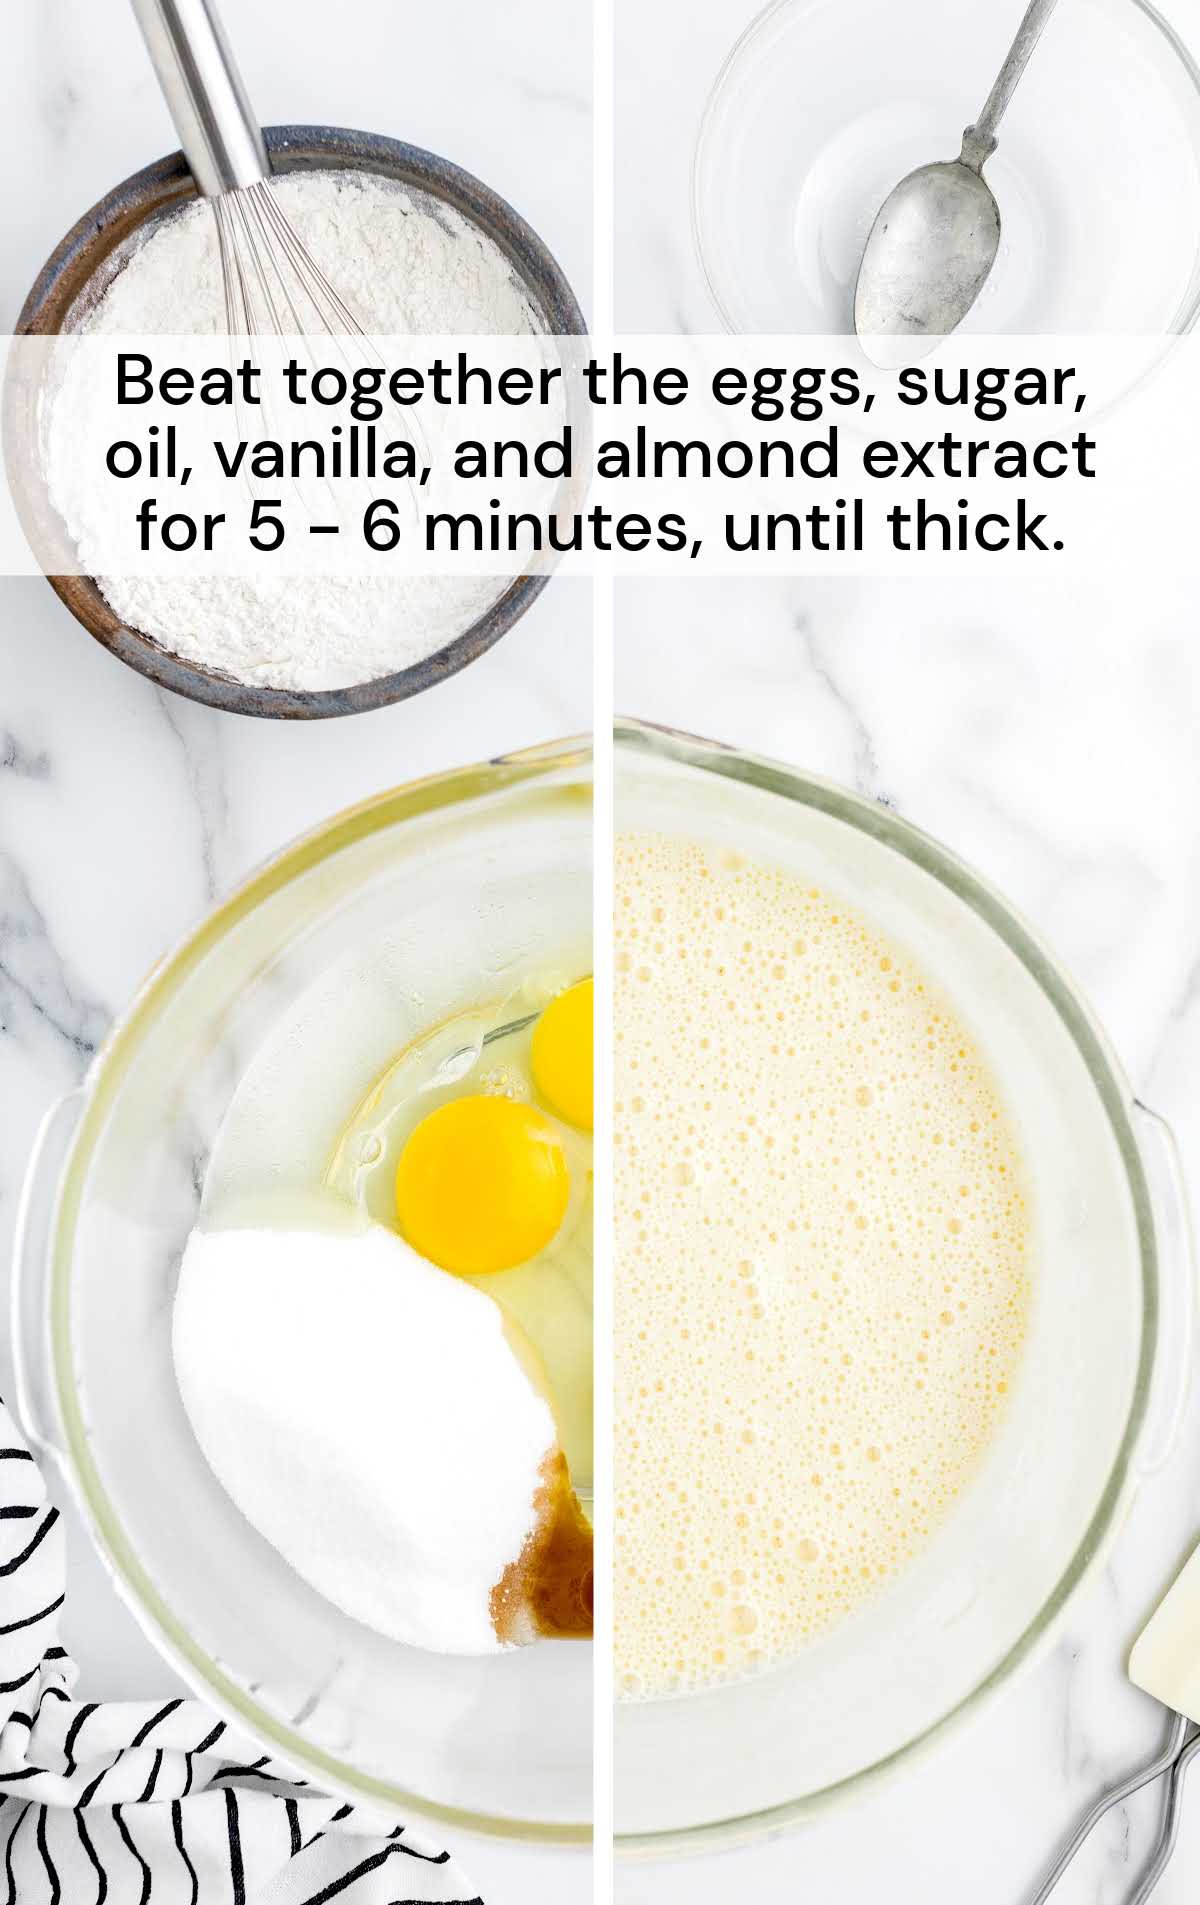
STEP THREE: Using either a stand mixer or a medium-sized mixing bowl and a handheld mixer on high speed, beat together the eggs, sugar, vegetable oil, vanilla, and almond extract for 5 to 6 minutes, until thickened and light yellow.
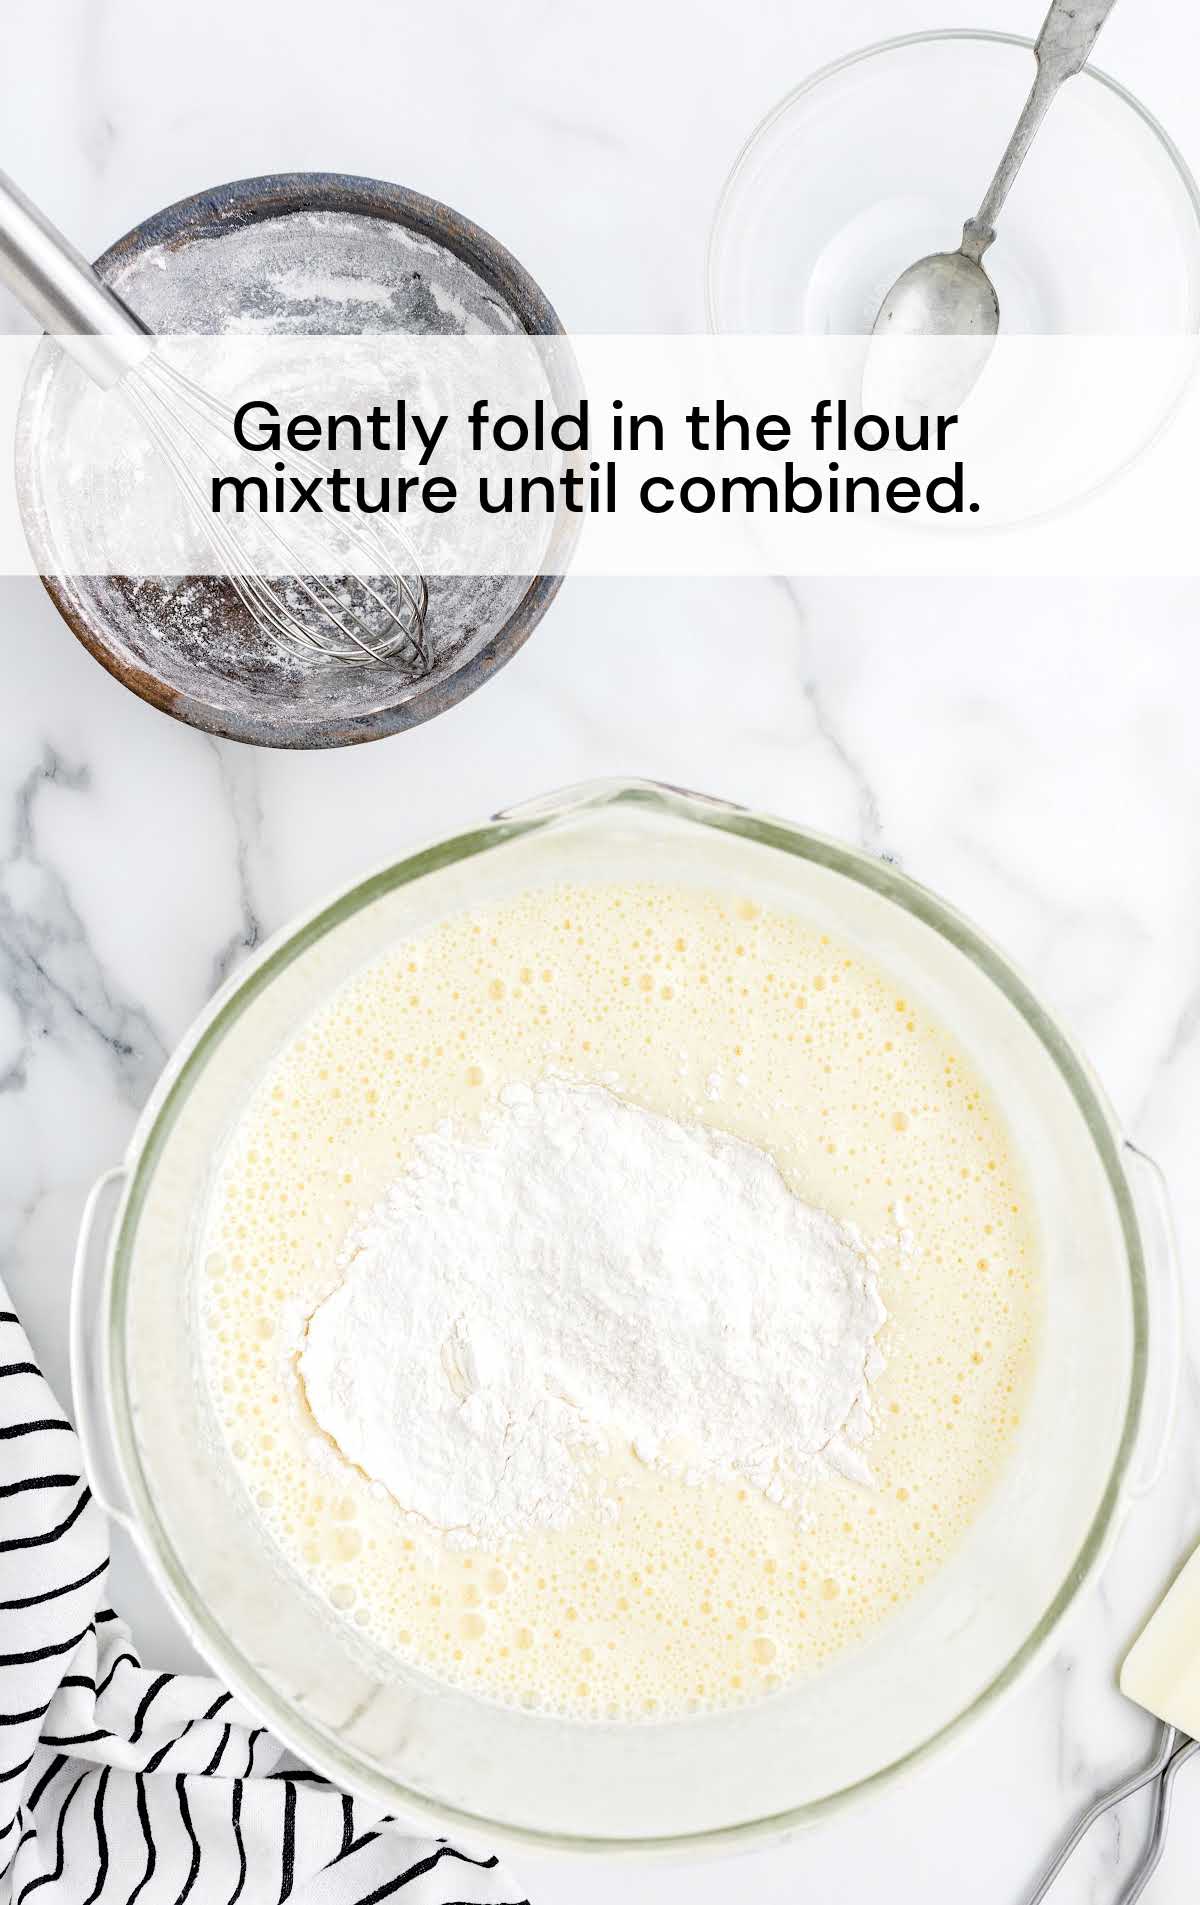
STEP FOUR: Gently fold in the flour mixture until combined.
PRO TIP: It is very important to be gentle when folding in the flour and the color. It’s important to keep as much of the air bubbles in the batter as possible to keep the cake fluffy.
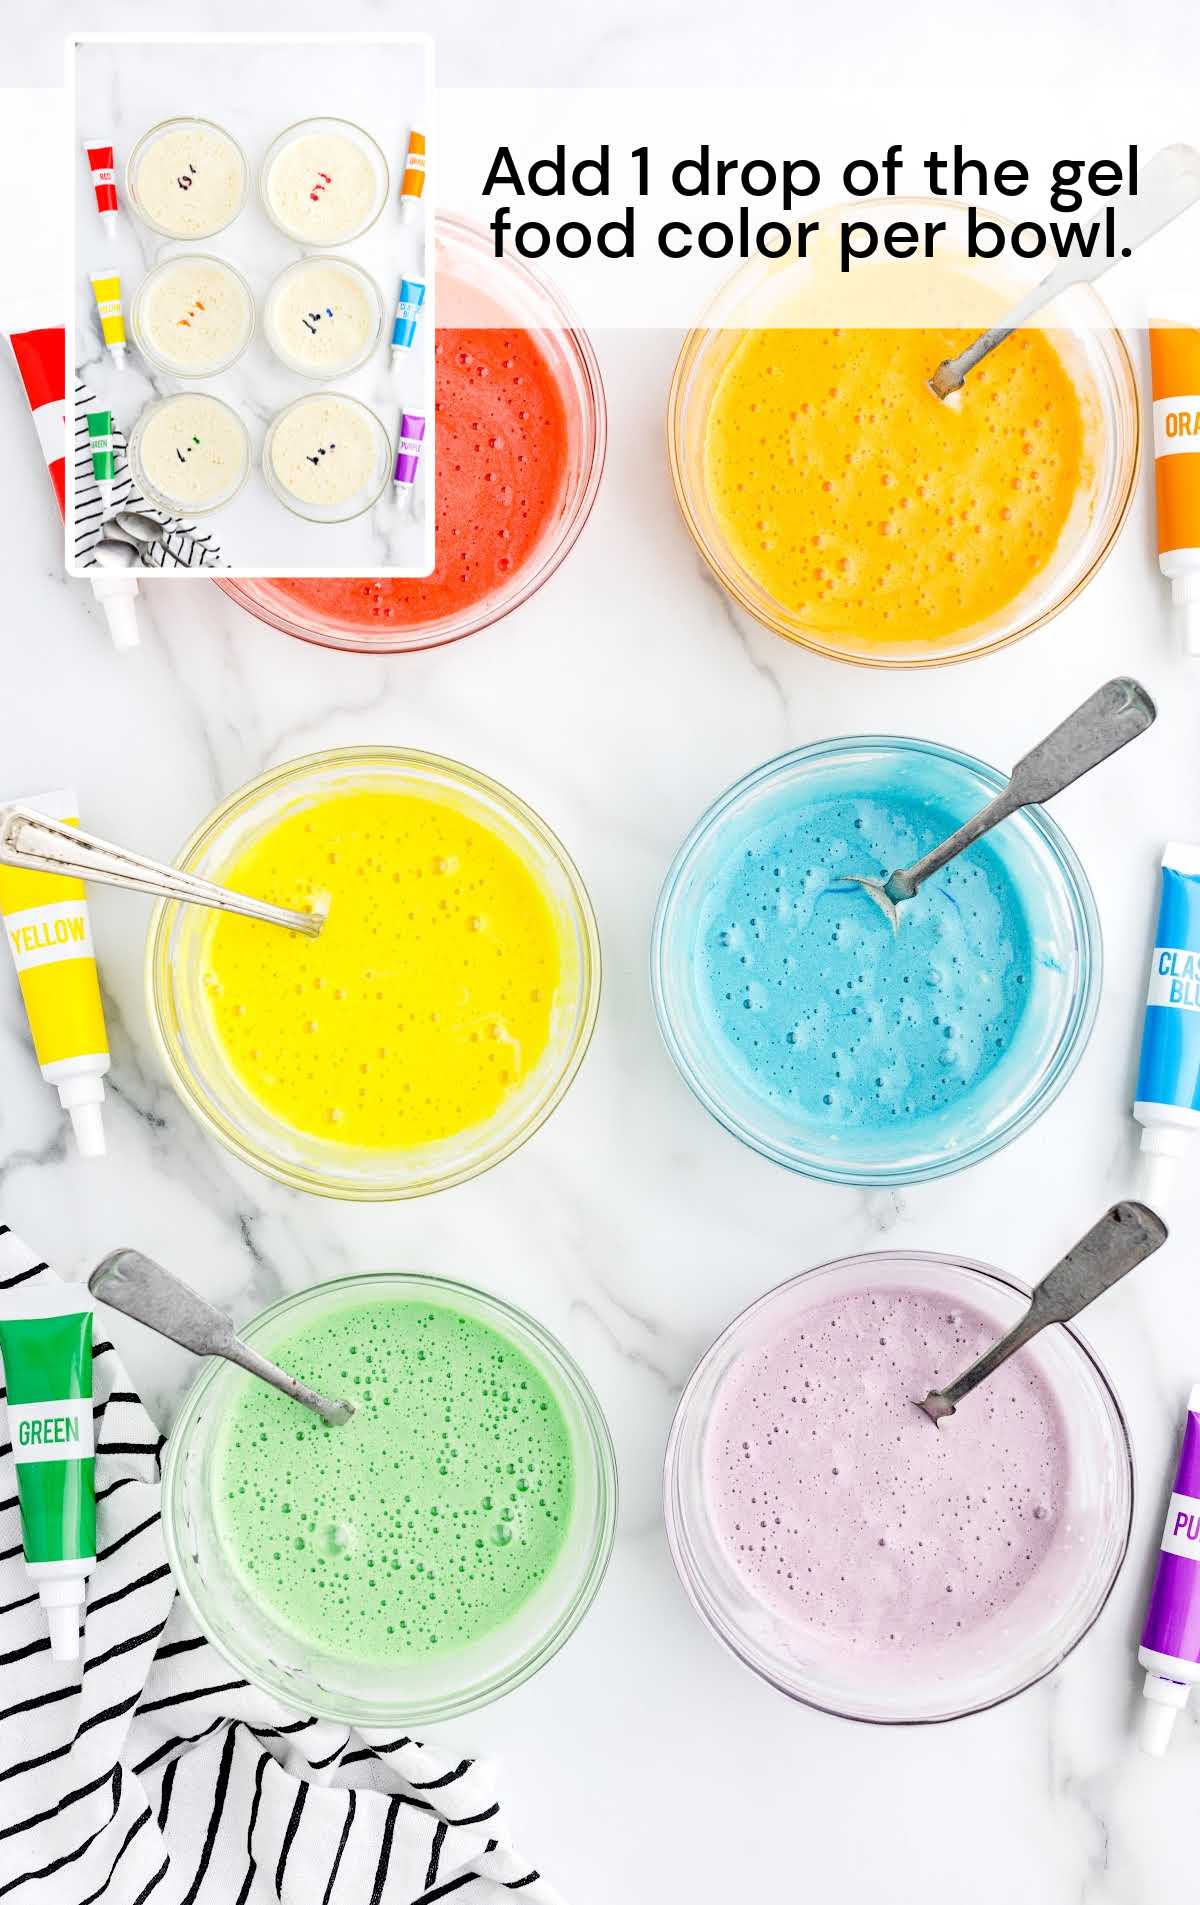
STEP FIVE: Quickly and gently divide the batter between 6 bowls (about ⅔ cup each).
STEP SIX: Add 1 color of the gel food color per bowl. Depending on how dark you want to tint the batter, we recommend 3 to 5 drops. Gently fold the gel into the cake batter.
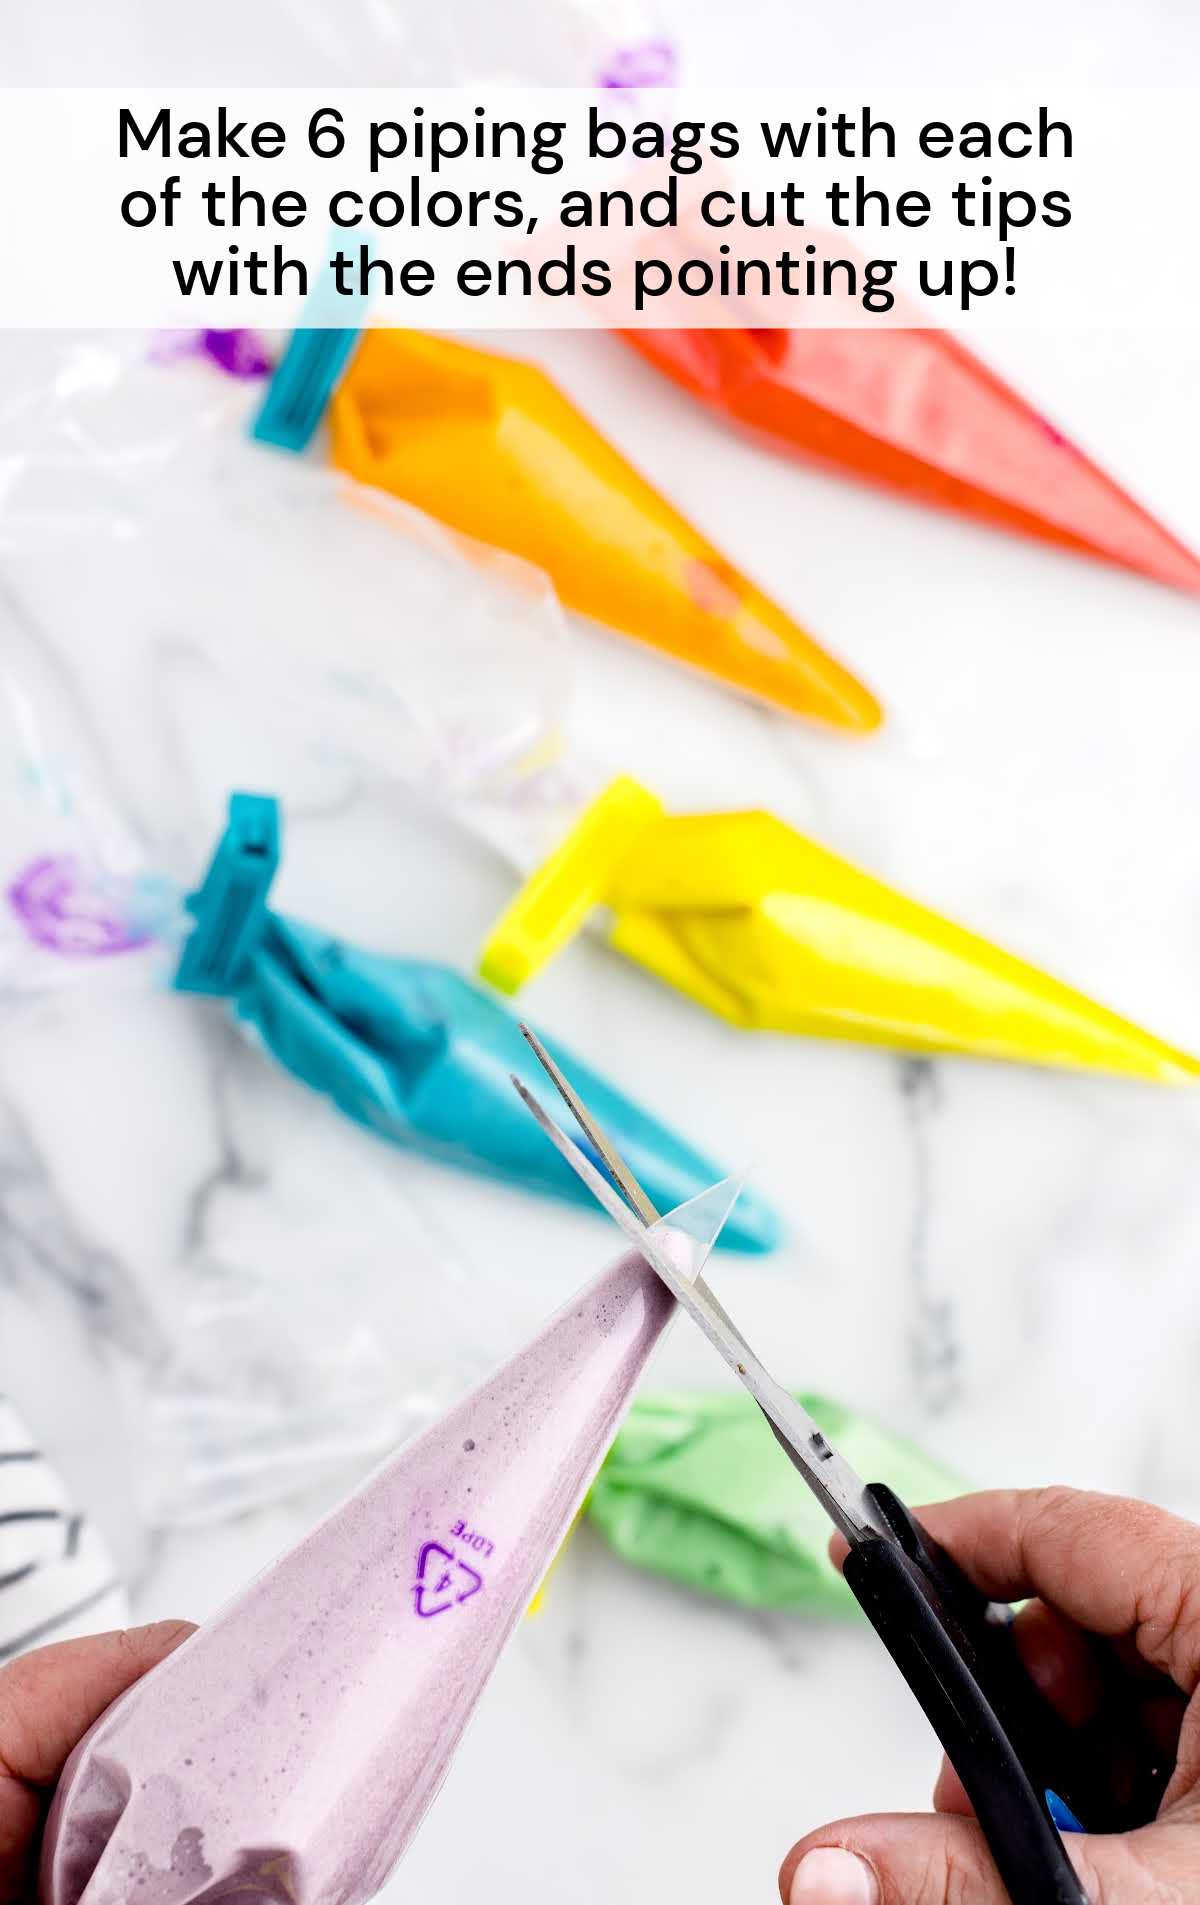
STEP SEVEN: Spoon the individual colors into 6 disposable piping bags or quart-size ziplock bags. Secure the tops of the bags.
PRO TIP: Place each bag in a bowl or cup with the cut end up so the batter doesn’t spill out while piping the layers in the cake pan.
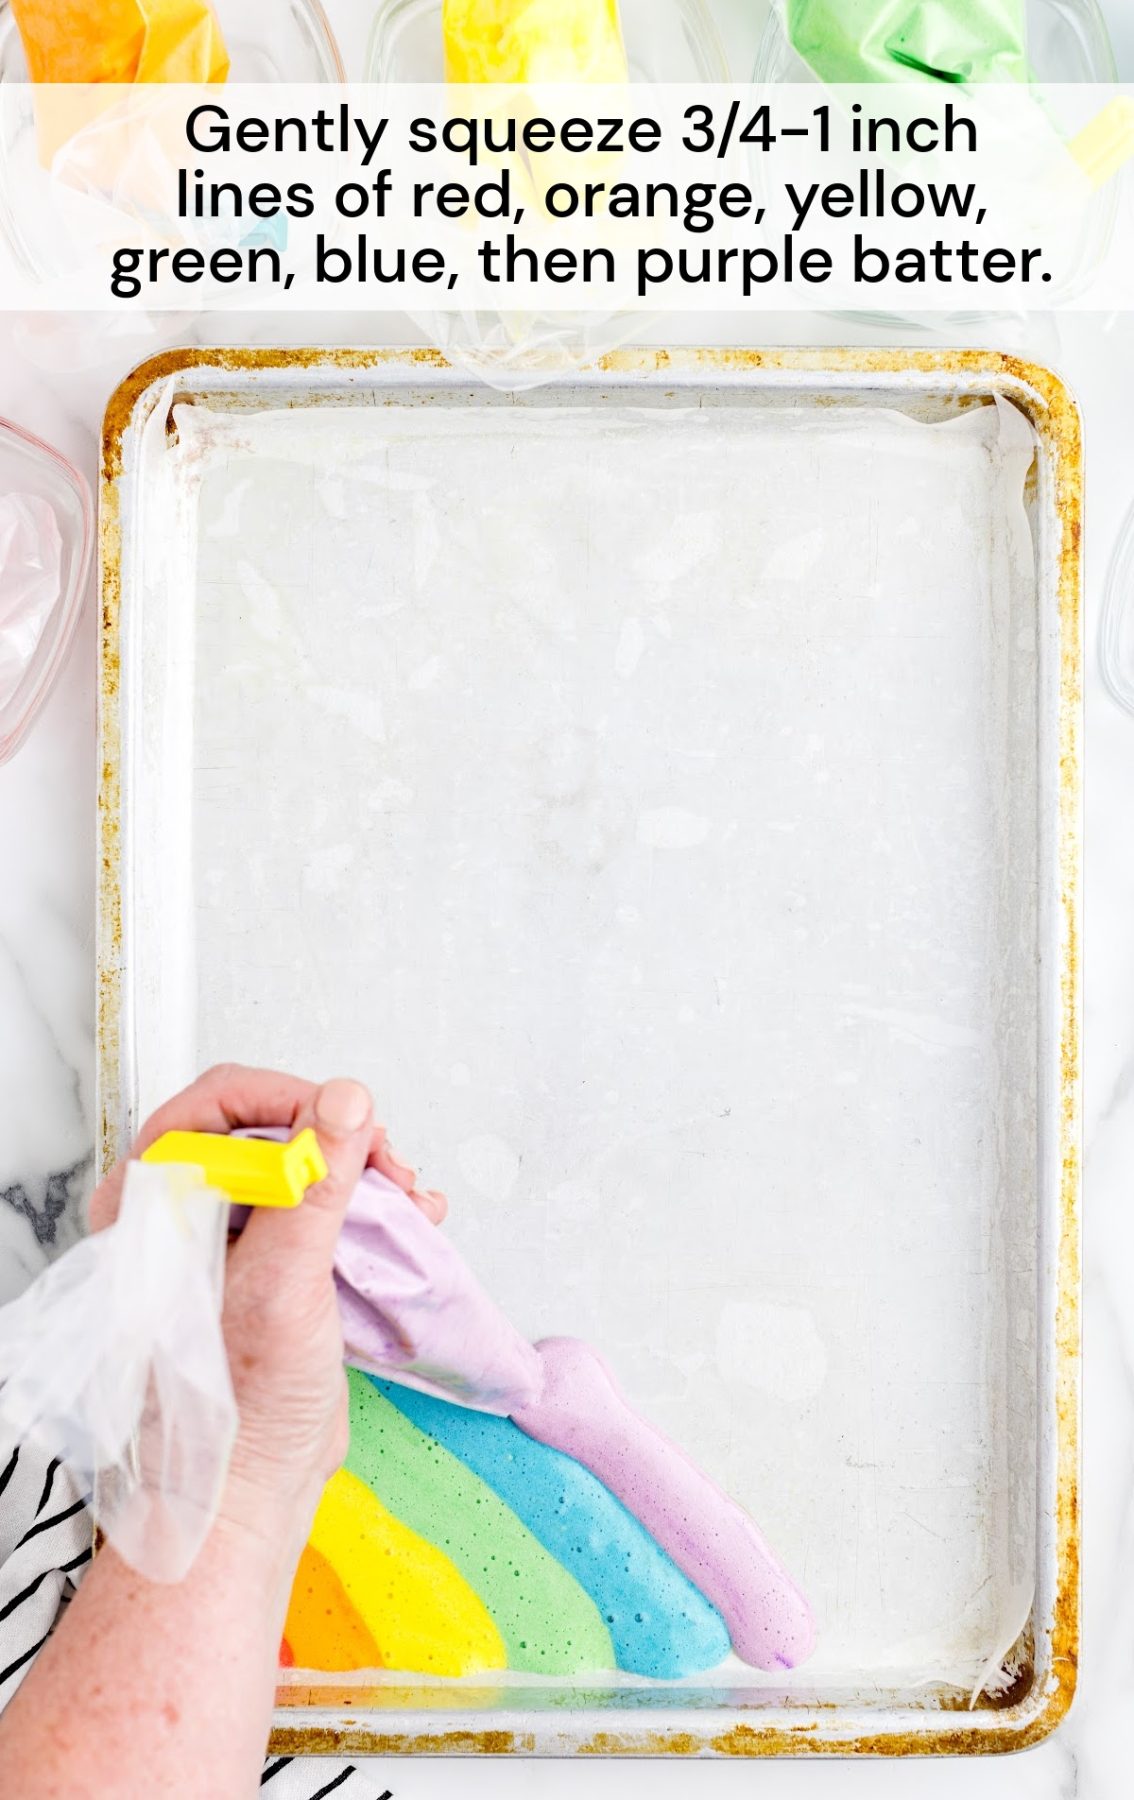
STEP EIGHT: Lightly spray the prepared baking sheet with nonstick spray, paying close attention to the edges.
STEP NINE: Snip off a small corner of the bag. Starting at 1 corner of the prepared baking sheet, gently squeeze a small amount of the red batter. Be sure to keep the line as straight as possible. Next, gently squeeze a line of orange batter ¾ inch-1 inch wide. Next, the yellow, green, blue, and purple. Continue until the pan has been covered. Lightly tap the pan on the counter to remove any air bubbles in the cake batter. Bake for 8 minutes.
PRO TIP: Oven temperatures vary and may need to be recalibrated periodically to ensure they are accurate. Make sure to keep a close eye on your cake as the suggested baking time approaches.
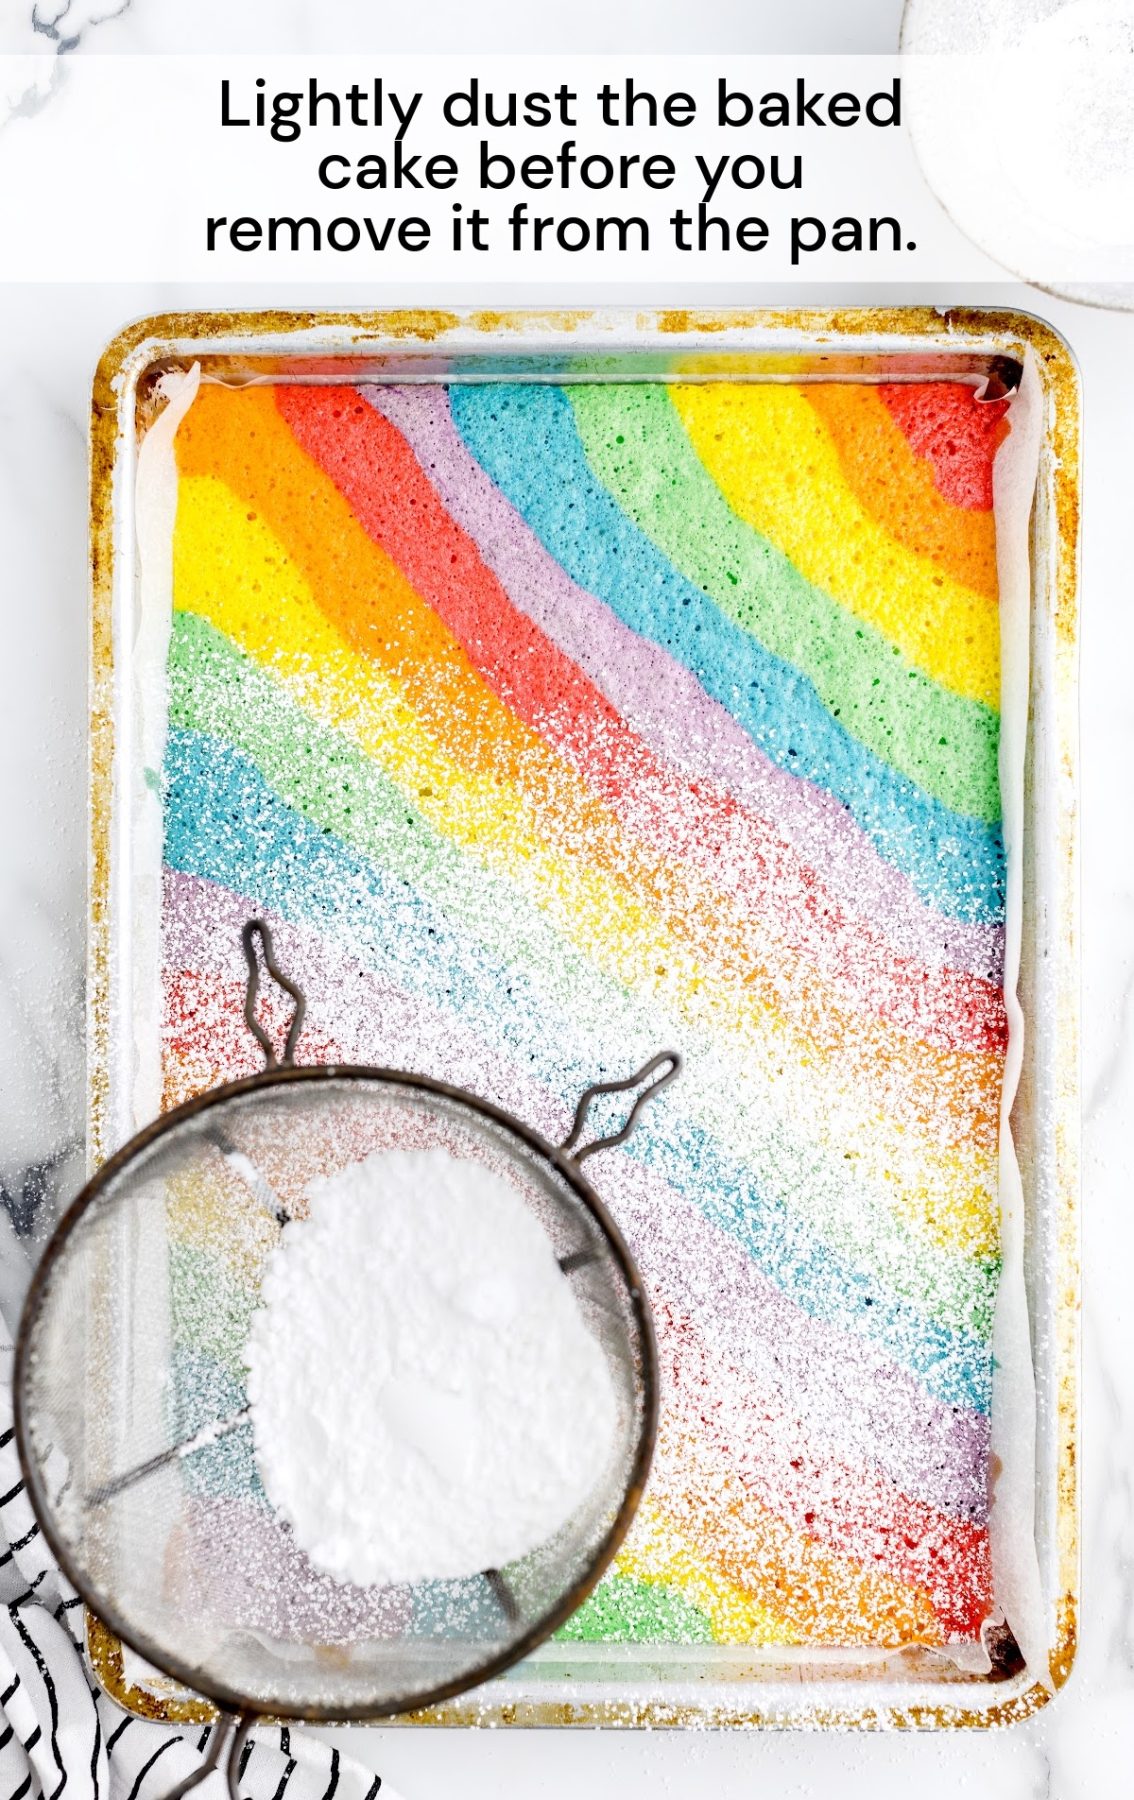
STEP TEN: Remove the pan from the oven. Measure out a piece of parchment paper to roll the cake in. You will need to leave about a 2-inch overhang to begin the cake roll. Lightly dust the baked cake.
STEP ELEVEN: Have a large cutting board or cooling rack ready to aid in the cake transfer.
STEP TWELVE: While the cake is warm, lay the piece of parchment paper over the powdered sugar-dusted cake. Place the cutting board (or cooling rack) on top of the parchment. Carefully flip the cake over so that the cake is resting on the dusted piece of parchment and cutting board/cooling rack.
PRO TIP: You can use a tea towel to wrap the warm cake roll in, but the rainbow colors will stain the tea towel. The parchment paper is disposable and will not stain.
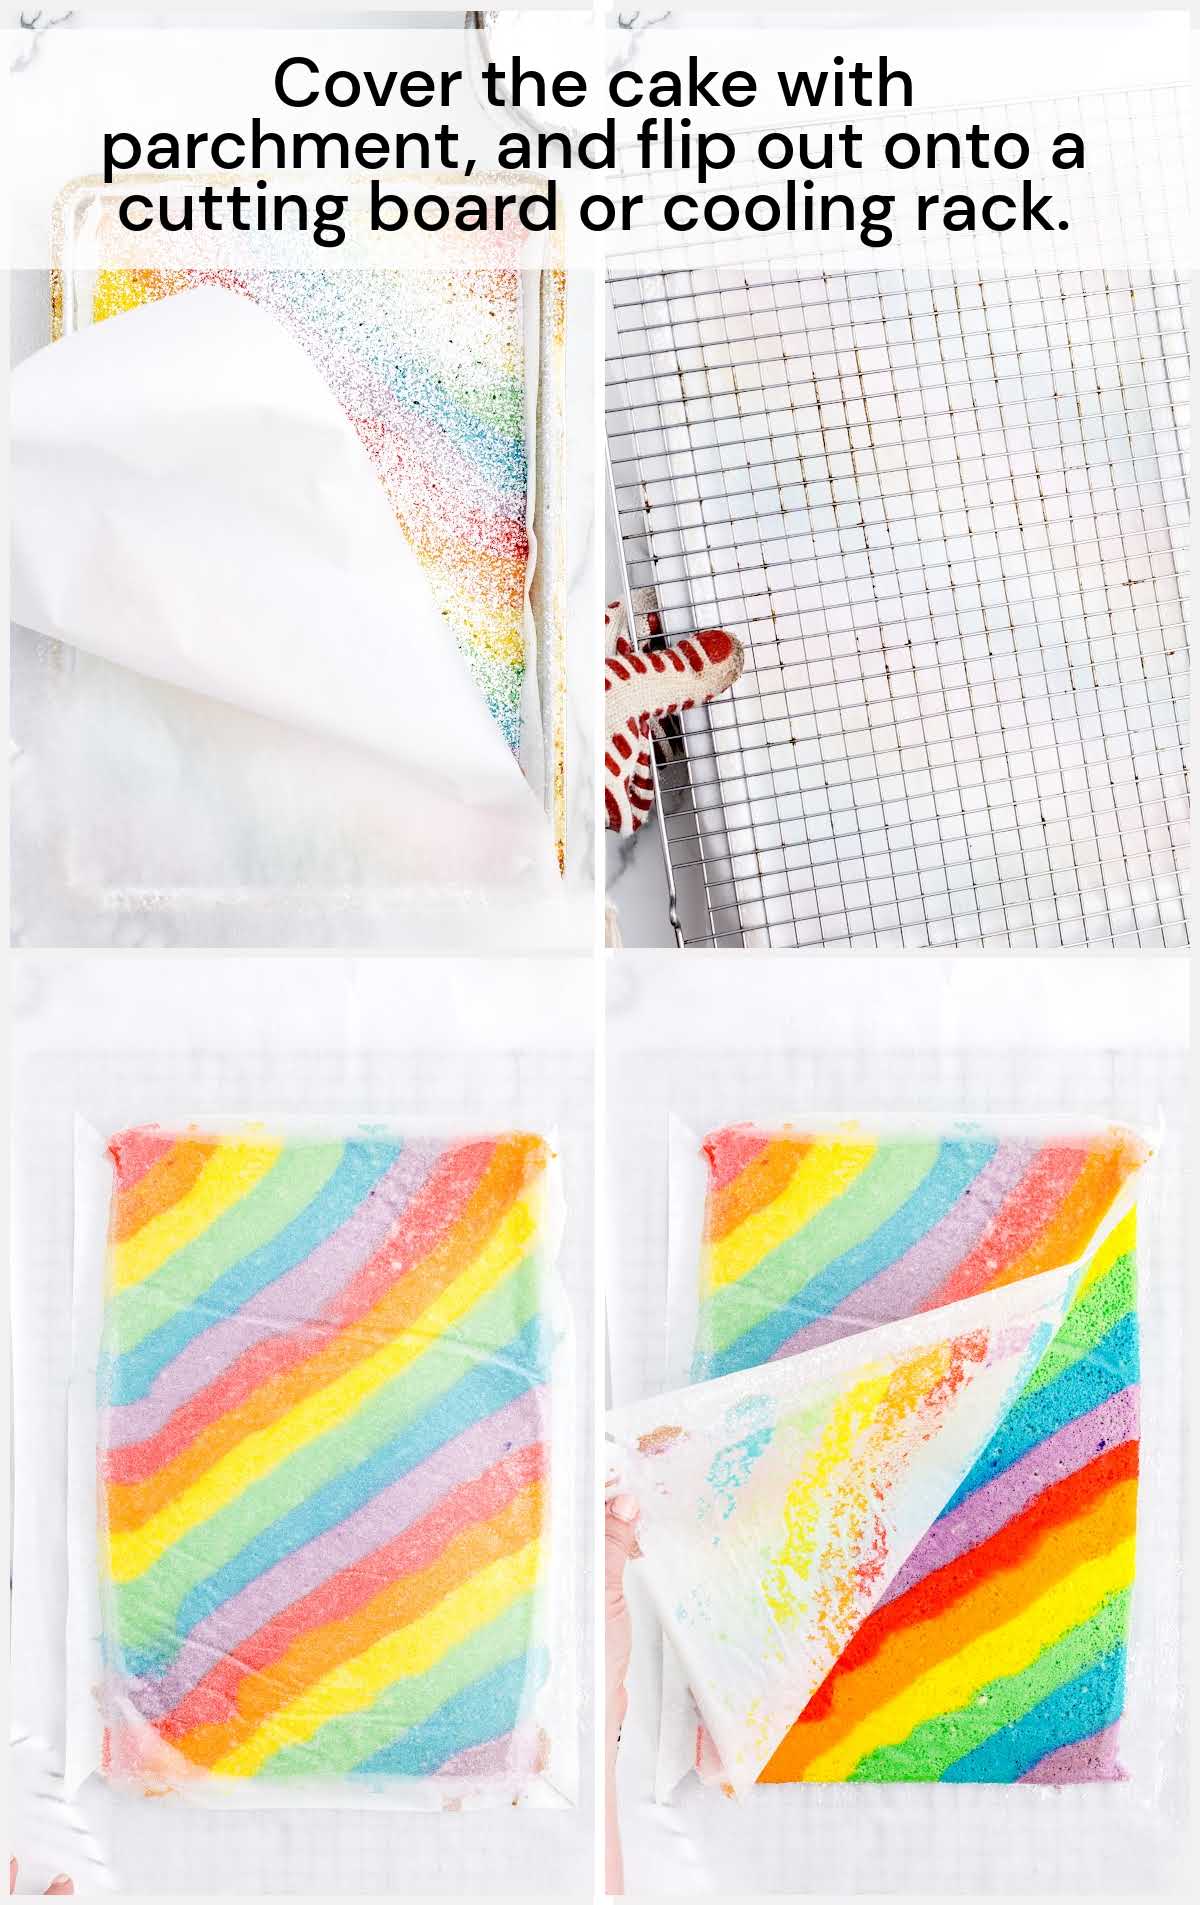
STEP THIRTEEN: Remove the upside-down cake pan, and carefully peel off the parchment paper that the cake was baked on.
STEP FOURTEEN: Fold the overhanging end of the parchment paper up onto the cake and then gently and patiently start rolling the shorter side of the cake towards the other short side. The parchment paper will be rolled up inside the cake. Once rolled, transfer to a cooling rack to finish cooling completely.
PRO TIP: Be patient when rolling and unrolling the cake roll. Unrolling too quickly can cause cracks in the cake.
Buttercream Filling
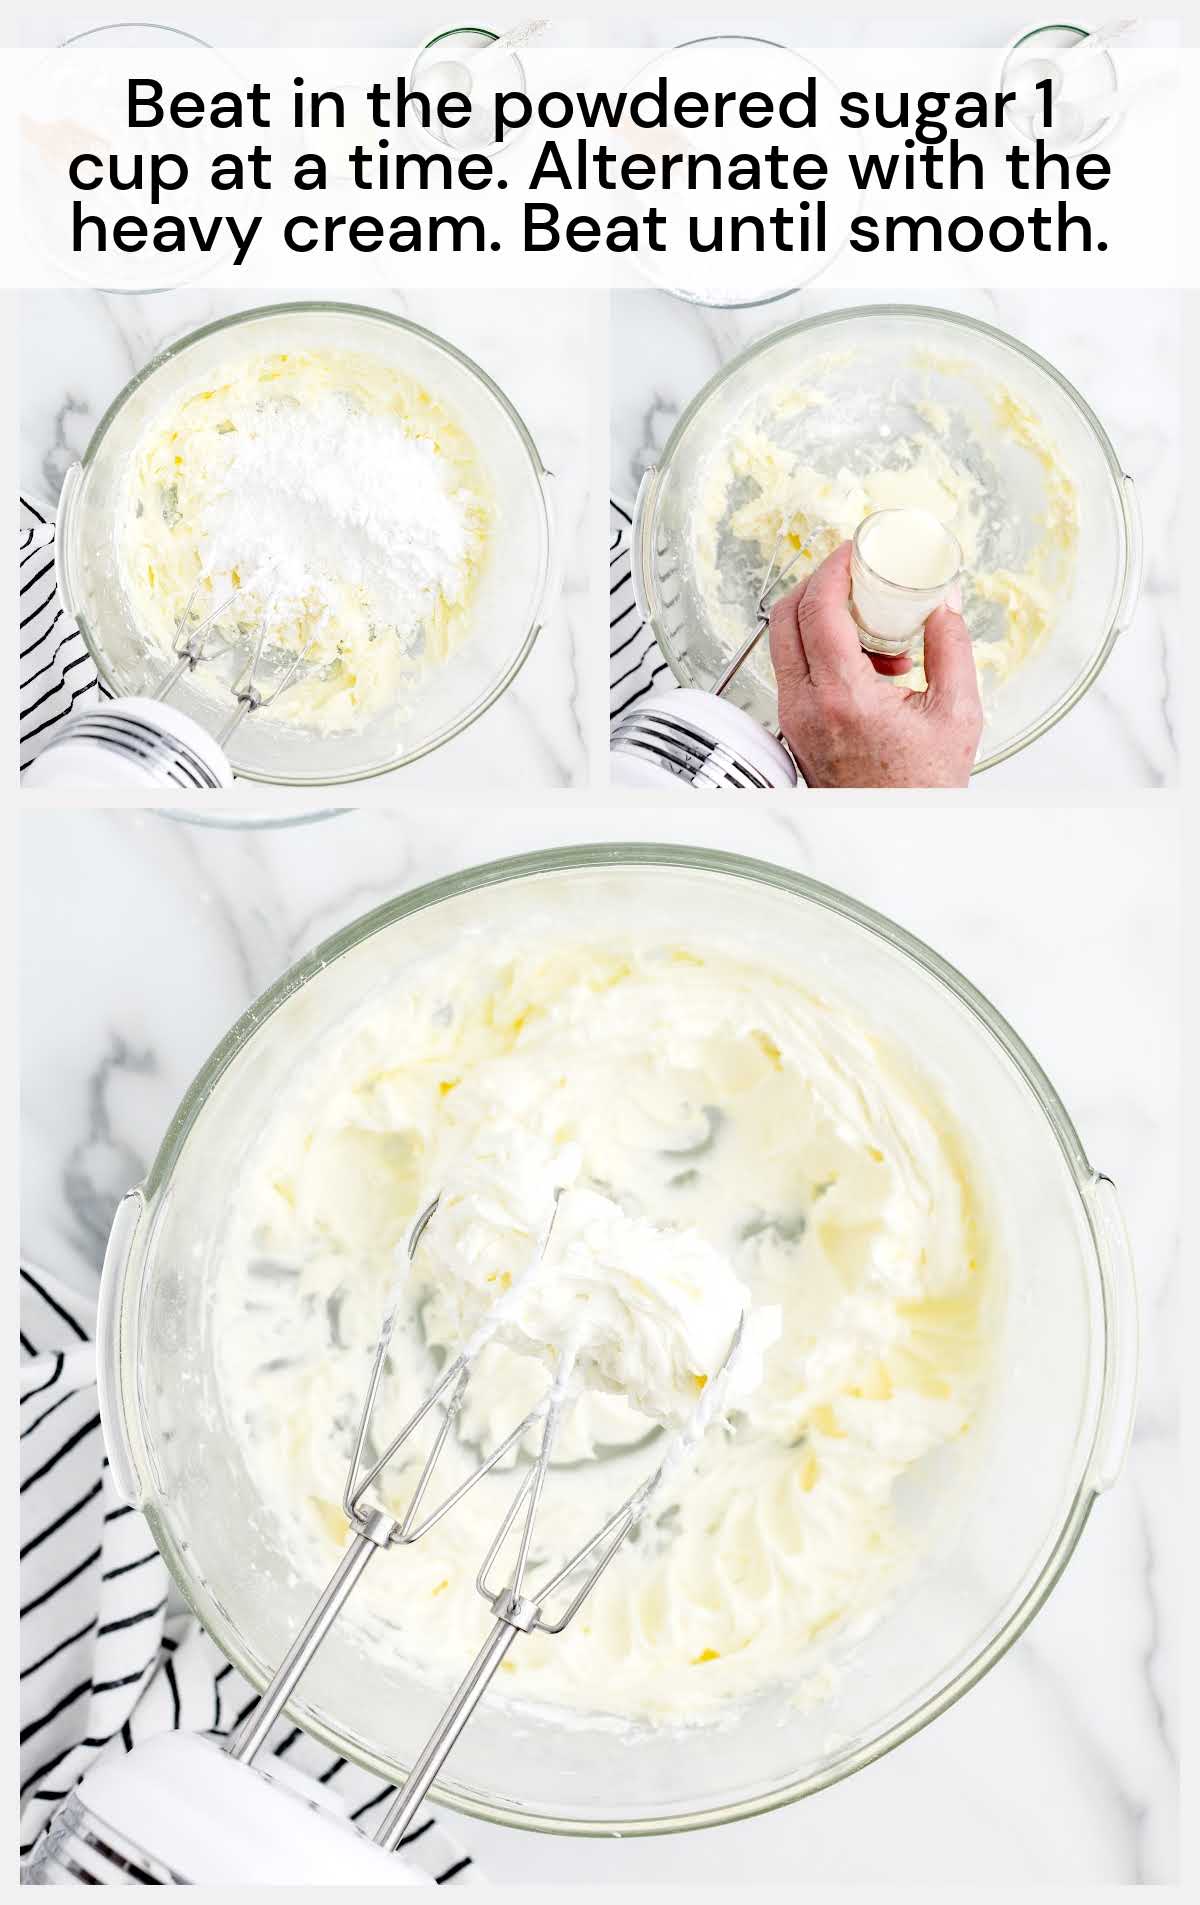
STEP FIFTEEN: Using either a stand mixer or a medium-sized mixing bowl and a handheld mixer on medium-high speed, beat the softened butter for 1 to 1½ minutes until smooth.
STEP SIXTEEN: Add the clear vanilla and the almond extract and continue mixing for another 30 seconds.
STEP SEVENTEEN: Lower the mixer speed to low, and beat in the powdered sugar 1 cup at a time. Alternate with the heavy cream. Increase the speed back up to medium-high and continue mixing for 1 more minute until smooth.
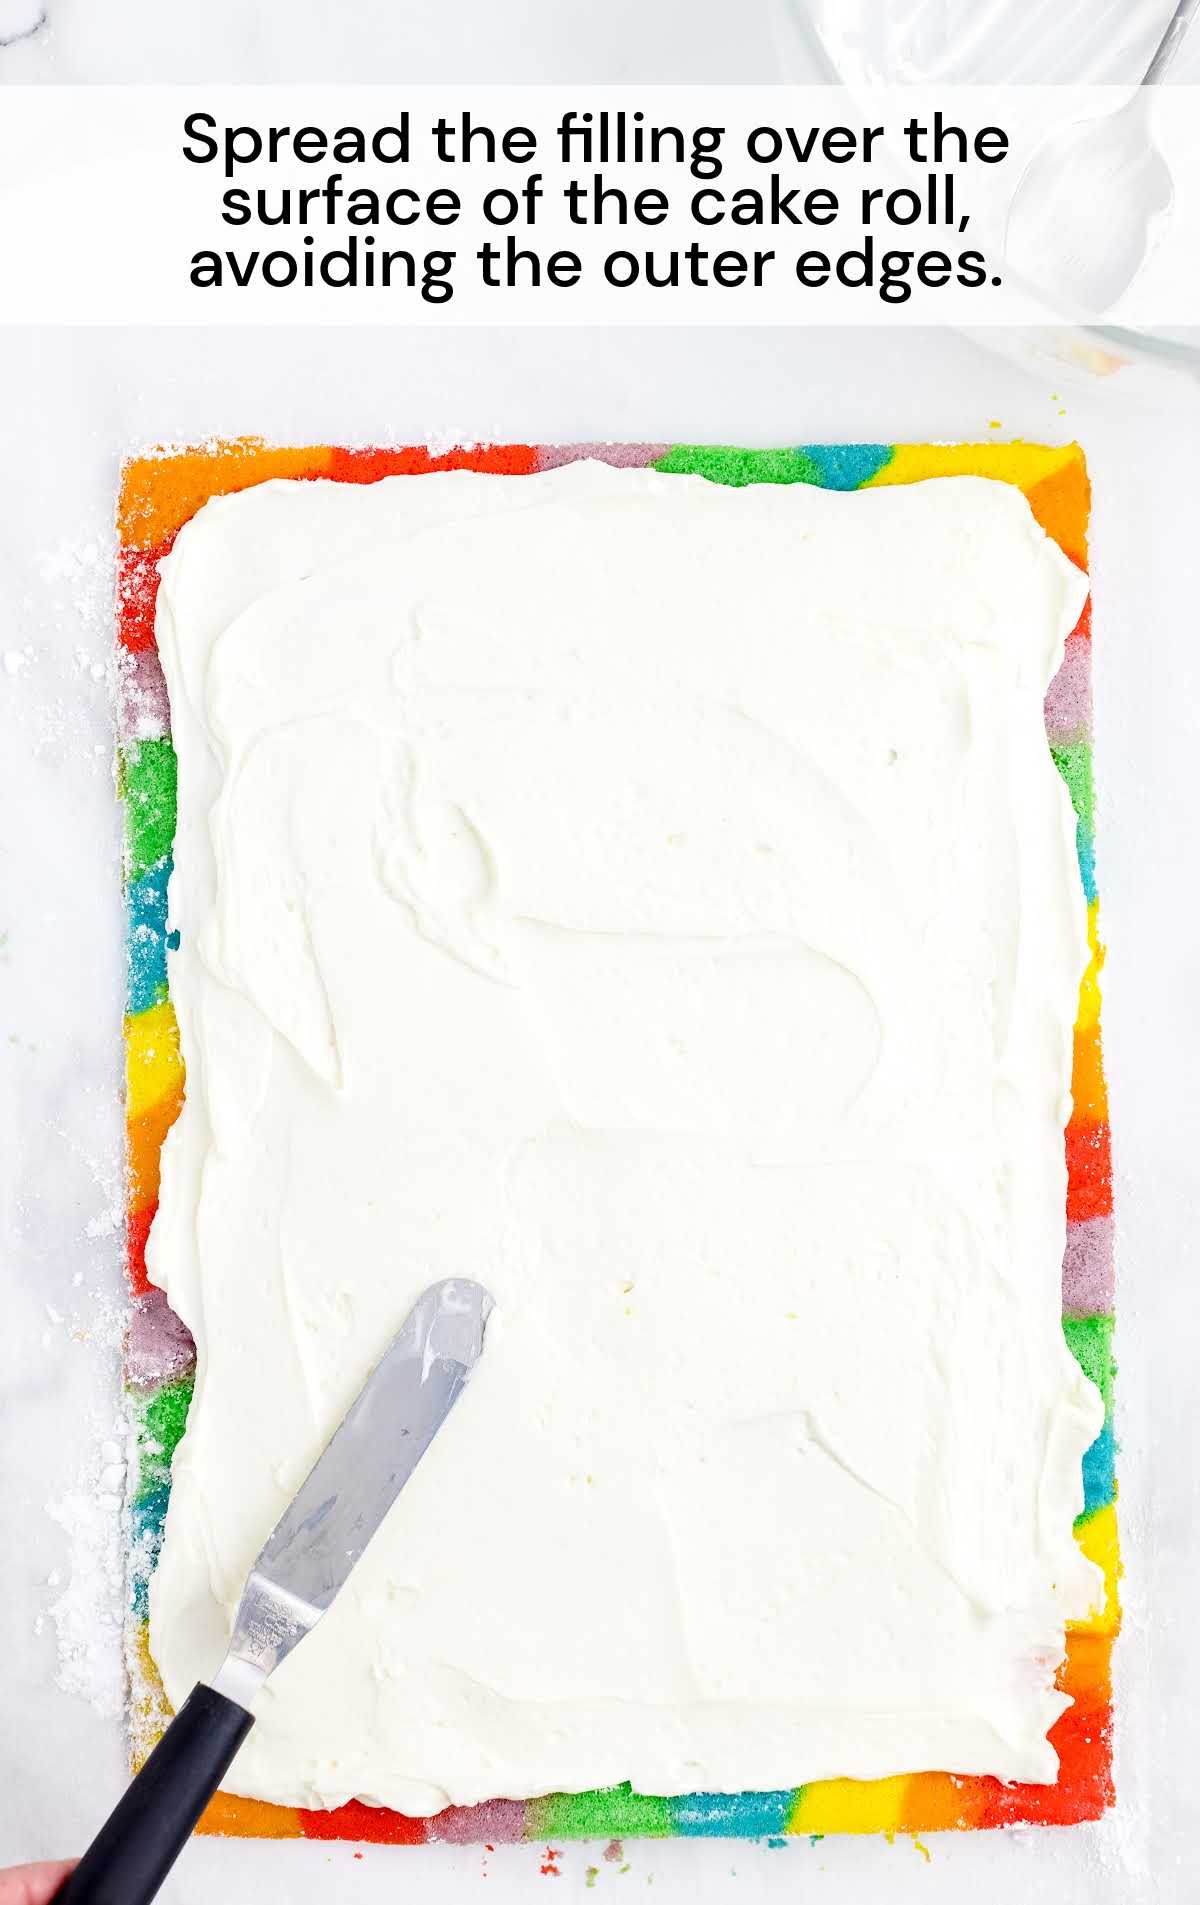
STEP EIGHTEEN: Once the cake has completely cooled, gently unroll the cake. Using either a silicone spatula or an offset spatula, spread the filling over the surface of the cake roll, avoiding the outer edges.
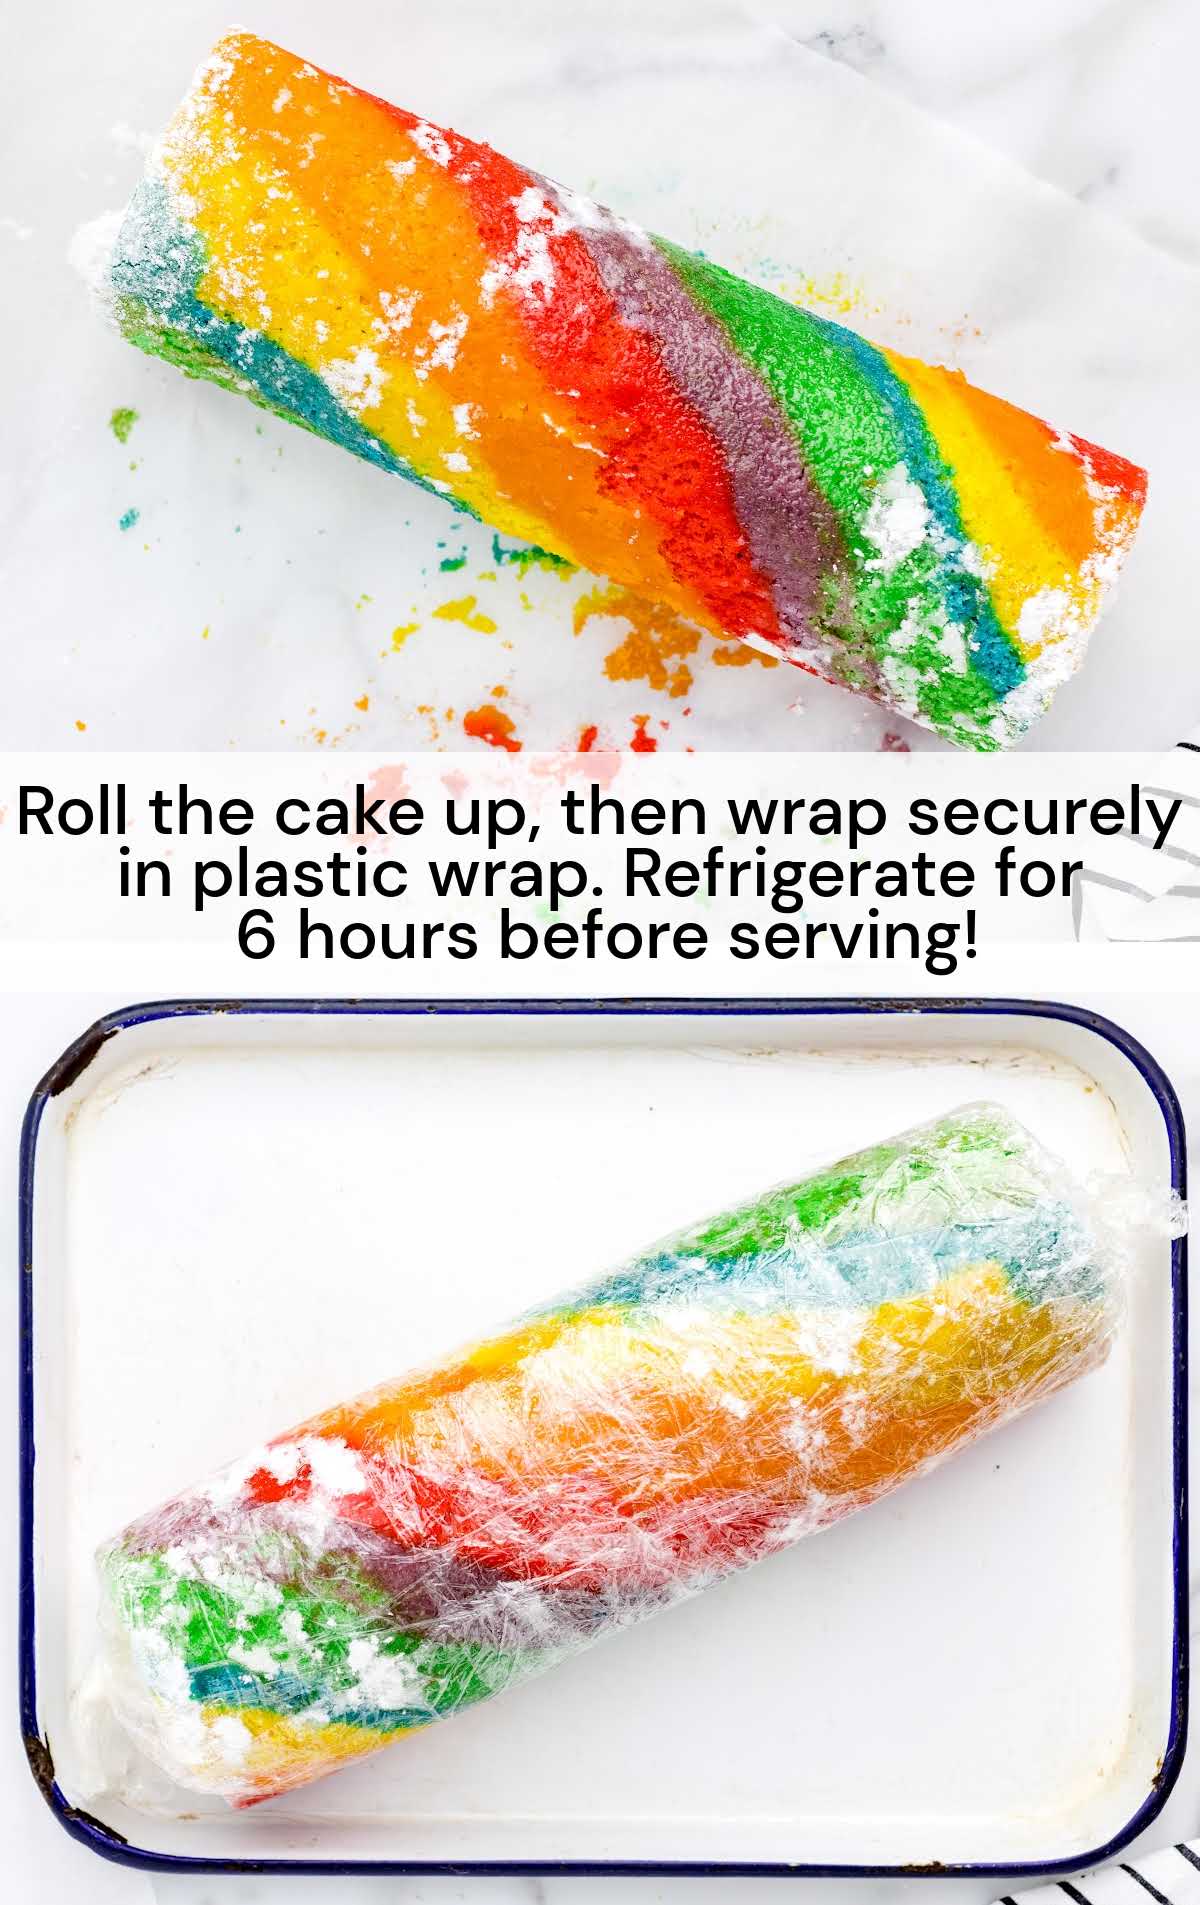
STEP NINETEEN: Tear off 2 sheets of plastic wrap to overlap the long edges and lightly spray with nonstick spray. This is for tightly wrapping the filled cake roll.
STEP TWENTY: Slowly roll the cake back up as before. Transfer the cake roll to the prepared plastic wrap. Roll the finished cake roll up in the plastic wrap. Once finished wrapping, twist the ends tightly to seal the cake roll securely. Chill in the refrigerator for 6 hours. Remove just before serving to slice the cake into ten ½-inch slices.
How to Serve Rainbow Roll Cake
This whimsical rainbow roll cake would be a fun cake for a birthday or party. Serve it with a scoop of vanilla ice cream on the side and a spoonful of whipped cream on top. Pair it with a cup of coffee or a glass of iced tea. A fantastic way to celebrate any occasion, this beautiful cake is a treat to slice and serve.
Storage
IN THE FRIDGE: Store any leftovers in an airtight container in the refrigerator for up to 5 days.
IN THE FREEZER: You can freeze the cake roll for up to 3 months. Wrap the plastic-wrapped cake roll in a layer of aluminum foil. Allow the cake roll to thaw in the refrigerator overnight before serving.
Rainbow roll cake, with its vibrant rainbow stripes, is moist and sweet with a creamy buttercream filling inside. Whether you’re a kitchen novice or an experienced baker, it’s surprisingly easy to create a beautiful rainbow swiss roll cake at home with just a few simple steps. Get ready to impress your friends and family with this alluring show-stopper!
FREQUENTLY ASKED QUESTIONS
Is a jelly roll pan the same as a baking sheet?
A jelly roll pan is different from a baking sheet. It’s important to use a 10×15-inch jelly roll pan for this cake as you want it to be nice and thin. A baking sheet will not work for this recipe.
Can I freeze this rainbow cake roll?
This easy rainbow roll recipe can be frozen, and well-wrapped, for up to four months.
Why did my rainbow roll crack?
Your cake needs to be rolled into the towel as soon as it comes out of the oven. When the cake is rolled while warm, the heat and moisture will help give you a crack-free cake. The cake is much more likely to crack if it is rolled when cooled.
MORE RECIPES YOU’LL LOVE

Rainbow Roll Cake
Rainbow roll cake is a whimsical, bright cake that is moist and sweet with a creamy buttercream filling inside.
Ingredients
Rainbow Cake
- ¾ cup all-purpose flour
- 1 teaspoon baking powder
- ½ teaspoon salt
- 4 large eggs room temperature
- ½ cup granulated sugar
- 3 tablespoons vegetable oil
- 1½ teaspoons pure vanilla extract
- ½ teaspoon pure almond extract
- gel food coloring red, orange, yellow, green, blue, and purple
- Powdered sugar for dusting
Buttercream Filling
- ¾ cup salted sweet cream butter softened
- 1 teaspoon clear vanilla flavoring
- ½ teaspoon almond extract
- 2 cups powdered sugar
- 2 tablespoons heavy cream
Instructions
Rainbow Cake
- Preheat the oven to 350°F. Line a 10x15x1-inch baking sheet (jelly roll pan) with parchment paper. Set it aside.
- Add the flour, baking powder, and salt to a small mixing bowl. Whisk to combine.
- Using either a stand mixer or a medium-sized mixing bowl and a handheld mixer on high speed, beat together the eggs, sugar, vegetable oil, vanilla, and almond extract for 5 to 6 minutes, until thickened and light yellow.
- Gently fold in the flour mixture until combined.
- Quickly and gently divide the batter between 6 bowls (about ⅔ cup each).
- Add 1 color of the gel food color per bowl. Depending on how dark you want to tint the batter, we recommend 3 to 5 drops. Gently fold the gel into the cake batter.
- Spoon the individual colors into 6 disposable piping bags or quart-size ziplock bags. Secure the tops of the bags.
- Lightly spray the prepared baking sheet with nonstick spray, paying close attention to the edges.
- Snip off a small corner of the bag. Starting at 1 corner of the prepared baking sheet, gently squeeze a small amount of the red batter. Be sure to keep the line as straight as possible. Next, gently squeeze a line of orange batter ¾ inch-1 inch wide. Next, the yellow, green, blue, and purple. Continue until the pan has been covered. Lightly tap the pan on the counter to remove any air bubbles in the cake batter. Bake for 8 minutes.
- Remove the pan from the oven. Measure out a piece of parchment paper to roll the cake in. You will need to leave about a 2-inch overhang to begin the cake roll. Lightly dust the baked cake.
- Have a large cutting board or cooling rack ready to aid in the cake transfer.
- While the cake is warm, lay the piece of parchment paper over the powdered sugar-dusted cake. Place the cutting board (or cooling rack) on top of the parchment. Carefully flip the cake over so that the cake is resting on the dusted piece of parchment and cutting board/cooling rack.
- Remove the upside-down cake pan, and carefully peel off the parchment paper that the cake was baked on.
- Fold the overhanging end of the parchment paper up onto the cake and then gently and patiently start rolling the shorter side of the cake towards the other short side. The parchment paper will be rolled up inside the cake. Once rolled, transfer to a cooling rack to finish cooling completely.
Buttercream Filling
- Using either a stand mixer or a medium-sized mixing bowl and a handheld mixer on medium-high speed, beat the softened butter for 1 to 1½ minutes until smooth.
- Add the clear vanilla and the almond extract and continue mixing for another 30 seconds.
- Lower the mixer speed to low, and beat in the powdered sugar 1 cup at a time. Alternate with the heavy cream. Increase the speed back up to medium-high and continue mixing for 1 more minute until smooth.
- Once the cake has completely cooled, gently unroll the cake. Using either a silicone spatula or an offset spatula, spread the filling over the surface of the cake roll, avoiding the outer edges.
- Tear off 2 sheets of plastic wrap to overlap the long edges and lightly spray with nonstick spray. This is for tightly wrapping the filled cake roll.
- Slowly roll the cake back up as before. Transfer the cake roll to the prepared plastic wrap. Roll the finished cake roll up in the plastic wrap. Once finished wrapping, twist the ends tightly to seal the cake roll securely. Chill in the refrigerator for 6 hours. Remove just before serving to slice the cake into ten ½-inch slices.
Notes
Make sure you are using an actual jelly roll pan. You cannot substitute a cookie sheet for a jelly roll pan as it will not produce the cake you are hoping for.
It is very important to be gentle when folding in the flour and the color. It’s important to keep as much of the air bubbles in the batter as possible to keep the cake fluffy.
Place each bag in a bowl or cup with the cut end up so the batter doesn’t spill out while piping the layers in the cake pan.
Oven temperatures vary and may need to be recalibrated periodically to ensure they are accurate. Make sure to keep a close eye on your cake as the suggested baking time approaches.
You can use a tea towel to wrap the warm cake roll in, but the rainbow colors will stain the tea towel. The parchment paper is disposable and will not stain.
Be patient when rolling and unrolling the cake roll. Unrolling too quickly can cause cracks in the cake.


Leave a Comment