Published on
Oreo Balls

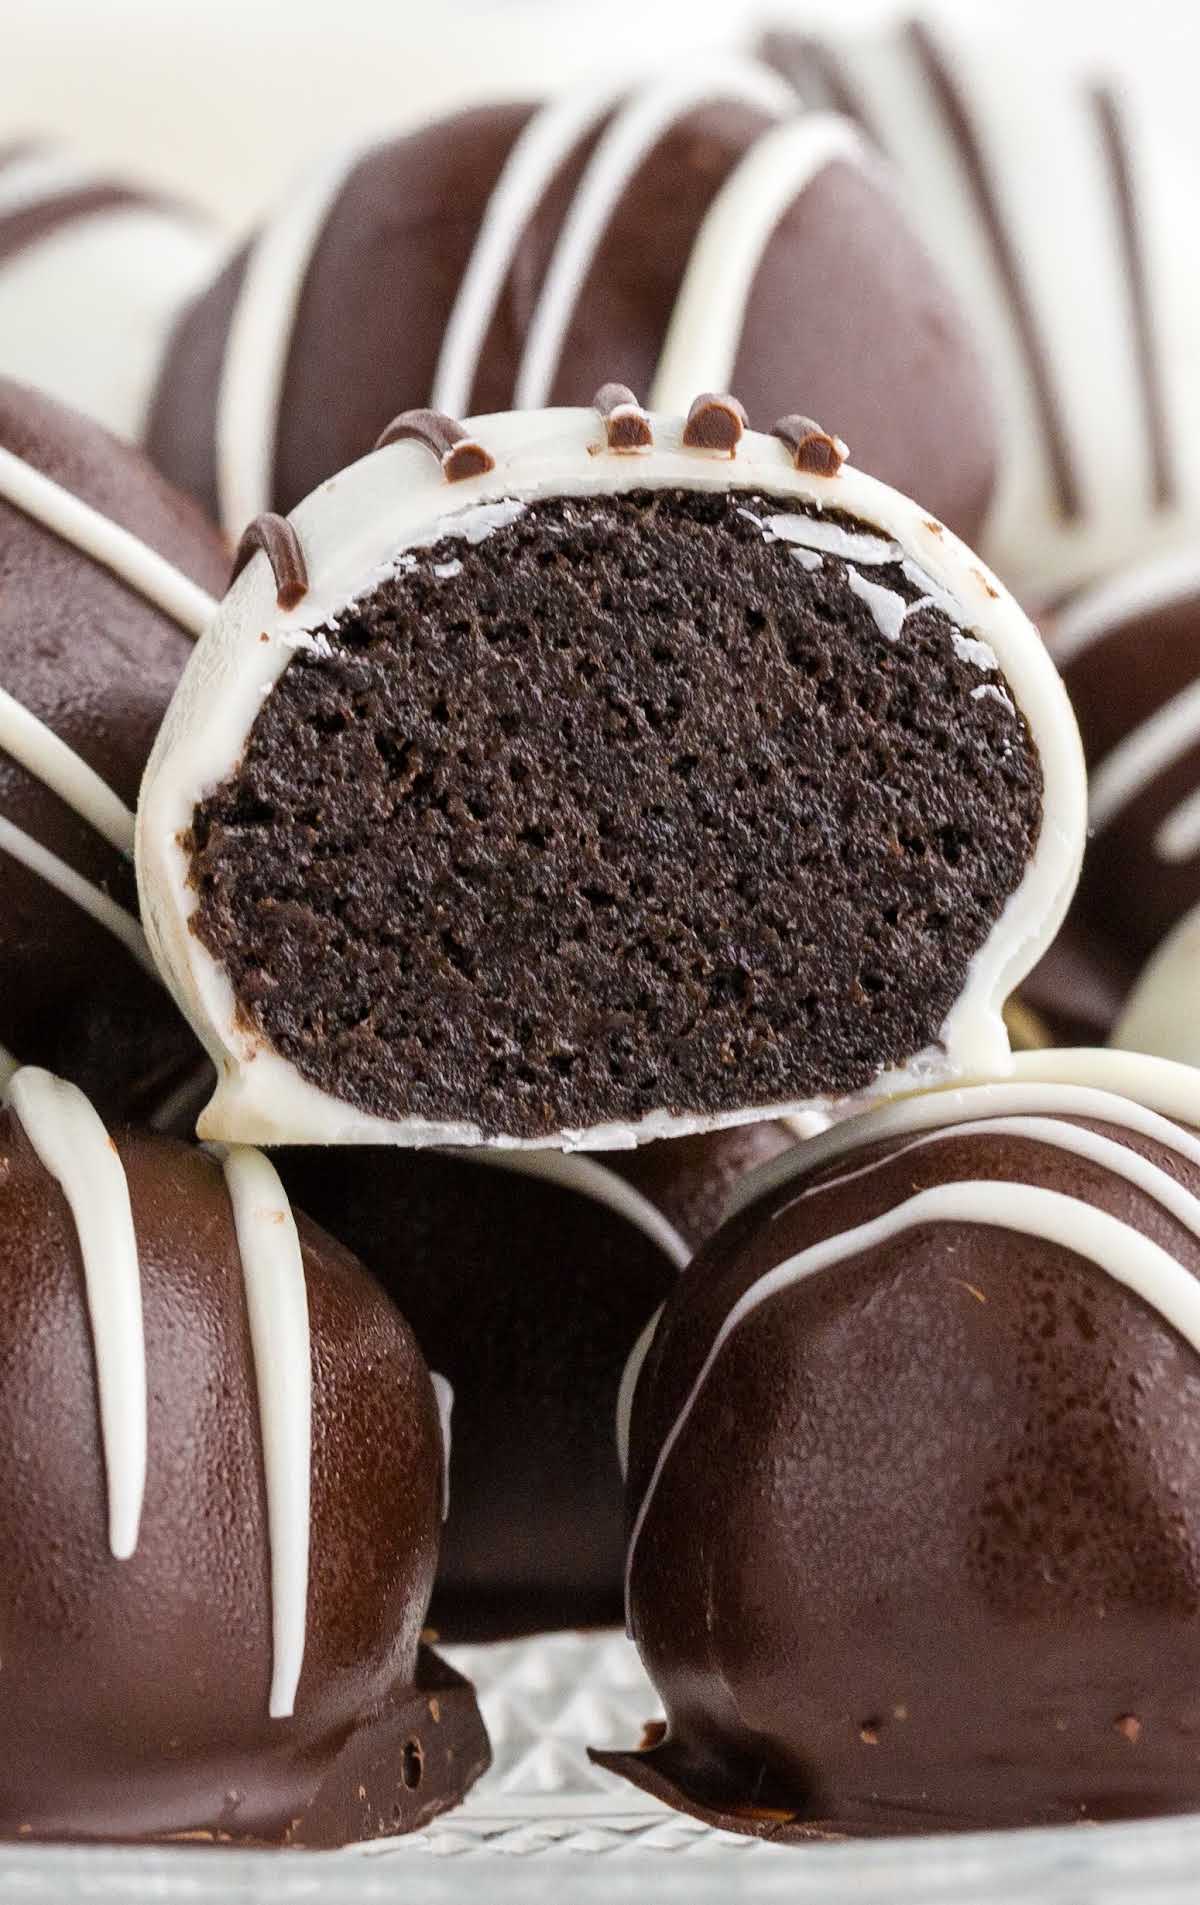
Oreo balls are bite-sized delicacies with an Oreo-infused cream cheese wrapped in a rich chocolate coating. Decadent and delicious, they are a favorite no-bake treat.
Jump to RecipeTable of Contents
Oreo balls are an irresistible, easy-to-make, no-bake treat that is like a cross between a cake pop and a truffle. With all the classic flavors of Oreo cookies wrapped in a small bundle covered in chocolate, these delectable Oreo balls will be a huge hit any time of year. Everyone will love taking a bite out of these sweet bite-size confections.

Looking for more recipes that taste like little bites of heaven? Peanut Butter Balls, Pecan Pie Balls, and Baileys Cheesecake Balls are three more recipes you’ll want to try.
Oreo Balls Ingredients

You will need:
- 1 package Oreo cookies about 36 cookies
- 8 ounces cream cheese cut into pieces and softened
- 1 teaspoon vanilla extract
- 1½ cups dark or milk chocolate melting wafers we love the Ghirardelli brand
- 1½ cups white chocolate melting wafers
PRO TIP: The Ghirardelli brand of chocolate wafers that come in a 10-ounce bag measures out to 1½ cups.
Substitutions and Additions
CHOCOLATE: If you prefer to use chocolate chips (and/or white chocolate chips) instead of the melting chocolate for the chocolate coating, follow the same instructions for melting and dipping, but add about 1 teaspoon of shortening per cup of chips when melting.
PEPPERMINT: Turn these delicious treats into a peppermint version by adding a little peppermint extract to the Oreo and cream cheese mixture.
How to Make Oreo Balls
PRO TIP: You can make these ahead of time, but sometimes the chocolate forms condensation on the outside of it after it has been placed in the freezer. For the best presentation, serve Oreo balls within a couple of hours of making them and keep cool.
STEP ONE: Place Oreo cookies in the bowl of a food processor and pulse until they have been broken down into fine, even crumbs.
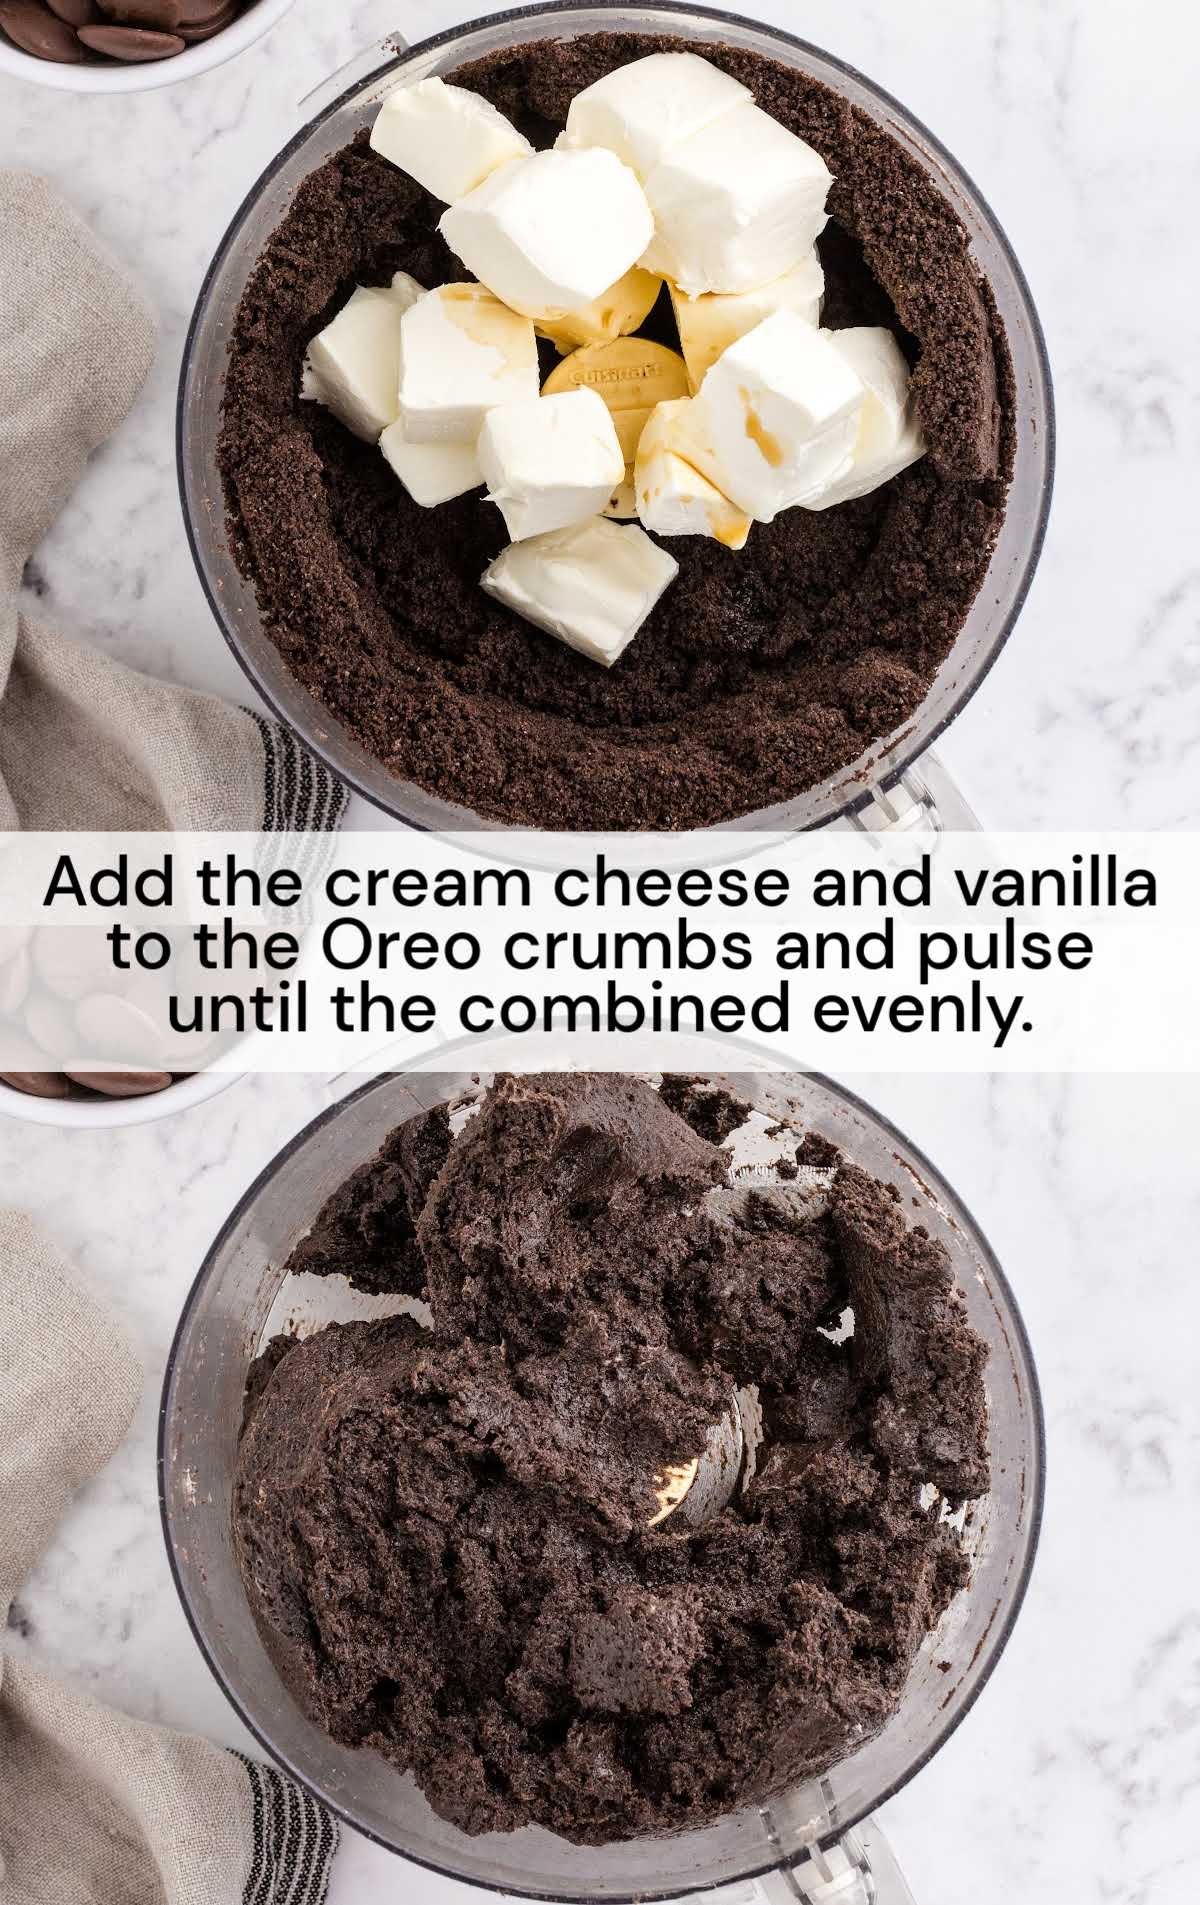
STEP TWO: Add the cream cheese and vanilla extract directly to the Oreo crumbs and pulse until the mixture combines evenly and comes together, making a “dough.”
PRO TIP: Make sure you are using room temperature cream cheese so that you don’t end up with lumps in the filling.
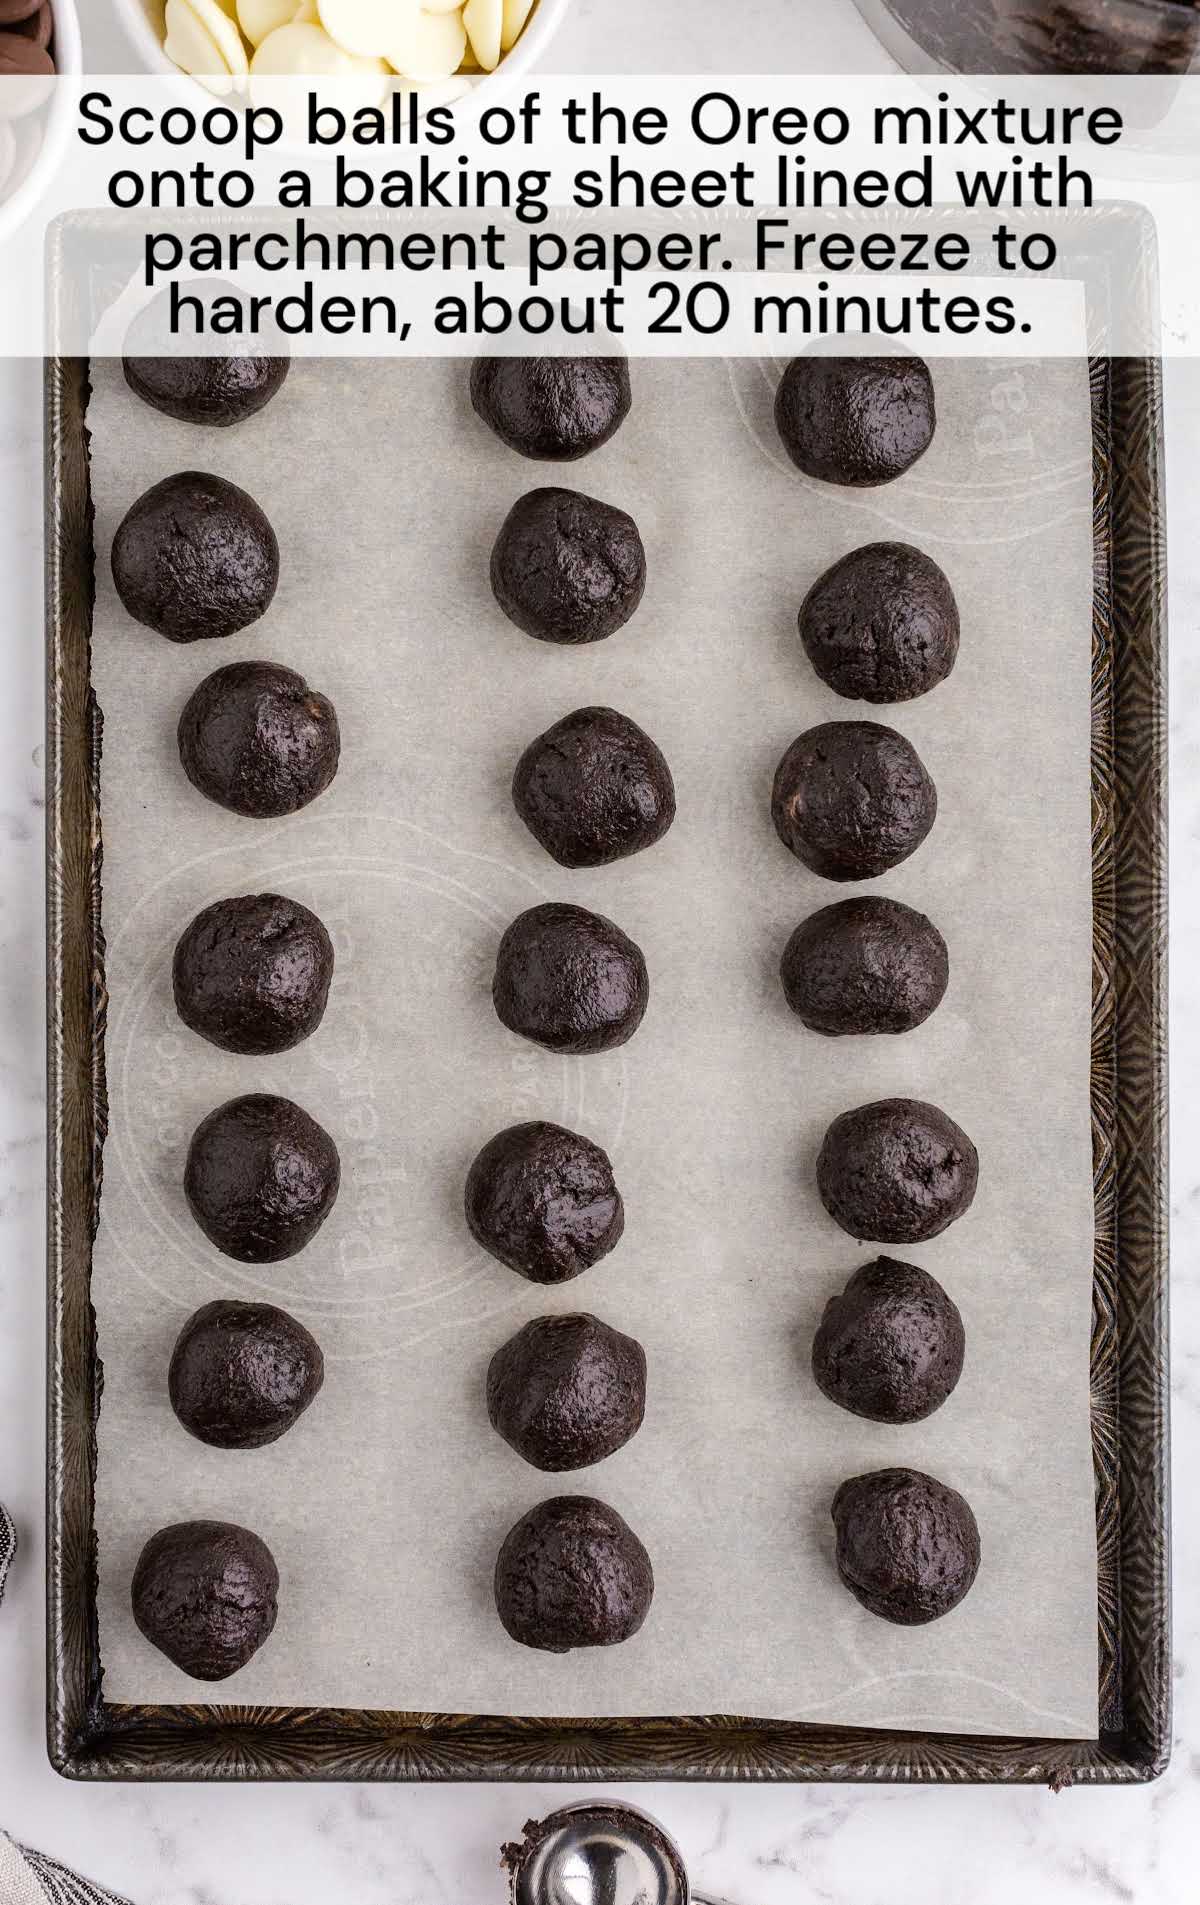
STEP THREE: Use a 1½ tablespoon cookie scoop to scoop balls of the Oreo mixture onto a baking sheet lined with parchment paper. Use your hands to roll them into smooth balls, if desired.
PRO TIP: Use parchment paper to place the balls on so that they do not stick to the baking sheet.
STEP FOUR: Place the baking sheet with Oreo balls into the freezer to harden for about 20 minutes.
STEP FIVE: Once the balls are firmed up, place the melting wafers into a microwave-safe bowl. (Keep the milk chocolate and white chocolate wafers in separate bowls.)
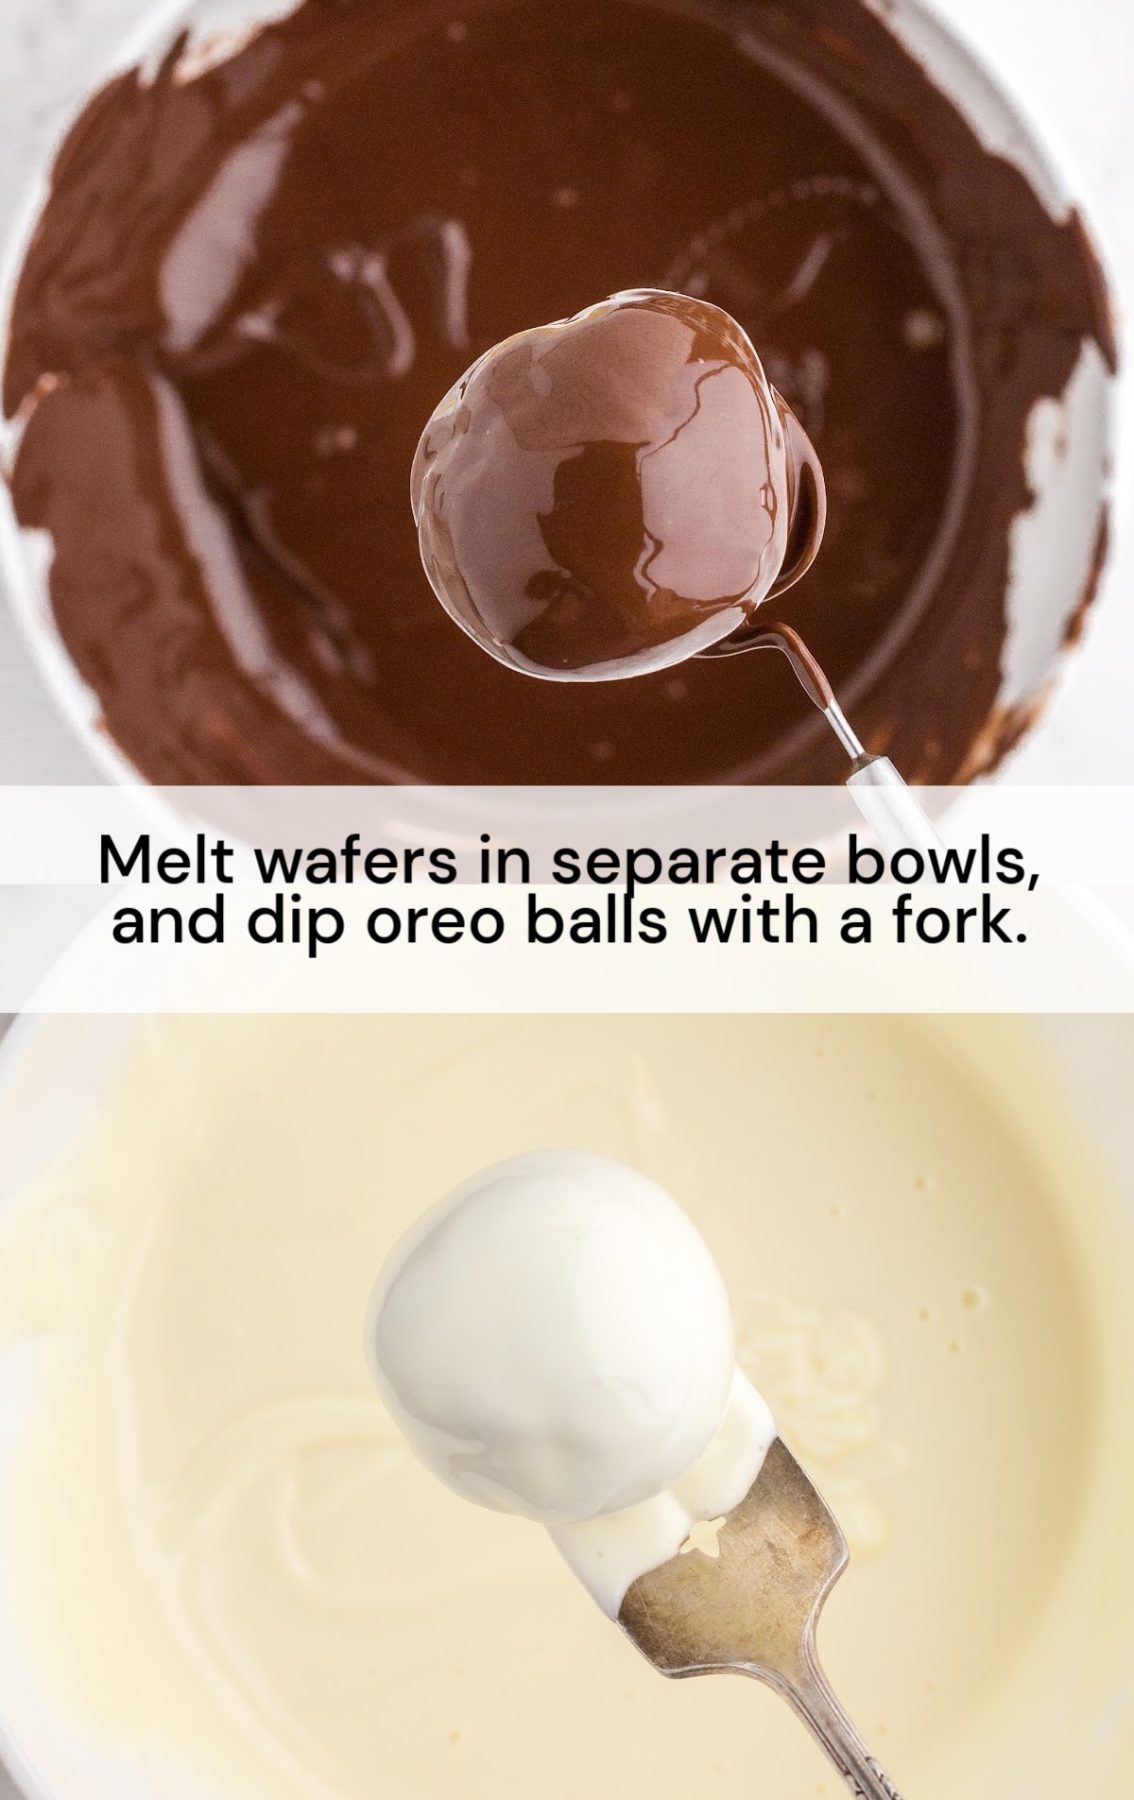
STEP SIX: Heat in 30-second increments, stirring between each, until the wafers are mostly melted.
STEP SEVEN: Stop heating and continue stirring until the mixture is fully melted and smooth.
STEP EIGHT: Remove several Oreo balls from the freezer at a time. Use a fork to dip and roll each Oreo ball in the melted chocolate. Lift from the chocolate, tap to remove excess chocolate, and place on a sheet of wax paper or parchment paper to set.
PRO TIP: If you are working during the warmer months, you can place the dipped Oreo balls back into the freezer or refrigerator for a few minutes after dipping to help the chocolate set quicker.
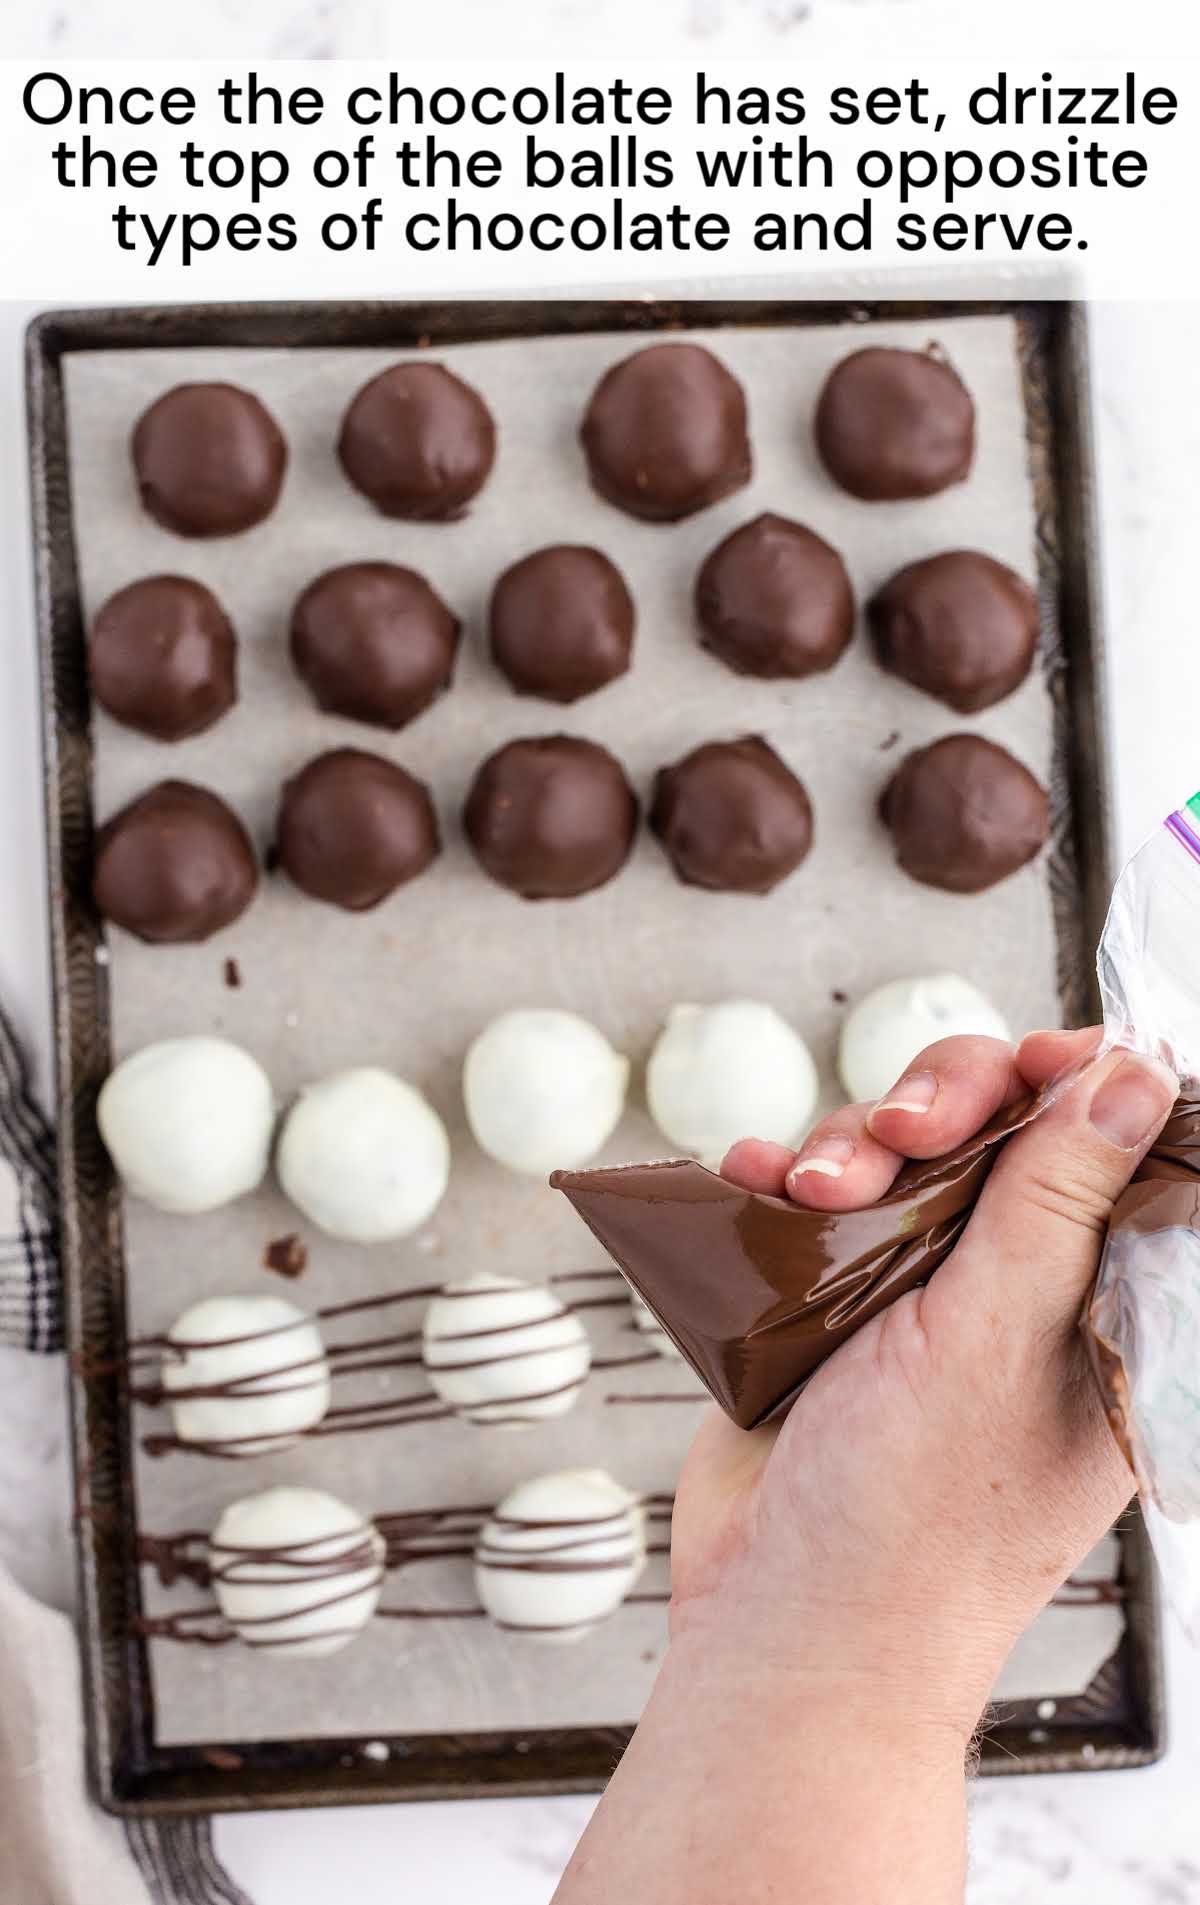
STEP NINE: Continue dipping and setting Oreo balls – coat half of the balls in milk chocolate and half of the balls in white chocolate.
PRO TIP: Reheat the chocolate for 15 seconds at a time if it begins to thicken too much for dipping.
STEP TEN: When the balls are set (this only takes a few seconds), drizzle the top with the opposite type of chocolate for contrast. You could also top with crushed Oreo crumbs, sprinkles, chocolate curls, etc.
STEP ELEVEN: Serve immediately or store in a cool location until serving.
How to Serve Oreo Balls
These Oreo ball truffles are a simple treat that is always a favorite at parties and potlucks, especially during the holidays. These sweet treats would be a lovely homemade gift idea. Make a batch for your friends, neighbors, and family. A guaranteed favorite treat, they would also be a unique treat to share at cookie exchanges. Don’t forget to make some for yourself, too!
Storage
IN THE FRIDGE: Store leftover Oreo cookie balls in the refrigerator in an airtight container for up to 1 week.
IN THE FREEZER: Store the Oreo truffles in the freezer for up to 3 months.
Oreo balls are bite-sized delicacies that are bursting with flavor. Stuffed with creamy Oreo-infused cream cheese and wrapped in a rich chocolate coating, they are a favorite no-bake treat. There is nothing better than these Oreo balls, just watch them disappear off your dessert tray!
FREQUENTLY ASKED QUESTIONS
Can I use generic chocolate sandwich cookies instead of Oreos?
This great recipe will work with either name-brand Oreos or generic.
Can I freeze these Oreo balls?
This recipe can be stored in the freezer for up to three months.
How do I store the truffles once they are made?
These are best stored in the fridge so that the candy coating doesn’t get too warm or soft.
MORE RECIPES YOU’LL LOVE

Oreo Balls
Oreo balls are bite-sized delicacies with an Oreo-infused cream cheese wrapped in a rich chocolate coating. Decadent and delicious, they are a favorite no-bake treat.
Ingredients
- 1 package Oreo cookies about 36 cookies
- 8 ounces cream cheese cut into pieces and softened
- 1 teaspoon vanilla extract
- 1½ cups dark or milk chocolate melting wafers we love the Ghirardelli brand
- 1½ cups white chocolate melting wafers
Instructions
- STEP ONE: Place Oreo cookies in the bowl of a food processor and pulse until they have been broken down into fine, even crumbs.
- STEP TWO: Add the cream cheese and vanilla extract directly to the Oreo crumbs and pulse until the mixture combines evenly and comes together, making a “dough.”
- STEP THREE: Use a 1½ tablespoon cookie scoop to scoop balls of the Oreo mixture onto a baking sheet lined with parchment paper. Use your hands to roll them into smooth balls, if desired.
- STEP FOUR: Place the baking sheet with Oreo balls into the freezer to harden for about 20 minutes.
- STEP FIVE: Once the balls are firmed up, place the melting wafers into a microwave-safe bowl. (Keep the milk chocolate and white chocolate wafers in separate bowls.)
- STEP SIX: Heat in 30-second increments, stirring between each, until the wafers are mostly melted.
- STEP SEVEN: Stop heating and continue stirring until the mixture is fully melted and smooth.
- STEP EIGHT: Remove several Oreo balls from the freezer at a time. Use a fork to dip and roll each Oreo ball in the melted chocolate. Lift from the chocolate, tap to remove excess chocolate, and place on a sheet of wax paper or parchment paper to set.
- STEP NINE: Continue dipping and setting Oreo balls – coat half of the balls in milk chocolate and half of the balls in white chocolate.
- STEP TEN: When the balls are set (this only takes a few seconds), drizzle the top with the opposite type of chocolate for contrast. You could also top with crushed Oreo crumbs, sprinkles, chocolate curls, etc.
- STEP ELEVEN: Serve immediately or store in a cool location until serving.
Notes
PRO TIP: You can make these ahead of time, but sometimes the chocolate forms condensation on the outside of it after it has been placed in the freezer. For the best presentation, serve Oreo balls within a couple of hours of making them and keep cool.
PRO TIP: Make sure you are using room temperature cream cheese so that you don’t end up with lumps in the filling.
PRO TIP: Use parchment paper to place the balls on so that they do not stick to the baking sheet.
PRO TIP: If you are working during the warmer months, you can place the dipped Oreo balls back into the freezer or refrigerator for a few minutes after dipping to help the chocolate set quicker.
PRO TIP: Reheat the chocolate for 15 seconds at a time if it begins to thicken too much for dipping.


Leave a Comment